Weider B460 Bench Assembly Instructions - Page 3
Ilrackot, Front
 |
View all Weider B460 Bench manuals
Add to My Manuals
Save this manual to your list of manuals |
Page 3 highlights
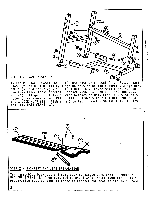
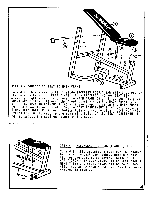
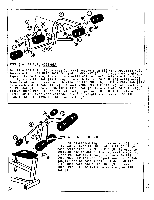
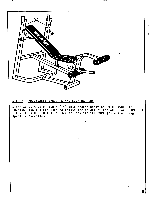
0 0 0 1 0 0 0 0 Roar Ilrackot 0 O O ." 3 0 gra ••• 0 ••• 0 0 Fronkt at • ac O STEP 1 - FRAME ASSEMBLY 0 2 Insert 2 SQUARE PLASTIC CAPS (K) into base of UPRIGHT (1). Attach BASE FRAME (2) to UPRIGHT (1) by aligning bolt holes and inserting 2 HEX HEAD BOLTS (A) and securing with 2 LOCK NUTS (B). Lower MAIN FRAME (3) to the base frame front bracket. Secure with HEX HEAD BOLT (A) and LOCK • NUT (B). Align bolt holes on rear bracket of MAIN FRAME (3) with bolt holes on crossmember on UPRIGHT (1). Secure with 2 HEX HEAD BOLTS (A) and 2 LOCK NUTS (B). Tighten all bolts. Insert 2 SQUARE PLASTIC CAPS (K) into BASE FRAME (2). R 0 0 4 44 1 4 .! STEP 2 - BACKREST AND SEAT PREPARATION Turn assembled backrest and seat over to expose work area. Remove 2 MACHINE SCREWS (R) from seat and remove 1 SHORT ANGLE IRON (12). This preparation must be done in order to connect the seat to the main frame. 3
-
 1
1 -
 2
2 -
 3
3 -
 4
4 -
 5
5 -
 6
6
 |
 |
