Weider B460 Bench Assembly Instructions - Page 5
Weider B460 Bench Manual
 |
View all Weider B460 Bench manuals
Add to My Manuals
Save this manual to your list of manuals |
Page 5 highlights
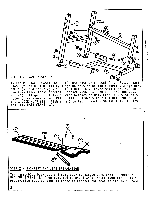
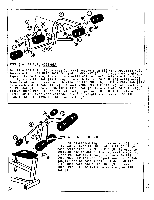
8 11 III • • 7 0 0 0 0 0 9 O 9 0 © • .0 0 10 (r) • STEP 5 - LEG CURL ASSEMBLY Position LEG CURL (8) between leg curl brackets on LEG CURL ADJUSTER (7). Secure with 1 HEX HEAD BOLT (C) and 1 LOCK NUT (D). Do not over tighten. Repeat the following instructions until all leg curl parts are in place. First, slide PAD BAR (9) through proper hole in LEG CURL (8) until equal amounts of pad bar are on both sides of LEG CURL (8). Slide FOAM PAD (11) onto each end of PAD BAR (9). Insert ROUND PLASTIC CAP (M) into each end of PAD BAR (9). Insert SQUARE PLASTIC CAP (K) into end of LEG CURL (8). Insert ROUND PLASTIC CAP (N) into weight pin on LEG CURL (8). Place COVER CAP (P) over rear extended piece of weight pin. -Insert SQUARE PLASTIC CAP (L) into LEG CURL ADJUSTER (7). O 0 • • C o STEP 6 - LEG CURL • With assembled leg curl extended slightly forward, lower LEG CURL ADJUSTER (7) into main frame tube. LOCKING PIN (H) is used to position the height of the leg curl assembly. Slide PAD BAR (9) through top hole in LEG H CURL ADJUSTER (7) until equal amounts of PAD BAR (9) are on both sides. Slide FOAM PAD (10) onto each end of PAD BAR (9). Insert ROUND PLASTIC CAP (M) into each end of PAD BAR (9). 5
-
 1
1 -
 2
2 -
 3
3 -
 4
4 -
 5
5 -
 6
6
 |
 |
