Weider Pro 240 Bench English Manual - Page 10
Warning, Adjustments
 |
View all Weider Pro 240 Bench manuals
Add to My Manuals
Save this manual to your list of manuals |
Page 10 highlights
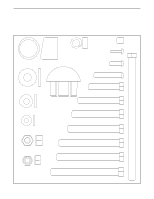
ADJUSTMENTS The weight bench is designed to be used with your own weight set (not included). The steps below explain how the weight bench can be adjusted. See EXERCISE GUIDELINES on page 12 for important exercise information and refer to the accompanying exercise guide to see the correct form for each exercise. Make sure all parts are properly tightened each time the weight bench is used. Replace any worn parts immediately. The weight bench can be cleaned with a damp cloth and a mild, non-abrasive detergent. Do not use solvents. ADJUSTING THE BACKREST The Backrest (13) can be used in a decline position, a level position, or an incline position. To use the Backrest in the decline position, remove the Adjustment Pin (25) and lay the Backrest on the Crossbar (4). To use the Backrest (13) in the level or incline position, lift the Backrest and insert the Adjustment Pin (25) through the Bench Frame (1) and a hole in the Backrest Bracket (10). Engage the top hole for a level position, or one of the other holes for an incline position. ATTACHING WEIGHTS TO THE LEG LEVER To use the Leg Lever (3), slide the desired weights (not included) onto the Weight Tube (16). Secure the weights with a Weight Clip (53 or 54). Weights can be added to the Curl Bar (not shown) in the same manner. Secure the weights to the Curl Bar with two Weight Clips (53 or 54). Weights can be stored on the tubes on the Uprights (not shown). WARNING: Do not place more than 150 pounds on the Leg Lever (3) or the Curl Bar (not shown). Only use the Weight Clips (53 or 54) provided with the bench. 13 4 1 25 10 3 16 53 Weight ADJUSTING THE WEIGHT RESTS To change the height of the Weight Rests (9), remove the Weight Rest Knobs (23). Position the Weight Rests at the desired height in the Uprights (8, 7 [not shown]) and secure them with the Weight Rest Knobs. WARNING: Always set both Weight Rests (9) at the same height. Make sure the Weight Rest Knobs (23) are inserted into both the Upright (7 or 8) and the Weight Rest. 10 9 23 8
-
 1
1 -
2
-
3
-
4
-
 5
5 -
 6
6 -
 7
7 -
 8
8 -
 9
9 -
 10
10 -
 11
11 -
 12
12 -
 13
13 -
 14
14 -
 15
15 -
16
 |
 |
