Weider Ultramax 1033 Owners Manual
Weider Ultramax 1033 Manual
 |
View all Weider Ultramax 1033 manuals
Add to My Manuals
Save this manual to your list of manuals |
Weider Ultramax 1033 manual content summary:
- Weider Ultramax 1033 | Owners Manual - Page 1
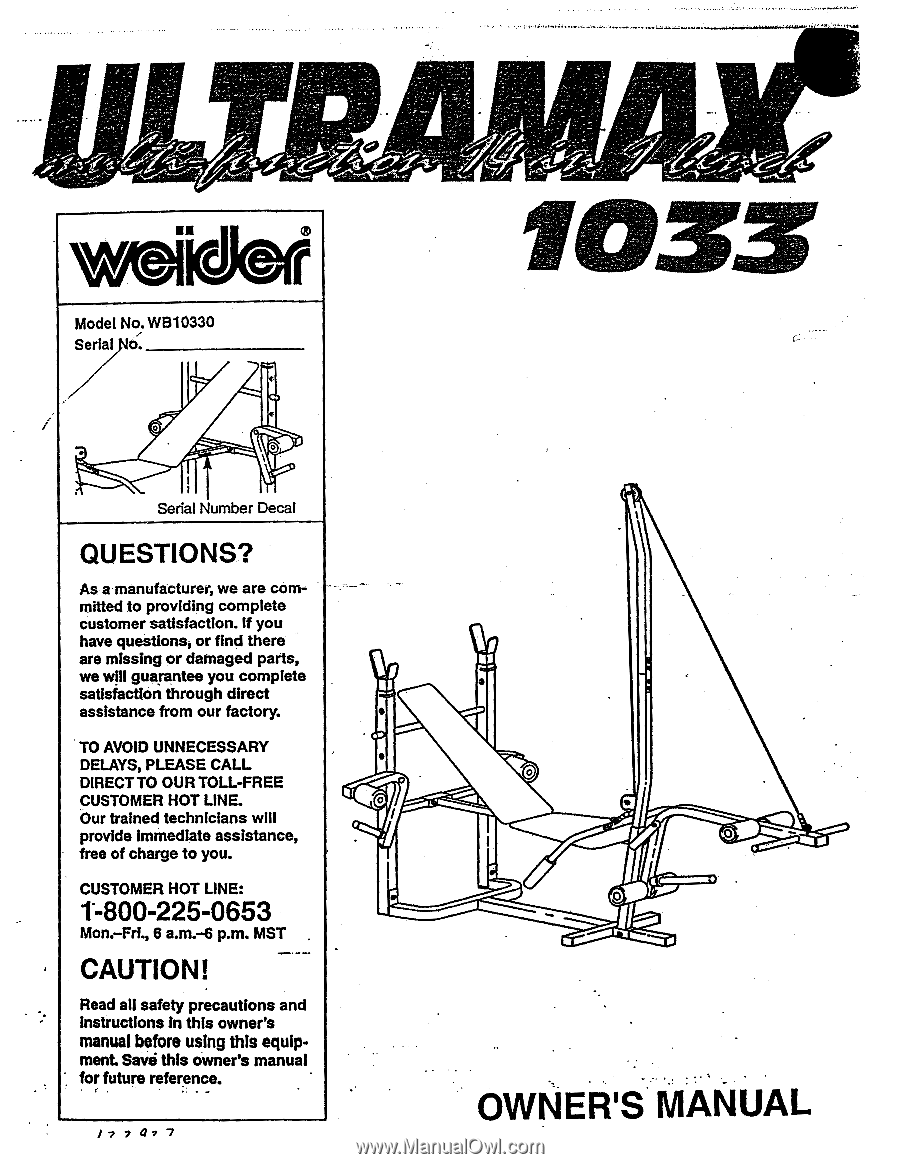
HOT LINE. 0 Our trained technicians will provide Immediate assistance, free of charge to you. CUSTOMER HOT LINE: 1-800-225-0653 Mon.-Fri., 6 a.m.-6 p.m. MST . CAUTION! - Read all safety precautions and instructions in this owner's manual before using this equip- ment. Save this owner's for - Weider Ultramax 1033 | Owners Manual - Page 2
before using the weight bench. , 1. Read all instructions in this manual and in the accompanying literature before using the weight bench.-- E..: • 2. Use the weight bench only on a revel surface. Cover the floor beneath the weight bench for protection. 8. The weight bench is designed to - Weider Ultramax 1033 | Owners Manual - Page 3
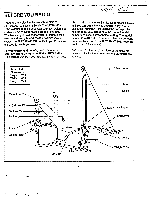
manual carefully before using the WEIDER' ULTRAMAX 1033 Weight Bench. If you have additional questions, tZ/A:5 please call our Customer Service Department toll-free 74 in. Weight Rests High Pulley Station Mast Cable Adjustment Pin Backrest Tube Backrest 0 Arm Weight Tube 0 0 Lat Bar Low Pulley - Weider Ultramax 1033 | Owners Manual - Page 4
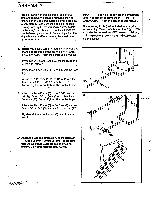
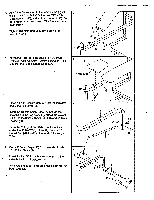
weight bench, make sure that all parts are oriented exactly as shown in the drawings. Tighten all parts as you attach them, unless instructed , carefully read the instructions at the top of this page and remove the PART IDENTI- 1 FICATION CHART from the center of this manual. Press two 2" Square - Weider Ultramax 1033 | Owners Manual - Page 5
8mm x 45mm Bolt (38) and an 8mm Locknut (30). Press the 1" Angled Cap (54) onto the indicated end of the 13 3/4" Weight Tube (7). Press a 1" Round Cap (40) into the other end of the Weight Tube. 7. Press 1" Round Caps (40) into the ends of both 13 1/2" Pad Tubes (9). • Insert the 13 1/2" Pad Tubes - Weider Ultramax 1033 | Owners Manual - Page 6
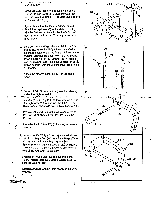
Plastic Spacer is on the same side of the Right Arm as the axle. Press a V Round Cap (40) into the end of the 10 1/2" Weight Tube (23). Slide a Weight Stop (29) 2 onto the Weight Tube. Assemble the Left Arm (21) (not shown) in the same manner. • 6 42 0 20 30 20 Axle -o 43 37 - Weider Ultramax 1033 | Owners Manual - Page 7
12. Insert a Plastic Sleeve (28) into the indicated welded tube on the "H"-Frame (1). 12 Apply lubricant to the axle on the Right Arm (20). Insert the axle into the Plastic Sleeve (28). Make sure that the Plastic Spacer (43) is resting against the outer side of the H-Frame (1). Secure the Right - Weider Ultramax 1033 | Owners Manual - Page 8
• water. Slide the Hand Grips (19) onto the Lat Bar. 17 19 18 • 18. Press a 1" Round Cap (40) into the end of the Backrest Tube (25). - 18 7 19 25 40 • • Make sure that all parts are properly tightened. See ADJUSTING THE WEIGHT BENCH on pages 9 and 10 to see how the different parts - Weider Ultramax 1033 | Owners Manual - Page 9
ADJUSTING THE WEIGHT BENCH The instructions below describe how the weight bench can be adjusted. Refer to USING THE WEIGHT BENCH on page 11 for information about exercises that can be performed with the weight bench. Inspect and tighten all parts each time you use the weight bench. Replace any worn - Weider Ultramax 1033 | Owners Manual - Page 10
Tube (10), place the desired amount of weight on the Leg Lever (8) (see ATTACHING 10 3 8 WEIGHTS TO THE WEIGHT BENCH on page 9). • USING THE HIGH PULLEY (8). Disconnect the Short Cable (13) from the Long Cable. Attach the Lat • Bar (18) to the Long Cable with a Cable Clip (33). 33 12 18 15 - Weider Ultramax 1033 | Owners Manual - Page 11
WEIDER° ULTRAMAX 1033 Weight Bench is a tool, and learning to use it properly is essential for your safety as well as the success of your exercise program. Read this OWNER'S MANUAL persons with pre-existing health problems. • THE FOUR BASIC TYPES The exercises in this guide are arranged according to - Weider Ultramax 1033 | Owners Manual - Page 12
you feeling exhausted. On pages 14 through 17 you will find photographs showing the correct form for exercises that can be performed on this weight bench. A description. of each exercise is also provided, along with a list of the muscles affected. Refer to the muscle chart below for muscle locations - Weider Ultramax 1033 | Owners Manual - Page 13
The following stretches can provide a good warm-up or cooldown. Correct form for each stretch is shown in the drawings below. Move slowly as you stretch-never bounce. TOE TOUCH STRETCH Stand with your knees bent slightly and slowly bend forward from your hips. Mow your back and shoulders to relax as - Weider Ultramax 1033 | Owners Manual - Page 14
Muscles affected: pectoral's major and minor, deltoids 4 STANDING CURL Place the desired amount of weight on the leg lever. Attach the lat bar to the low cable. Straddle the bench and extend your arms downward. Hold the let bar with an underhand grip. Keep your elbows at your sides and curl the let - Weider Ultramax 1033 | Owners Manual - Page 15
Muscles affected: deltoids, pectorals, triceps • .f.F.-!,"*.tro,..1-...tyq.t.7-.- 9 FRONT RAISE Place the desired amount of weight on the leg lever. Attach the lat bar to the low cable. Sit on the bench, hold the lat bar with an overhand grip, and extend your arms as shown. Slowly raise your arms - Weider Ultramax 1033 | Owners Manual - Page 16
. Muscles affected: deltoids, trapezius, biceps, brachioradials, latissimus dorsi 13 LAT PULL-DOWN-BACK Place the desired amount of weight on the leg lever. Attach the lat bar to the high Wi• cable. Sri on the bench, with your back to the mast, extend your arms up and hold Ile ends of the lat - Weider Ultramax 1033 | Owners Manual - Page 17
Return to the starting position. • Muscles affected: hip flexors, rectus abdominus •T' 'Az'," • 17 LEG EXTENSION Place the desired amount of weight on the leg lever. Sit on the bench, with your feet under the lower pads of the leg lever. Lift your legs, as shown. Return to the starting position - Weider Ultramax 1033 | Owners Manual - Page 18
te • • • • 1V •;4..M.04,Y 44.i.tli ott.U..j1.44:,:ii.4.:.:Ai i.ouLICaetl,Lipiiihinl•biTili444'..WiM W'""'"..". REMOVE THIS PART IDENTIFICATION CHART FROM THE MANUAL! This chart is provided to help you identify the small parts used in assembly. Note: Some parts may have been preassembled for - Weider Ultramax 1033 | Owners Manual - Page 19
I rail a ■ aro is II I It VI it - 111 IL I ---- This chart is provided to help you identify the small parts used in assembly. The number in parenthesis below each part refers to the key number of the part. The second number refers to the quantity used in assembly. 1 1/2" Square Cap (53)-1 0 - Weider Ultramax 1033 | Owners Manual - Page 20
Spring Clip (51)-2 8 mm Eye Bolt (34)-1 10mm x 35mm Bolt (47)-1 %AN 10mm x 45mm Bolt (48)-1 10mm x 55mm Bolt (46)-1 6mm x 20mm Screw (41)-8 0\\\\\\\\A 8mm x 45mm Screw (42)-2. W\\\ 8mrn x 50mm Carriage Bolt (35)-4 M\N Qr.-45mm Bolt (38)71,, 8mm Nut (56)-1 O AOMMI • 10mm Locknut (45)-3 8mm - Weider Ultramax 1033 | Owners Manual - Page 21
Bar Hand Grip Right Arm Left Arm 9" Pad Tube 10' 1/2" Weight Tube Weight Rest . Backrest Tube Curl Pad Curl Upright Plastic Sleeve Weight Nut # 1 Owner's Manual Note: "#" Indicates an non-illustrated part. See the back cover of this manual for information about ordering replacement - Weider Ultramax 1033 | Owners Manual - Page 22
EXPLODED DRAWING Model No.WB10330 R1194A 4 6 24 41 52 9 24 0 0 45 14 33 16 15 41 42 1 12 §3v. 1 20 29 44 eo 22 11 0"o 26 36 0 • 28 51 5 41 • 7 16 52 23 3 JA4'43k30 30 37 1- • • 30 55 50 1 17 / 9. 39 -31 25 • 52 '40 • 51 • • 28 49 47 31 45 41 33. • 8 • • 54 - Weider Ultramax 1033 | Owners Manual - Page 23
WEIDER° ULTRAMAX 1033 Weight Bench). 3. The SERIAL NUMBER of the product (see the front cover of this manual). 4. The KEY NUMBER and DESCRIPTION of the part(s) (see page 18 of this manual). LIMITED WARRANTY W'0rdgr, Inc. ("WEIDER'), warrants, this product to be free WEIDER authorized service center
-
 1
1 -
 2
2 -
 3
3 -
 4
4 -
 5
5 -
 6
6 -
 7
7 -
8
-
9
-
10
-
11
-
12
-
13
-
14
-
15
-
16
-
17
-
18
-
19
-
20
-
21
-
22
-
23
 |
 |
ro
,
/
tt
vyti
erideri
Model
No.
WB10330
Serial
o.
0
O
Senal
Number
Decal
QUESTIONS?
As
a
manufacturer,
we
are
com-
mitted
to
providing
complete
customer
satisfaction.
If
you
have
questions,
or
find
there
are
missing
or
damaged
parts,
we
will
guarantee
you
complete
satisfaction
through
direct
assistance
from
our
factory.
TO
AVOID
UNNECESSARY
DELAYS,
PLEASE
CALL
DIRECT
TO
OUR
TOLL
-FREE
CUSTOMER
HOT
LINE.
Our
trained
technicians
will
provide
Immediate
assistance,
free
of
charge
to
you.
CUSTOMER
HOT
LINE:
1-800-225-0653
Mon.
—Fri.,
6
a.m.-6
p.m.
MST
.
CAUTION!
—
Read
all
safety
precautions
and
instructions
in
this
owner's
manual
before
using
this
equip-
ment.
Save
this
owner's
manual
.
for
future
reference.
•
•
0
-
•
0
0
•
w.
I
7
7
4
7
7
OWNER'S
MANUAL