Weslo 8.0 English Manual - Page 6
Incline, Adjustment, Walking
 |
View all Weslo 8.0 manuals
Add to My Manuals
Save this manual to your list of manuals |
Page 6 highlights
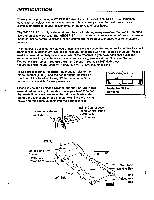
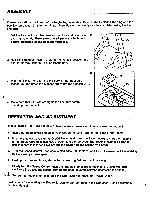
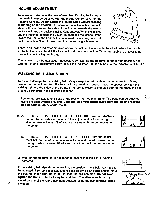
INCLINE ADJUSTMENT To increase or decrease the level of exercise difficulty, the incline of the treadmill can be adjusted with the Incline Control Lever on the treadmill Console. Do not adjust the incline while you are walking or running on the treadmill. To increase the incline of the treadmill, stand with your feet on the sides of the Frame, towards the rear of the treadmill, and pull back the Incline Control Lever. When the desired angle is reached, release the Lever. To decrease the incline, stand toward the front of the treadmill, lean forward if necessary, and pull back the Incline Control Lever until the desired angle is reached. There is an Incline Indicator mounted above the Incline Control on the treadmill. When the bubble in the Indicator is at level 1, the treadmill is at the lowest incline. When the bubble is at level 5,the treadmill is at the highest incline. The indicator can be adjusted, if necessary, by lowering the treadmill to the lowest position, and turning the small adjustment screw above the indicator until the bubble in the indicator is at level 1. WALKING BELT ADJUSTMENT To prevent damage to the walking belt, always keep the belt centered during operation. Stand beside the treadmill and turn the treadmill on at medium speed. Check the spaces between the walking belt and the sides of the frame. If the belt is closer to one side than to the other, the belt should be centered in the following manner: 1. Locate the belt adjustment bolts at the rear of the treadmill frame. The bolts can be adjusted using the alien wrench provided. Caution: keep your hands away from the moving walking belt or serious injury could result. 2. A. IF THE BELT HAS SHIFTED TO THE LEFT SIDE: turn the adjustment bolt on the left side clockwise and the adjustment bolt on the right side counterclockwise 1/8 of a turn at a time until the belt moves to the center. B. IF THE BELT HAS SHIFTED TO THE RIGHT SIDE: turn the adjustment bolt on the left side counterclockwise and the adjustment bolt on the right side clockwise 1/8 of a turn at a time until the belt moves to the center. e 4a: 2 B 3. Walk on the treadmill for 3-4 minutes to ensure that the belt is running centered. If the walking belt slips during operation, the tension on the belt may need to be adjusted. Turn both rear adjustment bolts clockwise an equal amount until the belt no longer slips. Be careful to keep the belt centered. Do not over- tighten the bolts or the belt may be stretched. The allen wrench can be stored on one of the rear adjustment brackets using the self-adhesive clamp 6 included. Adhesive Clamp tr-Allen Wrench
-
 1
1 -
 2
2 -
 3
3 -
 4
4 -
 5
5 -
 6
6 -
 7
7 -
 8
8 -
 9
9 -
 10
10 -
 11
11 -
 12
12
 |
 |
