Weslo Cadence 970 English Manual - Page 5
Assembly
 |
View all Weslo Cadence 970 manuals
Add to My Manuals
Save this manual to your list of manuals |
Page 5 highlights
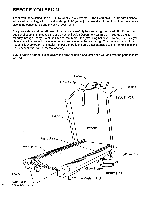
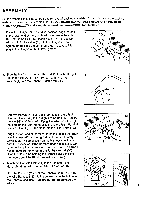
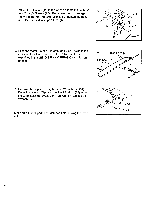
ASSEMBLY Set the treadmill in a cleared area and remove all packing materials. Do not dispose of the packing materials until assembly is completed. TOOLS REQUIRED FOR ASSEMBLY: An 8" adjustable wrench *:=Z:D and a regular screwdriver ---E1=) (not Included). 1. Raise the Upright (3) to a vertical position. Align the hole in the lower end of the Upright with the hole in the side of the Left Frame Rail (56). Insert a 3/8" x 4 1/2' Bolt (2), with an Upright Washer (1), into the Upright and hand tighten the Bolt into the Left Frame Rail. Leave a little play in the Upright for the following steps. 1 3 1 Tighten 56 2. Slide the bracket on the Left Handrail (5) into the Upright 2 (3). Insert the 3/8" x 1 1/4" Bolt (7), with an Upright Washer (1), into the Upright. Tighten the Bolt. 5 7 1 3 3. Remove the two 3/8" x 3" Bolts (30) attaching the Right Handrail Spacer (42) to the Right Frame Rail (47). Insert 3 the two 3/8" x 3" Bolts, with Upright Washers (1), through the plate on the Right Handrail (38) and the Right Handrail Spacer. Hand tighten the Bolts into the Right Frame Rail. 73 60 13 38 60 Plug the lower end of the Wire Harness (13) into the Short Wire Harness (60) on the right side of the Front Safety Cover (73). The small latch on the Harness should snap onto the connector. If the Harness does not fit easily, turn 47 42 13 30 it; do not force the harness into the connector. Be careful not to damage the wires In the Right Handrail (38). Snap the black tube holding the Harness into the clip on the underside of the Right Handrail Spacer (42). 4 11 --> 4. Attach the Console Plate (14) to the Left and Right Handrails (5, 38) with the two 3/8" x 1 3/41Bolts (8). Hold the Console (11) near the Console Plate (14). Plug 13 13 the Wire Harness (13) into the connector on the bottom of 5 I 14 the Console (see inset). Be careful not to damage the wires. 8 38 5
-
 1
1 -
 2
2 -
 3
3 -
 4
4 -
 5
5 -
 6
6 -
 7
7 -
 8
8 -
 9
9 -
 10
10 -
 11
11 -
12
-
13
-
14
-
15
-
16
 |
 |
