Weslo Pursuit 730 Bike English Manual - Page 3
Assembly
 |
View all Weslo Pursuit 730 Bike manuals
Add to My Manuals
Save this manual to your list of manuals |
Page 3 highlights
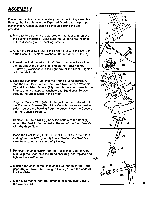
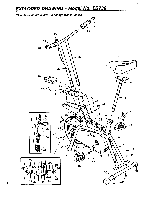
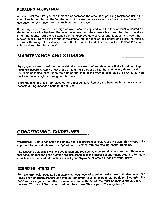
ASSEMBLY 2 Please read all instructions carefully before beginning assembly. Refer to the Part List and the Exploded Drawing for help in part identification. Assembly can be completed using the tool provided. 1. Place all bike parts in a clear area on the floor and remove the packing materials. Make sure that all parts are included before disposing of the packing materials. 3 iH11 2 10 36 ~14/ 2. Attach the Rear Leg (36) to the Frame (10) with the two Carriage Bolts (14), Molded Washers (12) and Acorn Nuts (11). 3. Thread the Pedal marked "Left" (19) counterclockwise into the left arm of the crank (18). Thread the Pedal marked "Right" (8) clockwise into the right arm of the Crank. Tighten both Pedals firmly. 4,5 4. Slide the Handlebar (35) into the Frame (10) as shown. Attach the Handlebar to the Frame with two Stepped Washers (5) and Handlebar Screws (24) through the lower holes in the Frame, and two Stepped Washers and Handlebar Screws through the upper holes in the Frame. 5. Plug the Monitor Wire (28) into the jack on the underside of 6 the Electronic Console (29). If the Console has self-adhesive strips, remove the backing from the strips. Press the Console into the Console Hood (27). 44gliirirk __. / W,,' 18 \ I,%m-,-i-i.i.-;-%00; 19 .e, . 29 28 27 24 35 . , 10 ' '5 -- . , A 1 ! • ! 6. Remove the three Nuts (2) from the bottom of the Seat (1). Attach the Seat to the bracket at the top of the Seat Post (3) with the three Nuts. -2 3 7 7. Insert the Seat Post (3) into the seat tube of the Frame (10), and tighten the T-Wingnut (4) firmly. Caution: the Seat Post must be inserted a minimum of 2 inches. 3 10 8. Remove the small screw from the Resistance Control Knob (33). Clip the Knob onto the Handlebar (35), and replace and tighten the small screw. 8,9 9. Moisten the ends of the Handlebar (35), and push the Handgrips (32) on. Insert the Handgrip Caps (31) into the ends of -the Handlebar. &,:.") 4 qtI,P I 33 31 32 10. Make sure that all part are tightened securely before using the exercise bike. 3
-
 1
1 -
 2
2 -
 3
3 -
 4
4 -
 5
5 -
 6
6 -
 7
7 -
 8
8
 |
 |
