Weslo Sport 50 Instruction Manual - Page 7
Maintenance And Troubleshooting
 |
View all Weslo Sport 50 manuals
Add to My Manuals
Save this manual to your list of manuals |
Page 7 highlights
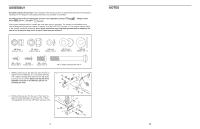
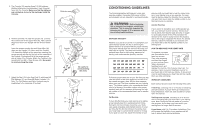
MAINTENANCE AND TROUBLESHOOTING Inspect and tighten all parts of the exercise cycle regularly. Replace any worn parts immediately. To clean the exercise cycle, use a damp cloth and a small amount of mild detergent. Important: To avoid damage to the console, keep liquids away from the console and keep the console out of direct sunlight. BATTERY REPLACEMENT If the console display becomes dim, the batteries should be replaced; most console problems are the result of low batteries. To replace the batteries, first see step 6 on page 6 and remove the console from the upright. Next, see step 5 and insert three batteries into the console. Reattach the console to the upright, being careful not to pinch the wires. HOW TO ADJUST THE REED SWITCH If the console does not display correct feedback, the reed switch should be adjusted. To adjust the reed switch, the left side shield must be removed. Turn the Crank (35) to the position shown. Using an adjustable spanner, turn the Left Pedal (24) clockwise and remove it. Next, remove the five M5 x 25mm Screws (52) and the M5 x 20mm Screw (42) from the Left Side Shield (17). Carefully remove the Left Side Shield. Next, locate the Reed Switch (43). Turn the Crank (35) until the Magnet (38) is aligned with the Reed Switch. Loosen, but do not remove, the M5 x 15mm Screw (46). Slide the Reed Switch slightly closer to or away from the Magnet, and then retighten the Screw. Turn the Crank for a moment. Repeat until the console displays correct feedback. When the Reed Switch is correctly adjusted, reattach the left side shield and the left pedal. 35 46 43 38 52 24 35 42 17 52 8. Turn the indicated Adjustment Knob (9) counterclock- 8 wise and remove it. Insert the Seat Post (5) into the Frame (1). Align one of the adjustment holes in the Seat Post with the indicated hole in the Frame. Insert the Adjustment Knob into the Frame and the Seat Post, and turn the Knob clockwise until it is tight. Make sure that the Knob is inserted through one of the adjustment holes in the Seat Post. 9. Identify the Left Pedal (24), which is marked with an "L." Using an adjustable spanner, firmly tighten the Left Pedal counterclockwise into the left arm of the Crank (35). Tighten the Right Pedal (not shown) clockwise into the right arm of the Crank. Important: Tighten both Pedals as firmly as possible. After using the exercise cycle for one week, retighten the Pedals. For best performance, the Pedals must be kept tightened. Adjust the Left Pedal Strap (25) to the desired position, and press the end of the Left Pedal Strap onto the tab on the Left Pedal (24). Adjust the Right Pedal Strap (not shown) in the same way. 9 25 24 Tab 5 Adjustment Holes 1 Hole 9 35 10. Make sure that all parts are properly tightened before you use the exercise cycle. Note: After assembly is completed, some extra parts may be left over. Place a mat beneath the exercise cycle to protect the floor. 10 7
-
 1
1 -
 2
2 -
 3
3 -
 4
4 -
 5
5 -
 6
6 -
 7
7 -
 8
8
 |
 |
