Weslo Sprint 225 English Manual - Page 6
Speedometer/Timer
 |
View all Weslo Sprint 225 manuals
Add to My Manuals
Save this manual to your list of manuals |
Page 6 highlights
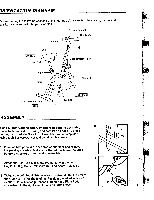
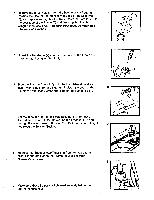
4. Remove the three Nuts (7) from the bottom of the Seat (4). Position the Seat on the bracket at the top of the Seat Post (8), and replace and tighten the Nuts. Insert the Seat Post into the seat tube of the Frame (5) and firmly tighten the TWingnut (14). CAUTION: The Seat Post must be inserted a minimum of 2 inches. 5. Insert the Handlebar (2) into the front tube of the Frame (5). Tighten the T-wingnut (14) firmly. 4 4 0 5 "M. 5 2 5 4 0 6. Slide the Tension Control (3) onto the Handlebar (2) and at- tach it with a Bolt (10) and Nut (19). Moisten the ends of the 6 Handlebar with soapy water and slide on the Handgrips (1). 3 2 19 7. Set the Tension Control (see step above), to "1" or "low". Thread the Nylon Belt (22) up around the Flywheel (23) and through the open Tension Buckle (21). Pull the Nylon Belt tight 7 and close the Tension Buckle. 21 8. Remove the Speedometer/Timer (11) from the box and attgtoh it to the bracket on the Frame (5) with the three 'Screws (9) as shown. 22 2 8 9. Make sure that all parts are tightened securely before using the exerise bike. 4 11 5
-
 1
1 -
 2
2 -
 3
3 -
 4
4 -
 5
5 -
 6
6 -
 7
7 -
 8
8 -
 9
9 -
 10
10 -
 11
11 -
 12
12
 |
 |
