Western Digital WDBVHT0080JCH Quick Install Guide - Page 4
Step 2: Access My Book Live Duo on the Network
 |
View all Western Digital WDBVHT0080JCH manuals
Add to My Manuals
Save this manual to your list of manuals |
Page 4 highlights
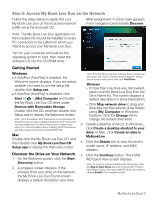
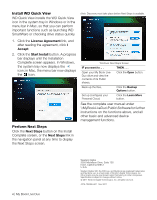
Step 2: Access My Book Live Duo on the Network Follow the steps below to easily find your My Book Live Duo on the local area network (LAN) using the enclosed CD. letter assignment. A check mark appears in the navigation panel beside Discover. Note: The My Book Live Duo application on the included CD should be installed on every PC connected to the LAN from which you intend to access your My Book Live Duo. Turn on your computer and wait for the operating system to load, then insert the software CD into the CD-ROM drive. Getting Started Windows „ If AutoRun (AutoPlay) is enabled, the Welcome screen displays. If you are asked whether you want to run the setup file, double-click Setup.exe. „ If AutoRun (AutoPlay) is disabled, click Start or > (My) Computer and locate the My Book Live Duo CD drive under Devices with Removable Storage. Double-click the CD, and then double-click Setup.exe to display the Welcome screen. Note: The CD enables UPnP Framework in the Windows XP firewall if it has not been enabled previously. UPnP Framework must be enabled for the discovery process to detect your drive. For more information about enabling UPnP Framework, see http://support.microsoft.com/kb/886257#8. Mac Double-click the My Book Live Duo CD, and then double-click My Book Live Duo CD Setup.app to display the Welcome screen. Discover the Drive on Your Network 1. On the Welcome screen, click the Start Discovery button. 2. A progress screen displays. If the process finds your drive on the network, the My Book Live Duo Found screen displays a default description and drive Note: If the My Book Live Duo software does not discover your drive, the How to Connect screen appears. Follow the on-screen instructions then click Find Drive. Windows - If more than one drive was discovered, select your My Book Live Duo from the Drive Name list. The screen displays a default description in Drive Description. - Click Map network drive to drag and drop files into the network drive folders using (My) Computer or Windows Explorer. Click the Change link to change the default drive letter. 3. Create a desktop shortcut. In Windows, click Create a desktop shortcut to your drive. In Mac, click Create an alias to MyBookLive. 4. Click the Details link to view the drive's model name, IP address, and MAC address. 5. Click the Continue button. The Install WD Quick View screen displays. Note: To continue without installing WD Quick View, click the Skip to Next Steps link and continue with "Perform Next Steps" below. You may install WD Quick View later by clicking Install in the navigation panel. My Book Live Duo | 3
-
 1
1 -
 2
2 -
 3
3 -
 4
4 -
 5
5
 |
 |
