Westinghouse MT10 FLIP Installation Instructions - Page 4
JJ HA AH
 |
UPC - 882777610015
View all Westinghouse MT10 FLIP manuals
Add to My Manuals
Save this manual to your list of manuals |
Page 4 highlights
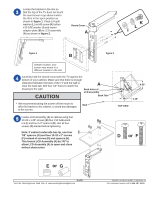
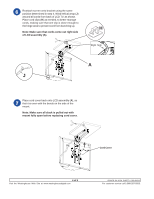
Reattach screen onto bracket using the same position determined in step 4. Wind helical wrap (J) around all cords from back of LCD TV, as shown. Place cord clips (H) as needed, to better manage cords, making sure that one clip is close enough to the hinge area to prevent cord from bunching up. Note: Make sure that cords come out right side of LCD assembly (A). H Right Side A J Place cord cover back onto LCD assembly (A), so that it is even with the bends on the side of the mount. Note: Make sure all slack is pulled out with mount fully open before replacing cord cover. Cord Cover 4 of 5 Visit the Westinghouse Web Site at www.westinghousedigital.com ISSUED: 04-16-04 SHEET #: 090-9101-1 For customer service call 1-866-287-5555.
-
 1
1 -
 2
2 -
 3
3 -
 4
4 -
 5
5
 |
 |

ISSUED: 04-16-04
SHEET #: 090-9101-1
4 of 5
Visit the Westinghouse Web Site at
www.westinghousedigital.com
For customer service call
1-866-287-5555
.
Reattach screen onto bracket using the same
position determined in step 4. Wind helical wrap (
J
)
around all cords from back of LCD TV, as shown.
Place cord clips (
H
) as needed, to better manage
cords, making sure that one clip is close enough to
the hinge area to prevent cord from bunching up.
Note: Make sure that cords come out right side
of LCD assembly (A).
Place cord cover back onto LCD assembly (
A
), so
that it is even with the bends on the side of the
mount.
Note: Make sure all slack is pulled out with
mount fully open before replacing cord cover.
J
Right Side
A
Cord Cover
H