Whirlpool EED4100SQ Installation Instructions
Whirlpool EED4100SQ - Estate Extra Large 5.9 Cu. Ft. Capacity Dryer Manual
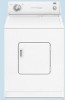 |
UPC - 883049021478
View all Whirlpool EED4100SQ manuals
Add to My Manuals
Save this manual to your list of manuals |
Whirlpool EED4100SQ manual content summary:
- Whirlpool EED4100SQ | Installation Instructions - Page 1
Requirements" before purchasing parts. Mobile home installations require metal exhaust system hardware available for purchase from the dealer from whom you purchased your dryer. For further information, please reference the "Assistance or Service" section of the Dryer User Instructions. 8577187 - Whirlpool EED4100SQ | Installation Instructions - Page 2
outlet located within 2 ft (61 cm) of either side of the dryer. See "Electrical Requirements." s A sturdy floor to support the total weight (dryer and load) of 200 lbs (90.7 kg). The combined weight of a companion appliance should also be considered. s A level floor with a maximum slope of - Whirlpool EED4100SQ | Installation Instructions - Page 3
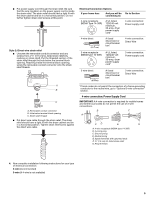
it is recommended that a qualified electrician determine that the ground path is adequate. Electrical Connection To properly install your dryer, you must determine the type of electrical connection you will be using and follow the instructions provided for it here. s If local codes do not permit the - Whirlpool EED4100SQ | Installation Instructions - Page 4
to do so can result in death, fire, or electrical shock. 1. Disconnect power. 2. Remove the hold-down screw and terminal block cover. A BC D E F A. Terminal block cover B. External ground conductor screw C. Center, silver-colored terminal block screw D. Hold-down screw location E. Neutral - Whirlpool EED4100SQ | Installation Instructions - Page 5
dryer cabinet and be in a horizontal position. Tighten strain relief screw against the direct wire cable. Electrical Connection Options If your home relief G. Ring terminals 4. Now complete installation following instructions for your type of electrical connection: 4-wire (recommended) 3-wire (if - Whirlpool EED4100SQ | Installation Instructions - Page 6
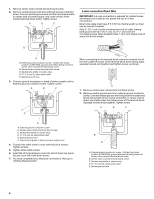
IMPORTANT: A 4-wire connection is required for mobile homes and where local codes do not permit the use , as shown. 1. Remove center silver-colored terminal block screw. 2. Remove neutral ground of dryer rear panel. Secure cover with hold-down screw. 7. You have completed your electrical connections - Whirlpool EED4100SQ | Installation Instructions - Page 7
center, silver-colored terminal screw of the terminal block. Tighten screw. B C D F E D A. External ground conductor screw B. Center silver-colored terminal block cover into slot of dryer rear panel. Secure cover with hold-down screw. 7. You have completed your electrical connections. Now go to - Whirlpool EED4100SQ | Installation Instructions - Page 8
connecting cabinet-ground conductor to neutral wire. 1. Remove center silver-colored terminal block screw. 2. Remove neutral ground wire from external ground block cover into slot of dryer rear panel. Secure cover with hold-down screw. 6. You have completed your electrical connections. Now go to " - Whirlpool EED4100SQ | Installation Instructions - Page 9
with rigid or flexible heavy metal vent. s Review Vent system chart. Modify existing vent system Whirlpool Parts and Accessories. For more information, see the "Assistance or Service" section of this manual metal vent must be fully extended and supported when the dryer is in its final position. 2½" - Whirlpool EED4100SQ | Installation Instructions - Page 10
service number located on the back page of this manual to order. s Over-the-Top Installation: Part Number 4396028 s Periscope Installation (For use with dryer vent to wall vent mismatch): Part installations are shown. Refer to the manufacturer's instructions. A B A. Over-the-top installation ( - Whirlpool EED4100SQ | Installation Instructions - Page 11
not remove) top screws from cabinet side of hinges. 3. Lift door until top screws in cabinet are in large part of hinge slot. Pull door forward off screws. Set door on top of dryer. Remove top screws from cabinet. 4. Use a small, flat-blade screwdriver to gently remove 4 hinge hole plugs (D) on left - Whirlpool EED4100SQ | Installation Instructions - Page 12
adjust alignment. Complete Installation 1. Check that all parts are now installed. If there is an extra part, go back through the steps to see dryer. 8. Read "Dryer Use" in the Dryer User Instructions. 9. Wipe the dryer drum interior thoroughly with a damp cloth to remove any dust. 10. Set the dryer
-
 1
1 -
 2
2 -
 3
3 -
 4
4 -
 5
5 -
 6
6 -
 7
7 -
8
-
9
-
10
-
11
-
12
 |
 |
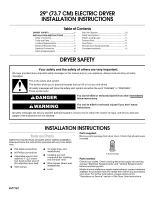
29" (73.7 CM) ELECTRIC DRYER
INSTALLATION INSTRUCTIONS
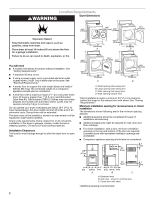
DRYER SAFETY
INSTALLATION INSTRUCTIONS
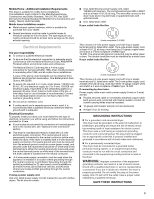
Tools and Parts
Gather the required tools and parts before starting installation.
Read and follow the instructions provided with any tools listed
here.
Parts supplied:
Remove parts package from dryer drum. Check that all parts were
included.
4 leveling legs
Parts needed:
Check local codes. Check existing electrical supply and venting
and see “Electrical Requirements” and “Venting Requirements”
before purchasing parts.
Mobile home installations require metal exhaust system hardware
available for purchase from the dealer from whom you purchased
your dryer. For further information, please reference the
“Assistance or Service” section of the Dryer User Instructions.
Table of Contents
DRYER
SAFETY
...............................................
1
INSTALLATION INSTRUCTIONS
....................
1
Table of Contents
..........................................
1
Tools and Parts
..............................................
1
Location Requirements
.................................
2
Electrical Requirements
.................................
3
Electrical Connection
.....................................
4
Venting Requirements
...................................
9
Plan Vent System
..................................................
10
Install Vent System
................................................
11
Install Leveling Legs
..............................................
11
Connect Vent
.........................................................
11
Level Dryer
.............................................................
11
Reverse Door Swing (Optional)
.............................
11
Complete Installation
.............................................
12
You can be killed or seriously injured if you don't immediately
You
can be killed or seriously injured if you don't follow
All safety messages will tell you what the potential hazard is, tell you how to reduce the chance of injury, and tell you what can
happen if the instructions are not followed.
Your safety and the safety of others are very important.
We have provided many important safety messages in this manual and on your appliance. Always read and obey all safety
messages.
This is the safety alert symbol.
This symbol alerts you to potential hazards that can kill or hurt you and others.
All safety messages will follow the safety alert symbol and either the word “DANGER” or “WARNING.”
These words mean:
follow instructions.
instructions.
DANGER
WARNING
■
Flat-blade screwdriver
■
#2 Phillips screwdriver
■
Adjustable wrench that
opens to 1" (2.5 cm) or
hex-head socket wrench
(for adjusting dryer feet)
■
Vent clamps
■
Tin snips (new vent
installations)
■
Caulking gun and
compound (for installing
new exhaust vent)
■
Wire stripper (direct wire
installations)
■
Level
8577187