Whirlpool GBS277PDQ Installation Instructions - Page 2
PRODUCT DIMENSIONS, BEFORE YOU START, Tool needed, Parts supplied
 |
View all Whirlpool GBS277PDQ manuals
Add to My Manuals
Save this manual to your list of manuals |
Page 2 highlights
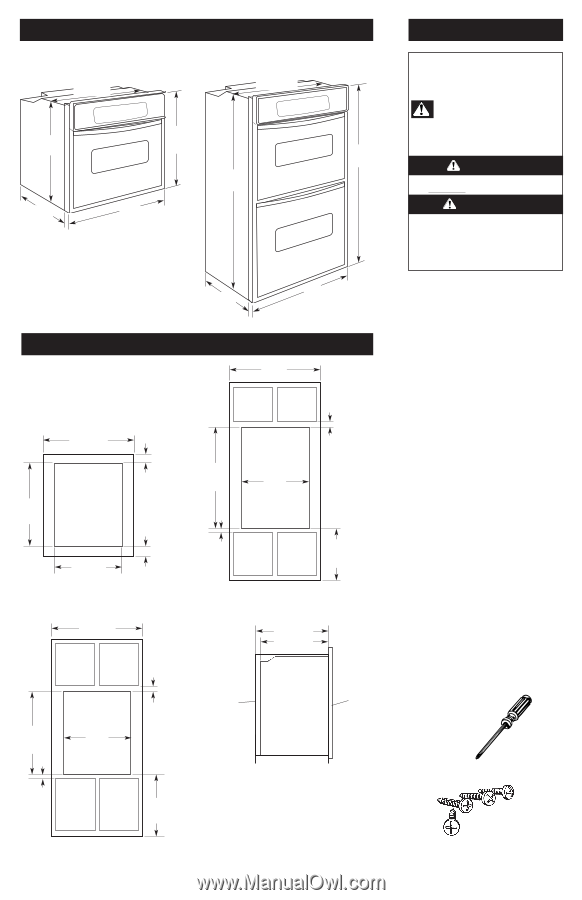
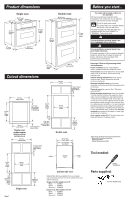
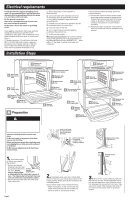
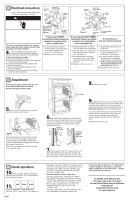
Product dimensions Single oven 28-3/8" max. recessed width Double oven 28-3/8" max. recessed width 27-1/2" recessed height 23" max. recessed 29" max. overall height 29-3/4" overall width 49-1/2" recessed height 51" max. overall height 23" max. recessed depth 29-3/4" overall width Cutout dimensions 30" min. cabinet 1" top of cutout to bottom of upper cabinet door 30" min. cabinet width 27-3/4" min. cutout height 1-1/2" min. top of cutout to underside of countertop 49-3/4" min. cutout height 28-1/2" cutout width Single oven undercounter (without cooktop installed above) 30" min. cabinet width 5-1/4" bottom of cutout to floor 1-1/2" min. bottom of cutout to top of cabinet door 1" top of cutout to bottom of upper cabinet door 28-1/2" cutout width 14-3/4" bottom of cutout to floor Double oven 23-1/4" min. cutout depth 23" recessed oven depth 27-3/4" min. cutout height 28-1/2" cutout width 1-1/2" min. bottom of cutout to top of cabinet door 32" bottom of cutout to floor Single oven Page 1 cabinet recessed oven oven front Cabinet side view Cabinet filler kits are available from your dealer. Use a matching color kit if oven is smaller than your cabinet opening. Single oven filler height is 3-5/16" Black - 4378941 White - 4378942 Almond - 4378943 Double oven filler height is 6-5/16" Black - 4378947 White - 4378948 Almond - 4378949 Before you start... Your safety and the safety of others are very important. We have provided many important safety messages in this manual and on your appliance. Always read and obey all safety messages. This is the safety alert symbol. This symbol alerts you to potential hazards that can kill or hurt you and others. All safety messages will follow the safety alert symbol and either the word "DANGER" or "WARNING". These words mean: DANGER You can be killed or seriously injured if you don't immediately follow instructions. WARNING You can be killed or seriously injured if you don't follow instructions. All safety messages will tell you what the potential hazard is, tell you how to reduce the chance of injury, and tell you what can happen if the instructions are not followed. Important: Observe all governing codes and ordinances. Proper installation is your responsibility. Have a qualified technician install this oven. Oven location should be away from strong draft areas, such as windows, doors and strong heating vents. Cabinet opening dimensions that are shown must be used. Given dimensions provide minimum clearance. Recessed installation area must provide complete enclosure around the recessed portion of the oven. Electrical ground is required. See "Electrical requirements." Electrical supply junction box should be located 3 inches maximum below the support surface when oven is installed in a wall cabinet. Drill a 1-inch minimum diameter hole in the right rear or left rear corner of the support surface to pass the appliance cable through to the junction box. For undercounter installation, it is recommended that the junction box be located in the adjacent right or left cabinet. If installing the junction box on rear wall behind oven, junction box must be recessed and located in the upper or lower right or left corner of cabinet. Oven support surface MUST be solid, level and flush with bottom of cabinet cutout. It is the customer's responsibility: To contact a qualified electrical installer. To assure that the electrical installation is adequate and in conformance with National Electrical Code, ANSI/NFPA 70 - latest edition*, and all local codes and ordinances. Copies of the standards listed may be obtained from: * National Fire Protection Association Batterymarch Park Quincy, Massachusetts 02269 Tool needed: Phillips screwdriver Parts supplied: 4 screws (double oven)
-
 1
1 -
 2
2 -
 3
3 -
 4
4 -
 5
5
 |
 |