Whirlpool GEW9868KQ Installation Instructions
Whirlpool GEW9868KQ Manual
 |
View all Whirlpool GEW9868KQ manuals
Add to My Manuals
Save this manual to your list of manuals |
Whirlpool GEW9868KQ manual content summary:
- Whirlpool GEW9868KQ | Installation Instructions - Page 1
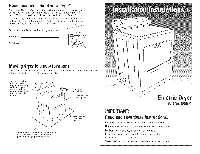
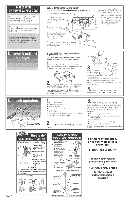
? Check your Use and Care Guide for a toll+free number to call, or catl your dealer. The dealer is listed in the Yellow Pages of your phone directory under "Appliances -- Household -- Major -- Service and Repair:" When you call, you will need the dryer model number and serial number: Both - Whirlpool GEW9868KQ | Installation Instructions - Page 2
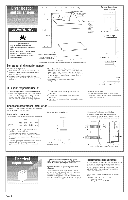
Dryer Feet Kit, Part No. 279810.) Clothes may not tumble properly and automatic sensor cycles may not operate correctly if dryer is not level. _'Sturdy floor to support dryer model/serial rating plate) is required on a separate 30-ampere circuit, fused on both sides of the line. A time-delay fuse or - Whirlpool GEW9868KQ | Installation Instructions - Page 3
dryer where it can be fuel for a fire. Moisture damage to woodwork, furniture, paint, wallpaper, carpet, etc. Housecleaning problems and heakh problems fully extended and supported when the dryer is in its Service Manual, Part No. 60319Z (To purchase the Service Manual, see your Use and Care Guide - Whirlpool GEW9868KQ | Installation Instructions - Page 4
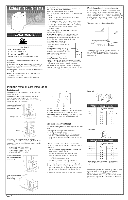
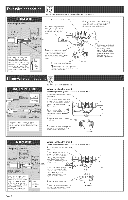
with 4" clamp. (Exhaust vent MUST fit inside hoodO Run exhaust vent to dryer location. Use the straightest path possible. (See Panel B.) Use clamps to this type of connection, use "Four-wire connection" instructions. GROUNDING INSTRUCTIONS: This appliance be grounded. In the event of malfunction - Whirlpool GEW9868KQ | Installation Instructions - Page 5
block (hook facing right). Squeeze hook end together: Tighten screw. 10-30R Three-wire receptacle HDH++r+wecircteabmleuhsat ve four feet of extra length so dryer can be moved if needed. Strip 3-1/2 inches of outer covering from end of cable, Strip insulation back 1 inch. If using 3-wire cable with - Whirlpool GEW9868KQ | Installation Instructions - Page 6
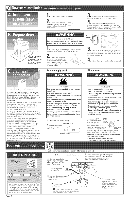
theti=e service Panel E Step 1 Clamp one elbow/vent section to wall and one to dryer, Step 2 Extend vent upward, almost to top of dryer, then I_ush dryer to wall. Step 3 From over the top, snap vent together. Dura Safe _nd Sure Connect are T,,ade n_rks of Whirlpool, USA, 18"=29": Part#4396811 - Whirlpool GEW9868KQ | Installation Instructions - Page 7
important safety messages in this manual and on your appliance=Always be killed or seriousmyinjured if you don't fellow instructions. All safety messages wii[ identify the hazard, tell installations) Part No. 3979171 © 2001 Whirlpool Corporation Partssupplied: Remove parts package from dryer drum.
-
 1
1 -
 2
2 -
 3
3 -
 4
4 -
 5
5 -
 6
6 -
 7
7
 |
 |

Havequestionsabout
your
dryer?
Check
your
Use and
Care
Guide
for
a toll+free
number
to
call,
or
catl your
dealer.
The
dealer
is listed
in the
Yellow
Pages
of your
phone
directory
under
"Appliances
--
Household
--
Major
--
Service
and
Repair:"
When
you
call,
you
will
need
the
dryer
model
number
and
serial
number:
Both
numbers
are on
the
model/serial
rating
plate
located
in the
door
well
behind
the
dryer
door
and
on
front
of
opening,
+_/._
Record
the
numbers
here
for
handy
reference:
ModeB
No+
Serial
No+
o
?
Moving dryer to a
new leeat+en.
Check
with
a
licensed
electrician
to
confirm
that
supply
voltage
at
new
home
matches
voltage
specified
on
the
model/serial
rating
plate,
Shut
off
electrical
supply
to
dryer.
Unplug
power
supply
cord
and
tape
it
\
securely
to
dryer.
_
_e top
(Or disconnect
power
\
to
cabinet.
supply
cable
from
dryer,)
_e
door
to
panel
/
Slide
dryer
onto
cardboard
or hardboard
before
moving
it across the
floor
to
prevent
damaging
floor
covering.
Read and
save
these
instmetiens.
installer:
Leave Installation
Instructions
with
homeowner.
Hemeewner:
Keep Installation
Instructions
for future
reference.
Fer
best
perfermanee,
install dryer according
to
Installation
Instructions+
Failure to complete
installation
as instructed
could
void warranty.
Save
Installation
Instructions
for local electrical
inspector's
use.