Whirlpool GEW9868KQ Installation Instructions - Page 7
Tools, Parts
 |
View all Whirlpool GEW9868KQ manuals
Add to My Manuals
Save this manual to your list of manuals |
Page 7 highlights
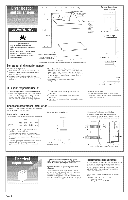
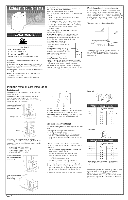
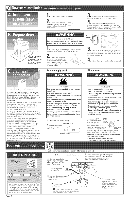
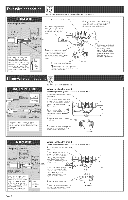
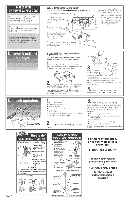
Your safety and the safety of others is very important. We have provided many important safety messages in this manual and on your appliance=Always read and obey all safety messages= This is the safety alert symbol, This symbol alerts you to hazards that can kiii or hurt you and others, AIi safety messages wiii be preceded by the safety alert symbol and the word "DANGER"or "WARNING",These words mean: You ca_ be killed or seriousmyinjured if you don't fellow instructions. All safety messages wii[ identify the hazard, tell you hew to reduce the chance of injury, and tel[ you what can happen if the instructionsare not f0ii0wed. Check that you have ever_hing necessary for correct installation. Proper installation is your responsibility. Toolsneeded: ] * #2 Phillips screwdriver o flat-blade screwdriver ® adjustable wrench that opens to 1" or 1" hexhead socket wrench (for adjustin 9 dryer feet) ® [eve[ o wire stripper (direct wire installations) " safety glasses • caulking gun and compound (new vent installation) • gloves ® tin snips (new vent installations) Part No. 3979171 © 2001 Whirlpool Corporation Partssupplied: Remove parts package from dryer drum. Check that all 4 legs were included. ] 4 leveling Jess Partsnee@d: ] Check IocaI codes and see electrical and venting requirements, Panels A and B, before purchasing Determine if you wilI need to purchase a power supply cord kit or power supply cable. parts. If using a power supply cord: Dryer power supply cord must be: U.hdisted • 120/240-volt * 30-ampere * Type SRD or SRDT minimum * At least 4 feet long The wires that connect to the dryer must end in ring terminals or spade terminals with upturned ends. The receptacle must be located within 3 feet of the top, back center of the control console. 4-wire receptade (14-30R) 4-wire power supply cord with ring or spade terminals and U,L-Jisted strain relief 3-wire receptacle Oo-3or) 3-wire power supply cord with ring or spade terminals and U.L-listed strain relief If coonectiog by direct wire: Power supply cable must match power supply (4-wire or 3-wire) and be: ,_ flexible armored or nommetallic sheathed copper cabie (with ground wire). All current-carrying must be insulated. See Panels D and E. wires * 10-GAUGE SOLID COPPER WIRE. (Do not use aluminum.) at least 4 feet long. Benton Harbor, Michigan 49022 Fire Hazard Use a heavy metal vent. Do not use a plastic vent. Do not use a met_[ foil vent. Failure to follow these instructionscan result in death or fire. Four-inch heavy metal exhaust vent and clamps must be used. Dura Safe TM vent products are recommended. Dura Safe vent products can be purchased from your dealer or by ca!ling WhMpooJ Parts & Accessories 1-800_442_9991, Mon-Fri: 8am to 9pm (CST), Sat: 9am to 4:30pm (CST) Visit our internet site at http://www.whidpoola pplia nces.com/accessories See Panel C for more information. Exhaust hood Do Not use exhaust hoods with magnetic latches. Mobile home installations require: * Mobile Home Installation Kit, Part Number Metal exhaust system hardware* 346764* Floors sloped greater than I inch: Require Extended Dryer Feet Kit, Part No. 279810* *Available for purchase from your dealer. Printed in U.S.A.
-
 1
1 -
 2
2 -
 3
3 -
 4
4 -
 5
5 -
 6
6 -
 7
7
 |
 |
