Whirlpool GGG390LXB Owners Manual - Page 12
Bakeware, Meat Thermometer, Oven Vents, Baking
 |
View all Whirlpool GGG390LXB manuals
Add to My Manuals
Save this manual to your list of manuals |
Page 12 highlights
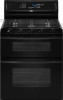
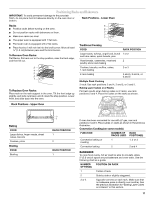
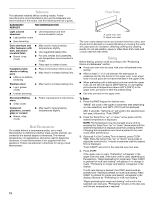
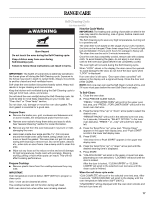
Bakeware The bakeware material affects cooking results. Follow manufacturer's recommendations and use the bakeware size recommended in the recipe. Use the following chart as a guide. BAKEWARE/ RESULTS RECOMMENDATIONS Light colored ■ aluminum ■ Light golden crusts ■ Even browning Use temperature and time recommended in recipe. Dark aluminum and other bakeware with dark, dull and/or nonstick finish ■ Brown, crisp crusts ■ May need to reduce baking temperatures slightly. ■ Use suggested baking time. ■ For pies, breads and casseroles, use temperature recommended in recipe. ■ Place rack in center of oven. Insulated cookie sheets or baking pans ■ Place in the bottom third of oven. ■ May need to increase baking time. ■ Little or no bottom browning Stainless steel ■ Light, golden crusts ■ Uneven browning ■ May need to increase baking time. Stoneware/Baking stone ■ Crisp crusts ■ Follow manufacturer's instructions. Ovenproof glassware, ceramic glass or ceramic ■ Brown, crisp crusts ■ May need to reduce baking temperatures slightly. Meat Thermometer On models without a temperature probe, use a meat thermometer to determine whether meat, poultry and fish, are cooked to the desired degree of doneness. The internal temperature, not appearance, should be used to determine doneness. A meat thermometer is not supplied with this appliance. Follow manufacturer's directions for using a meat thermometer. Oven Vents A B A. Lower oven vent B. Upper oven vent The oven vents release hot air and moisture from the ovens, and should not be blocked or covered. Blocking or covering the vents will cause poor air circulation, affecting cooking and cleaning results. Do not set plastics, paper or other items that could melt or burn near the oven vents. Baking Before baking, position racks according to the "Positioning Racks and Bakeware" section. ■ If only one oven is to be used, that oven will preheat more quickly. ■ Allow at least ½" (1.3 cm) between the baking pan or casserole and the top burner in the upper oven. Loaf, angel food or bundt pans are not recommended in the upper oven. ■ When preheating with a baking/pizza stone inside the upper oven, do not set oven above 400°F (205°C). To use baking/ pizza stones at temperatures above 400°F (205°C) in the upper oven, put stone in after the preheat beep. ■ Use only one rack in the upper oven. To Bake: 1. Press the BAKE keypad for desired oven. "BAKE" will scroll in the upper or lower text area (depending on oven selection), and 350°F (175°C) will be displayed. After 3 seconds, "Set temp or" will scroll in the selected oven text area, followed by "Push START." 2. Press the Temp/Time "up" or "down" arrow pads until the desired temperature is displayed. NOTE: The temperature may be changed at any time by pressing the Temp/Time "up" or "down" arrow pads until the desired temperature is displayed and then pressing START. Changing the temperature once food is placed in the oven could affect performance. 3. (Optional) If a Set Cooking Time is desired, press COOK TIME. Press the Temp/Time "up" or "down" arrow pads to adjust the cook time by 1-minute increments until the desired time is displayed. "Push START" will scroll in the selected oven text area. 4. Press START. If the upper oven is used, "Preheating" will appear in the upper oven text area. If the lower oven is used, depending on the selection, "Rapid preheating for single rack. Press START to preheat for multi rack baking" will appear. If no change is made, "Preheating for single rack baking" will appear in the display. If multi-rack baking is desired, the START pad should be pressed and "Standard preheat for multi rack baking. Press START to preheat for single rack baking" will appear in the display, followed by "Preheating for multi rack baking." "Rapid preheating for single rack baking" will scroll in the selected oven text area. "Preheating" remains in the text area until the set temperature is reached. 12
-
 1
1 -
2
-
3
-
4
-
5
-
6
-
 7
7 -
 8
8 -
 9
9 -
 10
10 -
 11
11 -
 12
12 -
 13
13 -
 14
14 -
 15
15 -
 16
16 -
 17
17 -
18
-
19
-
20
-
21
-
22
-
23
-
24
 |
 |