Whirlpool GSC308PRQ Installation Instructions - Page 4
Warning
 |
View all Whirlpool GSC308PRQ manuals
Add to My Manuals
Save this manual to your list of manuals |
Page 4 highlights
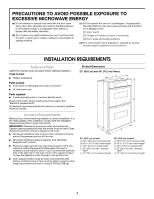
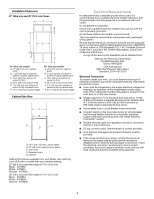
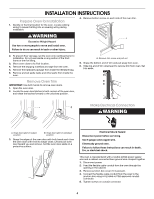
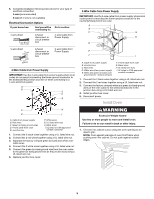
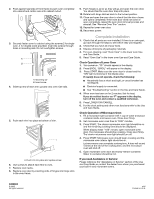
6. Complete installation following instructions for your type of electrical connection: 4-wire (recommended) 3-wire (if 4-wire is not available) Electrical Connection Options If your home has: And you will be connecting to: Go to section: 4-wire direct 5" (12.7 cm) A fused disconnect or circuit breaker box 4-wire Cable from Power Supply 3-wire direct 1" (12.7 cm) A fused disconnect or circuit breaker box 3-wire Cable from Power Supply (83.9¹⁄₂c"m) 4-Wire Cable from Power Supply IMPORTANT: Use the 4-wire cable from power supply where local codes do not permit connecting the frame-ground conductor to the neutral (white) junction box wire or when connecting to a 4-wire electrical system. A B E F G 3-Wire Cable from Power Supply IMPORTANT: Use the 3-wire cable from power supply where local codes permit connecting the frame-ground conductor to the neutral (white) junction box wire: A B C G H D E F I A. Cable from power supply B. Junction box C. Red wires D. White wire (from power supply) E. White and green (or bare) oven ground wires - factory crimped F. 4-wire cable from oven G. Black wires H. UL listed wire nuts I. UL listed or CSA approved conduit connector 1. Connect the 2 black wires together using a UL listed wire nut. 2. Connect the 2 red wires together using a UL listed wire nut. 3. Connect the factory crimped white and green (or bare) ground wires of the oven cable to the white (neutral) wire in the junction box using a UL listed wire nut. 4. Install junction box cover. 5. Reconnect power. Install Oven C H D I A. Cable from power supply B. Red wires C. Green (or bare) ground wires D. 4-wire cable from oven E. Junction box F. White wires G. UL listed wire nuts H. Black wires I. UL listed or CSA approved conduit connector 1. Connect the 2 black wires together using a UL listed wire nut. 2. Connect the 2 red wires together using a UL listed wire nut. 3. Separate the factory crimped green (or bare) and white oven cable wires. 4. Connect the 2 white wires together using a UL listed wire nut. 5. Connect the green (or bare) ground wire from the oven cable to the green (or bare) ground wire (in the junction box) using a UL listed wire nut. 6. Replace junction box cover. WARNING Excessive Weight Hazard Use two or more people to move and install oven. Failure to do so can result in back or other injury. 1. Lift oven into cabinet cutout using the oven opening as an area to grip. NOTE: Push against seal area of oven front frame when pushing oven into cabinet. Do not push against outside edges. 5
-
 1
1 -
 2
2 -
 3
3 -
 4
4 -
 5
5 -
 6
6
 |
 |