Whirlpool LDR3822P Owners Manual 1 - Page 7
Installation
 |
View all Whirlpool LDR3822P manuals
Add to My Manuals
Save this manual to your list of manuals |
Page 7 highlights
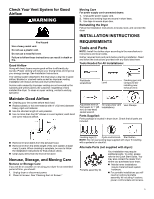
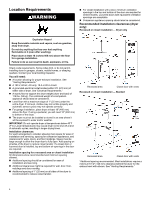
Minimum installation clearances (dryer only): Front Sides Rear Top Recessed NA 0" (0 mm) 0" (0 mm) 0" (0 mm) Closet NA 0" (0 mm) 0" (0 mm) 0" (0 mm) Under Counter NA 1" (25 mm) 0" (0 mm) 0" (0 mm) 0" (0 mm) rear spacing is allowed for straight-back venting only. Mobile Home - Additional installation requirements This dryer is suitable for mobile home installations. The installation must conform to the Manufactured Home Construction and Safety Standard, Title 24 CFR, Part 3280 (formerly the Federal Standard for Mobile Home Construction and Safety, Title 24, HUD Part 280) or the Standard for Mobile Homes, CAN/CSAZ240 MH. Mobile home installations require: � Metal exhaust system hardware, which is available for purchase from your dealer. � Special provisions must be made in mobile homes to introduce outside air into the dryer. The opening (such as a nearby window) should be at least twice as large as the dryer exhaust opening. Electrical Requirements WARNING GROUNDING INSTRUCTIONS For a grounded, cord-connected appliance: This appliance must be grounded. In the event of a malfunction or breakdown, grounding will reduce the risk of electric shock by providing a path of least resistance for electric current. This appliance is equipped with a cord having an equipment-grounding conductor and a grounding plug. The plug must be plugged into an appropriate outlet that is properly installed and grounded in accordance with all local codes and ordinances. WARNING: Improper connection of the equipmentgrounding conductor can result in a risk of electric shock. Check with a qualified electrician or serviceman if you are in doubt as to whether the appliance is properly grounded. Do not modify the plug provided with the appliance: if it will not fit the outlet, have a proper outlet installed by a qualified electrician. SAVE THESE INSTRUCTIONS INSTALLATION Install Leveling Legs WARNING Excessive Weight Hazard Use two or more people to move and install or uninstall appliance. Failure to do so can result in back or other injury. 1. Prepare dryer for leveling legs Electrical Shock Hazard Plug into a grounded 3 prong outlet. Do not remove ground prong. Do not use an adapter. Do not use an extension cord. Failure to follow these instructions can result in death, fire, or electrical shock. � 120 V, 60 Hz, AC-only, 15 A or 20 A fused electrical supply is required. � A time-delay fuse or circuit breaker is recommended. Check that the fuse or circuit breaker matches the rating of your line. � It is also recommended that a separate circuit serving only this dryer is provided. � Do not use an extension cord. To avoid damaging floor, use a large flat piece of cardboard from dryer carton; place under entire back edge of dryer. Firmly grasp dryer body (not console panel) and gently lay dryer down on cardboard. 2. Screw in leveling legs Using a wrench and tape measure, screw leveling legs into leg holes until bottom of foot is approximately 1" (25 mm) to 1 1/2" (38 mm) from bottom of the dryer. Place a carton corner post from dryer packaging under each of the two dryer back corners. Stand the dryer up. Slide the dryer on the corner posts until it is close to its final location. Leave enough room to connect the exhaust vent. 7
-
 1
1 -
 2
2 -
 3
3 -
 4
4 -
 5
5 -
 6
6 -
 7
7 -
 8
8 -
 9
9 -
 10
10 -
 11
11 -
 12
12 -
13
-
14
-
15
-
16
-
17
-
18
-
19
-
20
-
21
 |
 |
