Whirlpool RF111PXSQ Owners Manual - Page 5
Positioning Racks and Bakeware, Oven Vent, Baking and Roasting, Broiling - bake element
 |
UPC - 883049013145
View all Whirlpool RF111PXSQ manuals
Add to My Manuals
Save this manual to your list of manuals |
Page 5 highlights
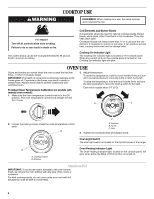
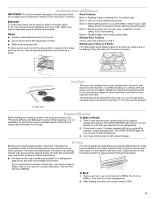
Positioning Racks and Bakeware IMPORTANT: To avoid permanent damage to the porcelain finish, do not place food or bakeware directly on the oven door or bottom. Rack Positions Rack 5: Toasting bread or broiling thin, non-fatty foods. Bakeware To cook food evenly, hot air must be able to circulate. Allow 2" (5 cm) of space around bakeware and oven walls. Make sure that no bakeware piece is directly over another. Racks ■ Position racks before turning on the oven. Rack 4: Use for 2-rack baking and broiling. Rack 3: Most baked goods on a cookie sheet or jelly roll pan, layer cakes, frozen convenience foods. Broiling chicken pieces. Rack 2: Roasting small cuts of meat, pies, casseroles, bundt cakes, and 2-rack baking. Rack 1: Roasting large cuts of meat and poultry. Multiple Rack Cooking ■ Do not move racks with bakeware on them. 2-rack: Use rack positions 2 and 4. ■ Make sure racks are level. To move a rack, pull it out to the stop position, raise the front edge, and then lift out. Use the following illustration and charts as a guide. Baking Layer Cakes on 2 Racks For best results when baking cakes on 2 racks use racks 2 and 4 for baking. Place the cakes on the racks as shown. 5 4 3 2 1 Oven Vent The oven vent releases hot air and moisture from the oven, and should not be blocked or covered. Blocking or covering vent will cause poor air circulation, affecting cooking and cleaning results. A Do not set plastics, paper or other items that could melt or burn near the oven vent. The element can be used when the oven is in use as long as the cookware does not extend more than ¹⁄₂" (1.3 cm) over the element. A. Oven vent Baking and Roasting Before baking and roasting, position the racks according to the "Positioning Racks and Bakeware" section. When roasting, it is not necessary to wait for the oven to preheat before putting food in, unless recommended in the recipe. To Bake or Roast: 1. Push in and turn the oven control knob to the desired temperature setting. The OVEN HEATING light will turn on and remain on until the oven reaches the set temperature. 2. Place food in oven. The bake element will turn on and off to maintain cooking temperature. The OVEN HEATING light will turn on and off with the element. 3. Turn oven control knob to OFF when finished. Broiling Broiling uses direct radiant heat to cook food. Changing the temperature when Custom Broiling allows more precise control when cooking. The lower the temperature, the slower the cooking. Thicker cuts and unevenly shaped pieces of meat, fish and poultry may cook better at lower broiling temperatures. It is not necessary to preheat the oven before putting food in unless recommended in the recipe. Position food on grid in a broiler pan, then place it in the center of the oven rack. Close the door to the broil stop position to ensure proper broiling temperature. ■ For best results, use a broiler pan and grid. It is designed to drain juices and help avoid spatter and smoke. If you would like to purchase a broiler pan, one may be ordered. Please refer to the cover for contact information. Ask for Part Number 4396923. To Broil: 1. Push in and turn oven control knob to BROIL HI or turn to BROIL LO to broil at a lower temperature. 2. After broiling, turn the oven control knob to OFF. 5
-
 1
1 -
 2
2 -
 3
3 -
 4
4 -
 5
5 -
 6
6 -
 7
7 -
 8
8
 |
 |
