Whirlpool SF367LXSS Use and Care Guide - Page 13
Sequence Programming
 |
View all Whirlpool SF367LXSS manuals
Add to My Manuals
Save this manual to your list of manuals |
Page 13 highlights
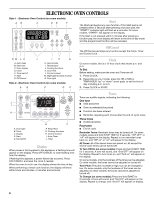
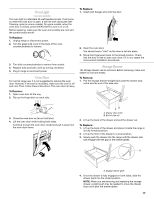
Style 1 - Series Electronic Controls (see "Electronic Oven Controls" section) To Set a Timed Cook: 1. Press BAKE (optional). 2. Press the TEMP "up" or "down" arrow pads to enter a temperature other than the one displayed. 3. Press STOP TIME. 4. Press the HR and MIN "up" or "down" arrow pads to enter the desired time to end cooking. 5. Press START. The display will count down the time. When the time ends, the oven will shut off automatically and "End" will appear on the display. End-of-cycle tones will sound, then, if enabled, reminder tones will sound every minute. 6. Open and close the oven door to clear the display and/or stop reminder tones. To Set a Delayed Timed Cook: Before setting, make sure the clock is set to the correct time of day. See "Clock" section. 1. Press desired cook function. 2. Press the TEMP "up" or "down" arrow pads to enter a temperature other than the one displayed. 3. Press START TIME or DELAY START TIME. 4. Press the HR and MIN "up" or "down" arrow pads to enter the time of day to start. 5. Press STOP TIME (optional). 6. If STOP TIME has been pressed, press the HR and MIN "up" or "down" arrow pads to enter the desired time to end cooking. 7. Press START. "DELAY" will appear on the display. When the start time is reached, the oven will automatically turn on. When the stop time is reached (if programmed), the oven will shut off automatically and "End" will appear on the display. End-of-cycle tones will sound, then, if on, reminder tones will sound every minute. 8. Open and close the oven door to clear the display and/or stop reminder tones. Style 2 - Series Electronic Oven Control (see "Electronic Oven Controls" section) To Set a Timed Cook: 1. Press BAKE. The bake indicator light will light up. 2. Set the temperature (optional). 3. Press the TEMP/HOUR "up" or "down" arrow pad to enter a temperature other than the one displayed. 4. Press COOK TIME. The cook time oven indicator light will light up. 5. Press TEMP/HOUR "up" or "down" arrow pad to enter the length of time to cook. 6. Press START. The display will count down the time. When the time ends, the oven will shut off automatically and "End" will appear on the display. 7. Press OFF/CANCEL or open the oven door to clear the display. To Set a Delayed Timed Cook: Before setting, make sure the clock is set to the correct time of day. See "Clock" section. 1. Press BAKE. 2. Set the temperature (optional). 3. Press the TEMP/HOUR "up" or "down" arrow pad to enter a temperature other than the one displayed. 4. Press COOK TIME. The cook time oven indicator light will light up. 5. Press the TEMP/HOUR "up" or "down" arrow pad to enter the length of time to cook. 6. Press START TIME. The start time/delay oven indicator light will light up. 7. Press the TEMP/HOUR "up" or "down" arrow pad to enter the time of day to start. 8. Press START. When the start time is reached, the oven will automatically turn on. The temperature and/or time settings can be changed any time after pressing START by repeating steps 17. When the set cook time ends, the oven will shut off automatically and "End" will appear on the display. 9. Press OFF/CANCEL or open the oven door to clear the display. Sequence Programming (on some models) Sequence Programming allows you to program up to 4 cooking functions at one time. Other oven functions, such as the Timer and Warming Drawer, may be used when a sequenced Program is running. All steps of a sequenced program must be programmed with a stop time. If a stop time is not entered for a step in the sequence program, and the FIRST/NEXT STEP pad is pressed, 3 tones will sound prompting you to enter a stop time. Sequence Programming takes precedence over any nonsequenced cooking function. For example, if an untimed Bake function is in process and a sequence program is started, the untimed Bake function will be canceled, and the program sequence will start. Example - Sequence Programming To Program the First Step of the Sequence: 1. Press FIRST/NEXT STEP. "PROGRAM" and "STEP" will appear on the display. A flashing "1" will also appear on the display, indicating that Step 1 is being programmed. 2. Press BAKE, or any other desired cooking function. 3. Press TEMP or TEMP/HOUR "up" or "down" arrow pad (if desired) to select a temperature other than the one displayed. 4. Press START TIME, then HR and MIN "up" or "down" arrow pads to set the time of day for the first cooking function to begin. For example, 1:00. If START TIME is not pressed, then the sequence of cooking functions will begin immediately once programming is complete and START is pressed. The display will show either the time of day (if start time was not programmed) or the start time (if same was programmed), but with a flashing colon. "Stop" and "Time" will also appear on the display. 5. Press STOP TIME, then HR and MIN or TEMP/HOUR "up" or "down" arrow pads to set the time of day for the first cooking function to stop. For example, 1:15. 13
-
 1
1 -
2
-
3
-
4
-
5
-
6
-
7
-
 8
8 -
 9
9 -
 10
10 -
 11
11 -
 12
12 -
 13
13 -
 14
14 -
 15
15 -
 16
16 -
 17
17 -
 18
18 -
19
-
20
-
21
-
22
-
23
-
24
-
25
-
26
-
27
-
28
-
29
-
30
-
31
-
32
-
33
-
34
-
35
-
36
-
37
-
38
-
39
-
40
 |
 |