Whirlpool UXT4130ADS Installation Guide
Whirlpool UXT4130ADS Manual
 |
View all Whirlpool UXT4130ADS manuals
Add to My Manuals
Save this manual to your list of manuals |
Whirlpool UXT4130ADS manual content summary:
- Whirlpool UXT4130ADS | Installation Guide - Page 1
" (91,4 CM) Instructions d'installation et Guide d'utilisation et d'entretien Au Canada, pour assistance, installation ou service, composer le 1-800-807-6777 ou visiter notre site Web à www.whirlpool.ca Table of Contents/Table des matières 2 Models/Modèles: UXT4130AD/UXT4136AD IMPORTANT: READ AND - Whirlpool UXT4130ADS | Installation Guide - Page 2
6 RANGE HOOD USE 10 RANGE HOOD CARE 10 WIRING DIAGRAM 11 ASSISTANCE OR SERVICE 12 WARRANTY 13 TABLE DES MATIÈRES SÉCURITÉ DE LA HOTTE DE CUISINIÈRE 14 EXIGENCES D'INSTALLATION 16 INSTRUCTIONS D'INSTALLATION 19 UTILISATION DE LA HOTTE 23 ENTRETIEN DE LA HOTTE 23 SCHÉMA DE CÂBLAGE - Whirlpool UXT4130ADS | Installation Guide - Page 3
dimensions provide minimum clearance. Consult the cooktop/range manufacturer installation instructions before making any cutouts. ■ This range hood is recommended . Models that are capable of being installed as non-vented (recirculating) require charcoal filters. See the "Assistance or Service" - Whirlpool UXT4130ADS | Installation Guide - Page 4
is not recommended. Flexible vent creates both back pressure and air turbulence that greatly reduce performance. ■ The vent system is optional for this model. Vent system can terminate either through the roof or wall. Use 3¹⁄₄" x 10" (8.3 x 25.4 cm) rectangular with a maximum vent length of 35 ft - Whirlpool UXT4130ADS | Installation Guide - Page 5
and industry accepted wiring practices. ■ Wire sizes and connections must conform with the rating of the appliance as specified on the model/serial rating plate. The model/serial plate is located behind the filter on the rear wall of the range hood. ■ Wire sizes must conform to the requirements - Whirlpool UXT4130ADS | Installation Guide - Page 6
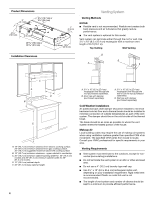
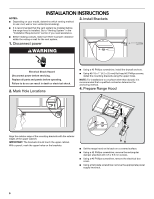
INSTALLATION INSTRUCTIONS NOTES: ■ Depending on your model, determine which venting method to use: roof, wall . 1. Disconnect power 3. Install Brackets WARNING Electrical Shock Hazard Disconnect power before servicing. Replace all parts and panels before operating. Failure to do so can result - Whirlpool UXT4130ADS | Installation Guide - Page 7
5. Mark Hole Locations 6. Mark and Cut Vent Opening 3¹⁄₄" x 10" (8.3 x 25.4 cm) Rectangular Vent System Lift the range hood into place and insert the mounting bracket tabs through the slots in the back of the range hood. 45˚+ AA 90˚ ■ Using a ¹⁄₂" (13 mm) drill bit, drill a hole in each of the - Whirlpool UXT4130ADS | Installation Guide - Page 8
8. Prepare Range Hood Vents and Mounting Tabs x2 E D C B A 10. Mount Range Hood ■ Install Strain Relief Install a UL Listed/CSA Approved ¹⁄₂" (13 mm) strain relief (A). ■ Mounting Tabs Start a #8-18 x 4.2 x 16 mm) truss-head screw into the mounting tab (E) on each side of the range hood as shown - Whirlpool UXT4130ADS | Installation Guide - Page 9
installations, follow the instructions supplied with the power cord kit. See the "Assistance or Service" section for information on ordering. NOTE: Use only with range hood cord connection kits that have been investigated and found acceptable for use with this model - Whirlpool UXT4130ADS | Installation Guide - Page 10
the hood and grease filters frequently according to the following instructions. Replace the grease filter before operating hood. Exterior Surfaces: not included): See the "Assistance or Service" section to order. A. Filter retainer ■ For stainless steel models, rub in the direction of the grain - Whirlpool UXT4130ADS | Installation Guide - Page 11
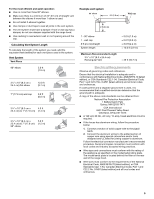
the tabs into the slots. 5. Reconnect power. If the new light does not operate, make sure the light bulb is inserted correctly before calling service. WIRING DIAGRAM Light Switch On - Off Motor Switch Low - Off - High SE116B BK BK W R BK BR R W BR Speed 1 Common Speed 2 R W BK Motor - Whirlpool UXT4130ADS | Installation Guide - Page 12
ASSISTANCE OR SERVICE If you need service Please refer to the warranty page in this manual If you need replacement parts following customer assistance telephone number or your nearest designated service center. In the U.S.A. Call the Whirlpool Customer eXperience Center toll free: 1-800-253-1301 - Whirlpool UXT4130ADS | Installation Guide - Page 13
few minutes to review the Troubleshooting or Problem Solver section of the Use and Care Guide, scan the QR code on the right to access additional resources, or visit www.whirlpool.com/product_help. 2. All warranty service is provided exclusively by our authorized Whirlpool Service Providers. In the - Whirlpool UXT4130ADS | Installation Guide - Page 14
le danger potentiel et vous disent comment réduire le risque de blessure et ce qui peut se produire en cas de non-respect des instructions. Avertissements de la proposition 65 de l'État de Californie : AVERTISSEMENT : Ce produit contient au moins un produit chimique connu par l'État de Californie - Whirlpool UXT4130ADS | Installation Guide - Page 15
FEU DE GRAISSE SUR LA CUISINIÈRE : CORPORELS, RESPECTER LES INSTRUCTIONS SUIVANTES : ■ Ne jamais laisser un élément de surface fonctionner fiche est endommagé(e). Jeter le ventilateur ou le retourner à un centre de service agréé pour examen et/ou réparation. DOMMAGES CORPORELS APRÈS LE DÉ - Whirlpool UXT4130ADS | Installation Guide - Page 16
nécessaires avant d'entreprendre l'installation. Lire et observer les instructions fournies avec chacun des outils de la liste ci-dessous Pour des renseignements sur la commande, voir la section "Assistance ou service". Exigences d'emplacement IMPORTANT : Observer les dispositions de tous les codes - Whirlpool UXT4130ADS | Installation Guide - Page 17
Dimensions du produit 2" (5,1 cm) 6 16,7 cm) ou 9 24,4 cm) 4 12,5 cm) 1" (2,5 cm) 1" (2,5 cm) 9" (22,9 cm) 29 76,0 cm) ou 35 91,0 cm) 1¹⁄₂" (3,8 cm) 18⁵⁄₈" (47,3 cm) Distances de dégagement à respecter Circuit d'évacuation Méthodes d'évacuation REMARQUES : ■ L'emploi d'un conduit - Whirlpool UXT4130ADS | Installation Guide - Page 18
■ Utiliser un conduit métallique rectangulaire de 3¹⁄₄" x 10" (8,3 x 25,4 cm), en fonction de la configuration d'installation. Un conduit en métal rigide est recommandé. Ne pas utiliser de conduit de plastique ou en aluminium. ■ La longueur du circuit d'évacuation et le nombre de coudes doivent être - Whirlpool UXT4130ADS | Installation Guide - Page 19
de courant électrique avant l'entretien. Replacer pièces et panneaux avant de faire la remise en marche. Le non-respect de ces instructions peut causer un décès ou un choc électrique. ■ À l'aide d'un tournevis Phillips n° 2, installer les chevilles d'ancrage. ■ À l'aide des vis à tête plate n° 8-18 - Whirlpool UXT4130ADS | Installation Guide - Page 20
5. Marquage de l'emplacement des trous 6. Marquage et découpage de l'ouverture d'évacuation Circuit d'évacuation pour conduit rectangulaire métallique de 3¹⁄₄" x 10" (8,3 x 25,4 cm) Soulever la hotte et la mettre en place, et insérer les pattes des brides de montage dans les fentes situées à l' - Whirlpool UXT4130ADS | Installation Guide - Page 21
8. Préparation des conduits d'évacuation et des pattes de montage de la hotte x2 E D C B A À l'aide de (2) vis courtes à tête Phillips, installer le clapet antireflux rectangulaire de 3¹⁄₄" x 10" (8,3 x 25,4 cm) par-dessus l'emplacement de l'opercule supérieur ou arrière retiré lors de l'étape 8. - Whirlpool UXT4130ADS | Installation Guide - Page 22
d'alimentation Pour les installations avec l'ensemble du cordon d'alimentation facultatif, suivre les instructions fournies avec l'ensemble du cordon d'alimentation. Voir la section "Assistance ou service" pour plus d'informations sur le processus de commande. REMARQUE : Utiliser uniquement avec - Whirlpool UXT4130ADS | Installation Guide - Page 23
fréquemment la hotte et les filtres à graisse en suivant les instructions suivantes. Réinstaller le filtre à graisse avant de faire fonctionner la - pièce n° 31462A (non inclus) : Voir la section "Assistance ou service" pour commander. A. Patte de retenue du filtre 3. Installations avec évacuation à - Whirlpool UXT4130ADS | Installation Guide - Page 24
Remplacement du filtre : 1. Pour réinstaller le filtre, placer le rebord arrière du filtre dans la rainure à l'arrière de la hotte. Enfoncer le filtre en place et faire pivoter la patte de retenue du filtre pour fixer le filtre à la hotte. 2. Réinstaller la vis dans la patte de retenue du filtre à - Whirlpool UXT4130ADS | Installation Guide - Page 25
SCHÉMA DE CÂBLAGE Commutateur d'éclairage Contacteur du moteur Marche - Arrêt Faible - Arrêt - Élevé SE116B N N BL MAR N R MAR BL R Vitesse 1 Commun Vitesse 2 BL N Caractéristiques du moteur BL BL Alimentation électrique 120 VCA Fréquence Intensité 60 Hz 0,9 ±10% A Puissance - Whirlpool UXT4130ADS | Installation Guide - Page 26
et d'entretien. ■ Ventes d'accessoires et de pièces de rechange. ■ Références aux marchands locaux, aux distributeurs de pièces de rechange et aux compagnies de service. Les techniciens de service désignés par Whirlpool Canada LP sont formés pour remplir la garantie des produits et fournir un - Whirlpool UXT4130ADS | Installation Guide - Page 27
Dépannage ou Résolution de problèmes du guide d'utilisation et d'entretien, scannez le code QR ci-contre avec votre téléphone intelligent pour accéder à des ressources supplémentaires, ou rendez-vous sur le site http://www.whirlpool.ca. 2. Tout service sous garantie doit être effectué exclusivement - Whirlpool UXT4130ADS | Installation Guide - Page 28
W10646403C ®/™ ©2014. Used under license in Canada. All rights reserved. Utilisé sous licence au Canada. Tous droits réservés. 2/14 Printed in Mexico Imprimé au Mexique
-
 1
1 -
 2
2 -
 3
3 -
 4
4 -
 5
5 -
 6
6 -
 7
7 -
8
-
9
-
10
-
11
-
12
-
13
-
14
-
15
-
16
-
17
-
18
-
19
-
20
-
21
-
22
-
23
-
24
-
25
-
26
-
27
-
28
 |
 |
RANGE HOOD SAFETY
30" (76.2 CM) AND 36" (91.4 CM) RANGE HOOD
Installation Instructions and Use & Care Guide
For questions about features, operation/performance, parts, accessories or service, call:
1-800-253-1301
or visit our website at
www.whirlpool.com
In Canada, call
1-800-807-6777
or visit our website at
www.whirlpool.ca
HOTTE D’ASPIRATION DE
30" (76,2 CM) ET 36" (91,4 CM)
Instructions d’installation et Guide d’utilisation et d’entretien
Au Canada, pour assistance, installation ou service, composer
le
1-800-807-6777
ou visiter notre site Web à
www.whirlpool.ca
Table of Contents/Table des matières
.............................................................................
2
IMPORTANT: READ AND SAVE THESE INSTRUCTIONS.
FOR RESIDENTIAL USE ONLY.
IMPORTANT : LIRE ET CONSERVER CES INSTRUCTIONS.
POUR UTILISATION RÉSIDENTIELLE UNIQUEMENT.
Models/Modèles:
UXT4130AD/UXT4136AD
LI32JC/W10646403C
You can be killed or seriously injured if you don't immediately
You
can be killed or seriously injured if you don't follow
All safety messages will tell you what the potential hazard is, tell you how to reduce the chance of injury, and tell you what can
happen if the instructions are not followed.
Your safety and the safety of others are very important.
We have provided many important safety messages in this manual and on your appliance. Always read and obey all safety
messages.
This is the safety alert symbol.
This symbol alerts you to potential hazards that can kill or hurt you and others.
All safety messages will follow the safety alert symbol and either the word “DANGER” or “WARNING.”
These words mean:
follow instructions.
instructions.
DANGER
WARNING