Whirlpool WCG97US6DS Use & Care Guide - Page 3
Assembling Your Cooktop - installation
 |
View all Whirlpool WCG97US6DS manuals
Add to My Manuals
Save this manual to your list of manuals |
Page 3 highlights
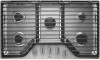
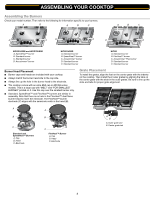
ASSEMBLING YOUR COOKTOP Assembling the Burners Check your model number. Then refer to the following for information specific to your burners. A B A B C A B C D C E D E D WCG51US0D and WCG75US0D A. SpeedHeat™ burner B. Standard burner C. Standard burner D. Accusimmer® burner WCG51US6D A. Standard burner B. SpeedHeat™ burner C. Accusimmer® burner D. Standard burner E. Standard burner WCG9 A. Standard burner B. FlexHeat™ burner C. Accusimmer® Plus burner D. Standard burner E. Standard burner Burner Head Placement ■ Burner caps and heads are included with your cooktop. ■ Always match the burner head size to the cap size. ■ Always line up the hole in the burner head to the electrode. ■ The cooktop comes with an extra Melt cap on WCG9 series models. This is a large cap with "MELT" and "FOR SMALLEST BURNER" printed on it. Use this cap over the smallest burner only. ■ Standard, SpeedHeat™ and FlexHeat™ burners are similar in assembly. Note that there is no hole in the FlexHeat™ dual flame burner head to insert the electrode. The FlexHeat™ burner electrode (C) aligns with the semicircle notch in the head (B). Grate Placement To install the grates, align the feet on the center grate with the indents on the cooktop. Then install the 2 outer grates by aligning the tabs on the center grate with the slots in the outer grates. Be sure to line up the slots and tabs for proper grate alignment. A B C Standard and SpeedHeat™ Burners A. Cap B. Head C. Electrode A B C FlexHeat™ Burner A. Cap B. Head C. Electrode A B A. Outer grate slot B. Center grate tab 3
-
 1
1 -
 2
2 -
 3
3 -
 4
4 -
 5
5 -
 6
6 -
 7
7 -
 8
8 -
 9
9 -
10
-
11
-
12
-
13
-
14
-
15
-
16
 |
 |
