Whirlpool WDF550SAAW Installation Guide - Page 9
Warning
 |
View all Whirlpool WDF550SAAW manuals
Add to My Manuals
Save this manual to your list of manuals |
Page 9 highlights
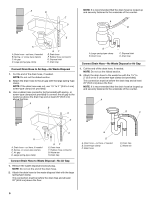
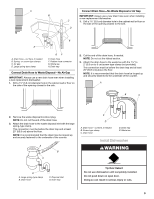
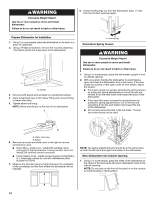
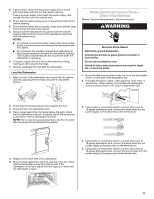
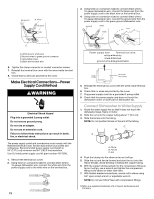
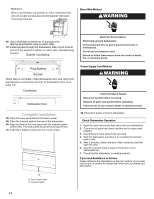
A B Connect Drain Hose-No Waste Disposal or Air Gap IMPORTANT: Always use a new drain hose even when installing a new replacement dishwasher. C 1. Drill a 1¹⁄₂" (3.8 cm) diameter hole in the cabinet wall or floor on the side of the opening closest to the sink. D - E H A. Drain hose-cut here, if needed B. Spring- or screw-type clamps C. Air gap D. Large spring-type clamp GF E. Drain hose F. Rubber hose connector G. Waste tee H. Drain trap Connect Drain Hose to Waste Disposal-No Air Gap IMPORTANT: Always use a new drain hose even when installing a new replacement dishwasher. 1. Drill a 1¹⁄₂" (3.8 cm) diameter hole in the cabinet wall or floor on the side of the opening closest to the sink. - 2. Cut the end of the drain hose, if needed. NOTE: Do not cut the ribbed section. 3. Attach the drain hose to the waste tee with the 1¹⁄₂" to 2" (3.8 cm to 5 cm) screw-type clamp (not provided). This connection must be before the drain trap and at least 20" (50.8 cm) above the floor. NOTE: It is recommended that the drain hose be looped up and securely fastened to the underside of the counter. A B C 2. Remove the waste disposal knockout plug. NOTE: Do not cut the end of the drain hose. 3. Attach the drain hose to the waste disposal inlet with the large spring-type clamp. This connection must be before the drain trap and at least 20" (50.8 cm) above the floor. NOTE: It is recommended that the drain hose be looped up and securely fastened to the underside of the counter. A B C E D A. Drain hose-cut here, if needed B. Screw-type clamp C. Drain hose D. Drain trap E. Waste tee Install Dishwasher WARNING D A. Large spring-type clamp B. Drain hose C. Disposal inlet D. Drain trap Tip Over Hazard Do not use dishwasher until completely installed. Do not push down on open door. Doing so can result in serious injury or cuts. 9
-
 1
1 -
2
-
3
-
 4
4 -
 5
5 -
 6
6 -
 7
7 -
 8
8 -
 9
9 -
 10
10 -
 11
11 -
 12
12 -
 13
13 -
 14
14 -
15
-
16
-
17
-
18
-
19
-
20
-
21
-
22
-
23
-
24
-
25
-
26
-
27
-
28
-
29
 |
 |
