Whirlpool WFE775H0HW Owners Manual - Page 10
Home Canning, Oven Use, Electronic Oven Controls
 |
View all Whirlpool WFE775H0HW manuals
Add to My Manuals
Save this manual to your list of manuals |
Page 10 highlights
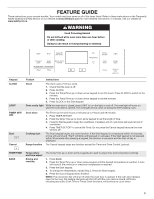
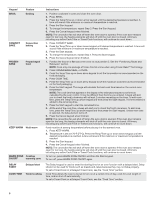
Home Canning Canning can be performed on a glass smooth-top cooking surface or traditional coil element cooktop. When canning for long periods, alternate the use of surface cooking areas or elements between batches. This allows time for the most recently used areas to cool. ■■ Center the canner on the largest surface cooking area or element. On electric cooktops, canners should not extend more than 1/2" (13 mm) beyond the surface cooking area or element. ■■ Do not place canner on 2 surface cooking areas or elements at the same time. ■■ On ceramic glass models, use only flat-bottomed canners to avoid damage to the cooktop and elements. ■■ For more information, contact your local agricultural extension office or refer to published home canning guides. Companies that manufacture home canning products can also offer assistance. OVEN USE Odors and smoke are normal when the oven is used the first few times or when it is heavily soiled. IMPORTANT: The health of some birds is extremely sensitive to the fumes given off. Exposure to the fumes may result in death to certain birds. Always move birds to another closed and well‑ventilated room. NOTE: The convection fan will shut off when the oven door is opened. If the oven door remains open for too long, the heating elements will shut off until the oven door is closed. All timers, including any active Cook Time or Timed Cook functions, will continue to count down. Electronic Oven Controls Control Display The display will flash when powered up or after a power loss. Press the Cancel keypad to clear. When oven is not in use, the time of day is displayed. Fahrenheit and Celsius The temperature is preset at Fahrenheit, but it can be changed to Celsius. To change: Press and hold the Temp/Time up arrow keypad for 5 seconds. "°C" or "°F" will appear on the display. Repeat to change back. To exit mode, press the Cancel keypad. Keypress Tones Activates or turns off the tones when a keypad is pressed. To change: Press and hold LIGHT for 5 seconds. Repeat to change back. To exit mode, press the Cancel keypad. Demo Mode IMPORTANT: This feature is intended for use on the sales floor with a 120V power connection and permits the control features to be demonstrated without heating elements turning on. If this feature is activated, the oven will not work. To change: Press the Cancel keypad, the Cancel keypad, the Temp/Time up arrow keypad, and TIMER SET/OFF. Repeat to change back and end Demo mode. Tones Tones are audible signals, indicating the following: Basic Functions One tone ■■ Valid keypad press ■■ Oven is preheated (long tone) ■■ Function has been entered ■■ Reminder (on some models), repeating every 20 seconds after the end-of-cycle tones Three tones ■■ Invalid keypad press Four tones ■■ End of cycle Oven Temperature Control IMPORTANT: Do not use a thermometer to measure oven temperature. Elements will cycle on and off as needed to provide consistent temperature but may run slightly hot or cool at any point in time due to this cycling. Most thermometers are slow to react to temperature change and will not provide an accurate reading due to this cycling. The oven provides accurate temperatures; however, it may cook faster or slower than your previous oven, so the temperature can be adjusted to personalize it for your cooking needs. It can be changed in Fahrenheit or Celsius. To Adjust Oven Temperature: 1. Press and hold the Temp/Time down arrow keypad for 5 seconds until the oven display shows the current setting, for example "0°F CAL" or "00." 2. Press the Temp/Time up or down arrow keypad to increase or decrease the temperature in 5°F (3°C) amounts. The adjustment can be set between 30°F (18°C) and -30°F (-18°C). 3. Press the Start keypad. 10
-
 1
1 -
2
-
3
-
4
-
 5
5 -
 6
6 -
 7
7 -
 8
8 -
 9
9 -
 10
10 -
 11
11 -
 12
12 -
 13
13 -
 14
14 -
 15
15 -
16
-
17
-
18
-
19
-
20
-
21
-
22
-
23
-
24
-
25
-
26
-
27
-
28
-
29
-
30
-
31
-
32
-
33
-
34
-
35
-
36
-
37
-
38
-
39
-
40
-
41
-
42
-
43
-
44
-
45
-
46
-
47
-
48
-
49
-
50
-
51
-
52
-
53
-
54
-
55
-
56
-
57
-
58
-
59
-
60
-
61
-
62
-
63
-
64
-
65
-
66
-
67
-
68
 |
 |
