Whirlpool WGD6600VW Use and Care Guide - Page 13
Complete Installation - parts
 |
UPC - 883049141237
View all Whirlpool WGD6600VW manuals
Add to My Manuals
Save this manual to your list of manuals |
Page 13 highlights
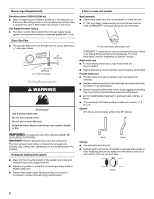
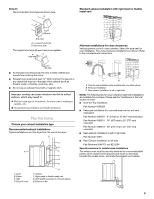
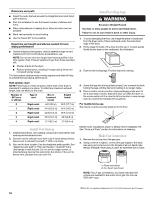
Reverse the strike 1. Remove the door strike from the dryer door opening. 2. Remove the cosmetic screw opposite the door strike. A B 5. Install screws in the top hinge holes in the door. Do not tighten screws. Leave approximately ¼" (5 mm) of screw exposed. A A A. Door strike B. Cosmetic screw 3. Reinstall the door strike and cosmetic screw on the opposite side of the dryer door opening from where they were removed. NOTE: Door strike and plugs must be on the same side of the dryer door opening. Reinstall the door 1. Remove the 4 screws and 2 hinges from the dryer door. 2. Replace the 4 screws in the same holes. A. Install these screws first. 6. Hang door by placing screw heads into top slotted holes of hinges and slide door down. Align bottom screw holes in hinge and door. Install two bottom screws. Tighten all hinge screws. 3. Remove the 4 screws from the opposite side of the door. 7. Close door to engage door strike. Complete Installation 1. Check that all parts are now installed. If there is an extra part, go back through the steps to see which step was skipped. 2. Check that you have all of your tools. 3. Dispose of/recycle all packaging materials. 4. Be sure the water faucets are on. 5. Check for leaks around "Y" connector, faucet, and hoses. 6. Check the dryer's final location. Be sure the vent is not crushed or kinked. 4. Install the 2 hinges to the front panel of the dryer using 4 screws. Use the non-slotted side to attach the hinge to the front panel. 13
-
 1
1 -
2
-
3
-
4
-
5
-
6
-
7
-
 8
8 -
 9
9 -
 10
10 -
 11
11 -
 12
12 -
 13
13 -
 14
14 -
 15
15 -
 16
16 -
 17
17 -
 18
18 -
19
-
20
-
21
-
22
-
23
-
24
-
25
-
26
-
27
-
28
-
29
-
30
-
31
-
32
-
33
-
34
-
35
-
36
-
37
-
38
-
39
-
40
-
41
-
42
-
43
-
44
-
45
-
46
-
47
-
48
-
49
-
50
-
51
-
52
 |
 |
