Whirlpool WOEC5030LW Owners Manual - Page 16
Replace Oven Door(s
 |
View all Whirlpool WOEC5030LW manuals
Add to My Manuals
Save this manual to your list of manuals |
Page 16 highlights
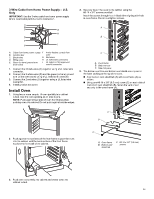
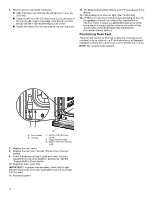
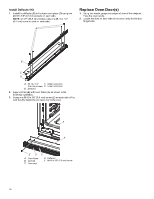
Install Deflector Kit 1. Install the deflector (B) to the lower vent piece (D) using two #8-18 x 1/4" (6.4 mm) screws on each side. NOTE: On 27" (68.6 cm) models, only one #8-18 x 1/4" (6.4 mm) screw is used on each side. A Replace Oven Door(s) 1. Using two hands, grasp side edges of door at the midpoint. Face the oven cavity. 2. Locate the slots on each side of the oven cavity for the door hinge locks. A. Slot in the oven cavity for door hinge lock B 3. Using 2 hands, grasp the edges of the oven door. At a 45° angle, insert the hinges at the same time, and push the oven door into the oven cavity slot to replace. You may need to gently shift the door from side to side as you push. C D A. #8-18 x 1/4" C. Upper vent piece (6.4 mm) screws D. Lower vent piece B. Deflector 2. Align vent tab (B) with oven frame (A) as shown in the following illustration. 3. Using one #8-18 x 3/8" (9.5 mm) screw (E) on each side of the vent tab (B), fasten the vent securely to the oven. 4. Make sure the door hinge notch is engaged on the bottom of the oven cavity slot. A IMPORTANT: Do not close the door at this step or damage B may occur to the door hinge. 5. Lower the oven door to the fully open position. If the oven door does not open to a full 90°, repeat steps 1 through 3. ED A. Oven frame B. Vent tab C. Oven vent C D. Deflector E. #8-18 x 3/8" (9.5 mm) screw 16
-
 1
1 -
2
-
3
-
4
-
5
-
6
-
7
-
8
-
9
-
10
-
 11
11 -
 12
12 -
 13
13 -
 14
14 -
 15
15 -
 16
16 -
 17
17 -
 18
18 -
 19
19 -
 20
20 -
 21
21 -
22
-
23
-
24
-
25
-
26
-
27
-
28
-
29
-
30
-
31
-
32
-
33
-
34
-
35
-
36
-
37
-
38
-
39
-
40
-
41
-
42
-
43
-
44
-
45
-
46
-
47
-
48
-
49
-
50
-
51
-
52
-
53
-
54
-
55
-
56
 |
 |
