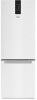
Whirlpool WRB533CZJW Owners Manual - Page 4
Dec-2019 18:58:20 Est | Released
 |
View all Whirlpool WRB533CZJW manuals
Add to My Manuals
Save this manual to your list of manuals |
Page 4 highlights
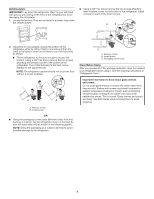
Install Levelers IMPORTANT: Lay down the refrigerator ONLY to your left-hand side (as you are looking at the front of the refrigerator) to avoid damaging the refrigerator. 1. Locate the levelers. They are enclosed in a plastic bag inside the crisper drawer. ■■ Using a 3/8" hex driver, remove the two screws attaching each wooden runner to the bottom of the refrigerator. Install a leveler to each of the front corners. A B 2. Using two or more people, access the bottom of the refrigerator either by tilting it first to one side and then the other or by laying it down on the floor to your left-hand side as shown. ■■ Tilt the refrigerator to the side enough to access the bottom. Using a 3/8" hex driver, remove the two screws attaching the wooden runner to the bottom of the refrigerator. Then install a leveler to the front corner. Repeat for the opposite side. NOTE: The refrigerator cabinet should not touch the floor without a leveler installed. A B A. Remove runner. B. Install leveler. OR ■■ Using the packaging corner posts (left-hand side, front and back) as a cushion, lay the refrigerator down on the floor (to your left-hand side only) as shown in the following graphic. NOTE: Using the packaging as a cushion will help to avoid possible damage to the refrigerator. C A. Remove runner. B. Install leveler. C. Packaging corner post. Clean Before Using After you remove all of the package materials, clean the inside of your refrigerator before using it. See the cleaning instructions in "Refrigerator Care." Important information to know about glass shelves and covers: Do not clean glass shelves or covers with warm water when they are cold. Shelves and covers may break if exposed to sudden temperature changes or impact, such as bumping. Tempered glass is designed to shatter into many small, pebble-size pieces. This is normal. Glass shelves and covers are heavy. Use both hands when removing them to avoid dropping. 03-Dec-2019 18:58:20 EST | RELEASED 4 In some European factories the letter "W" of the part code mentioned herein will be automatically replaced by the number "4000" (e.g. "W12345678" becomes "400012345678")
-
 1
1 -
 2
2 -
 3
3 -
 4
4 -
 5
5 -
 6
6 -
 7
7 -
 8
8 -
 9
9 -
 10
10 -
11
-
12
-
13
-
14
-
15
-
16
-
17
-
18
-
19
-
20
-
21
-
22
-
23
-
24
-
25
-
26
-
27
-
28
-
29
-
30
 |
 |
