Whirlpool WRF736SDAM Use & Care Guide - Page 13
Remove the Handles - 10
 |
View all Whirlpool WRF736SDAM manuals
Add to My Manuals
Save this manual to your list of manuals |
Page 13 highlights
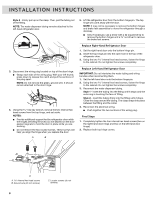
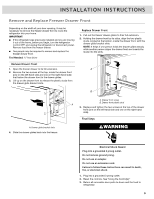
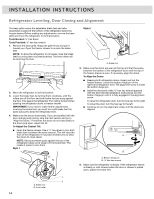
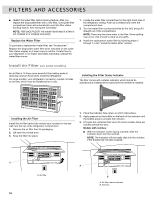
INSTALLATION INSTRUCTIONS 4. While holding the handle, insert the short end of the hex key into the upper hole and slightly rotate the hex key until it is engaged in the setscrew. 10. Firmly push the handle toward the drawer until the handle base is flush against the drawer. 11. Insert the short end of the hex key into the left-hand hole and slightly rotate the hex key until it is engaged in the setscrew. 5. Using a clockwise motion tighten the setscrew just until it begins to contact the shoulder screw. Do not fully tighten. 6. Repeat steps 4 and 5 to fasten the lower setscrew. 7. Once both setscrews have been partially tightened as instructed in the previous steps, fully tighten both setscrews. IMPORTANT: When the screws feel tight, tighten them an additional quarter-turn. The handle is not properly installed without this extra tightening. 8. Repeat steps 2 through 7 to install the other handle onto the adjacent refrigerator door. 9. With the freezer drawer closed, place the handle onto the shoulder screws so that the setscrews are facing down toward the floor. A B 12. Using a left to right motion tighten the setscrew a quarter-turn at a time just until it begins to contact the shoulder screw. Do not fully tighten. 13. Repeat steps 11 and 12 to fasten the right-hand setscrew to the shoulder screw. 14. Once both setscrews have been partially tightened as instructed in the previous steps, fully tighten both setscrews. IMPORTANT: When the screws feel tight, tighten them an additional quarter-turn. The handle is not properly installed without this extra tightening. 15. Save the hex key and all instructions. Remove the Handles 1. While holding the handle, insert the short end of the hex key into a setscrew hole and slightly rotate the hex key until it is engaged in the setscrew. 2. Using a right to left motion loosen the setscrew a quarter-turn at a time. 3. Repeat steps 1 and 2 for the other setscrew. Slowly pull the handle away from the door or drawer. 4. If necessary, use a Phillips screwdriver to remove the shoulder screws from the door. A. Shoulder screw B. Setscrews inside the handle 13
-
 1
1 -
2
-
3
-
4
-
5
-
6
-
7
-
 8
8 -
 9
9 -
 10
10 -
 11
11 -
 12
12 -
 13
13 -
 14
14 -
 15
15 -
 16
16 -
 17
17 -
 18
18 -
19
-
20
-
21
-
22
-
23
-
24
-
25
-
26
-
27
-
28
-
29
-
30
-
31
-
32
-
33
-
34
-
35
-
36
-
37
-
38
-
39
-
40
-
41
-
42
-
43
-
44
-
45
-
46
-
47
-
48
-
49
-
50
-
51
-
52
-
53
-
54
-
55
-
56
-
57
-
58
-
59
-
60
-
61
-
62
-
63
-
64
-
65
-
66
-
67
-
68
-
69
-
70
-
71
-
72
-
73
-
74
-
75
-
76
-
77
-
78
-
79
-
80
-
81
-
82
-
83
-
84
-
85
-
86
-
87
-
88
-
89
-
90
-
91
-
92
-
93
-
94
-
95
-
96
-
97
-
98
-
99
-
100
-
101
-
102
-
103
-
104
-
105
-
106
-
107
-
108
-
109
-
110
-
111
-
112
-
113
-
114
-
115
-
116
-
117
-
118
-
119
-
120
-
121
-
122
-
123
-
124
 |
 |
