Whirlpool WRS571CIDM Installation Guide - Page 9
Complete the Installation, Leveling and Door Closing
 |
View all Whirlpool WRS571CIDM manuals
Add to My Manuals
Save this manual to your list of manuals |
Page 9 highlights
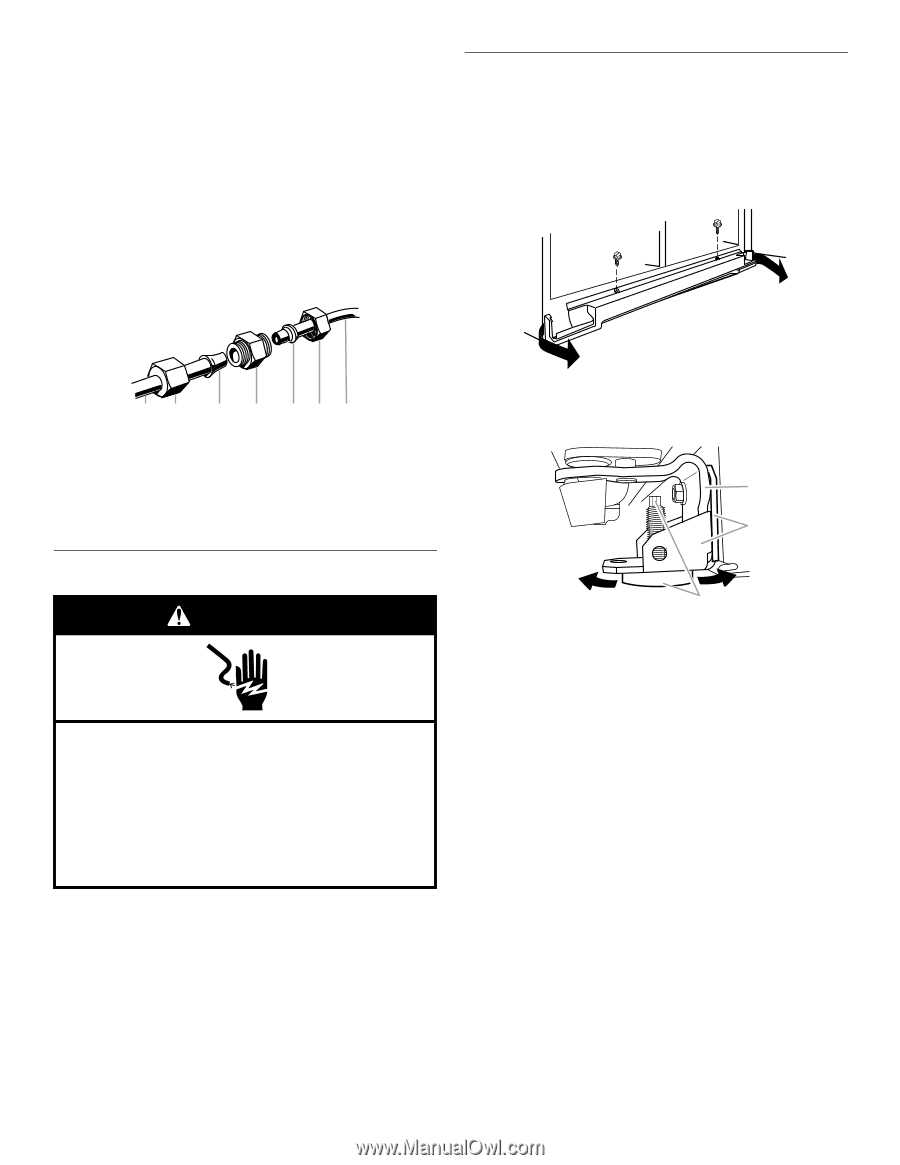
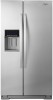
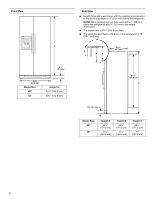
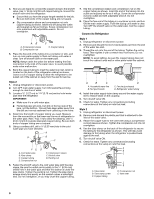
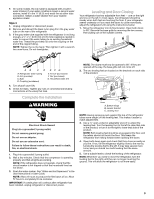
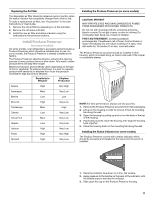
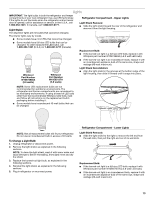
7. On some models, the ice maker is equipped with a built-in water strainer. If your water conditions require a second water strainer, install it in the ¹⁄₄" (6.35 mm) water line at either tube connection. Obtain a water strainer from your nearest appliance dealer. Style 3 1. Unplug refrigerator or disconnect power. 2. Remove and discard the black nylon plug from the gray water tube on the rear of the refrigerator. 3. If the gray water tube supplied with the refrigerator is not long enough, a ¹⁄₄" x ¹⁄₄" (6.35 mm x 6.35 mm) coupling is needed in order to connect the water tubing to an existing household water line. Thread the provided nut onto the coupling on the end of the copper tubing. NOTE: Tighten the nut by hand. Then tighten it with a wrench two more turns. Do not overtighten. Leveling and Door Closing Your refrigerator has two adjustable front feet - one on the right and one on the left. In most cases, the refrigerator should be steady when both feet are touching the floor. If your refrigerator seems unsteady or if you want the doors to close more easily, adjust the refrigerator's tilt using the instructions below: 1. Move the refrigerator into its final location. Open both doors to 90°. Remove the base grille by removing the two screws, then pulling out on the outside corners. AB CD A. Refrigerator water tubing B. Nut (provided) C. Bulb D. Coupling (purchased) EFG E. Ferrule (purchased) F. Nut (purchased) G. Household water line 4. Turn shutoff valve ON. 5. Check for leaks. Tighten any nuts or connections (including connections at the valve) that leak. Complete the Installation WARNING Electrical Shock Hazard Plug into a grounded 3 prong outlet. Do not remove ground prong. Do not use an adapter. Do not use an extension cord. Failure to follow these instructions can result in death, fire, or electrical shock. 1. Plug into a grounded 3 prong outlet. 2. Wait a few minutes. Check that the compressor is operating properly and that all lights are working. NOTE: If the refrigerator does not operate, check that the circuit breaker is not tripped or that the household fuse has not blown. 3. Flush the water system. See "Water and Ice Dispensers" in the User Instructions or User Guide. NOTE: Allow 24 hours to produce the first batch of ice. Allow 72 hours to completely fill ice container. IMPORTANT: If construction will continue after refrigerator has been installed, unplug refrigerator or disconnect power. NOTE: The doors must only be opened to 90°. If they are opened all the way, the base grille will not come off. 2. The two leveling feet are located on the brackets on each side of the product. A B Raise Lower C A. Bottom hinge B. Leveler bracket C. Leveling foot NOTE: Having someone push against the top of the refrigerator takes some weight off the leveling feet. This makes it easier to make adjustments. 3. Use a ¹⁄₄" open-ended or adjustable wrench to adjust the leveling feet. Turn the leveling foot to the left to raise that side of the product, or turn it to the right to lower that side of the product. NOTE: Both leveling feet should be snug against the floor, and the rollers should not touch the floor. This keeps the refrigerator from rolling forward when opening the doors. 4. Open both doors again and check that they close as easily as you like. If not, tilt the refrigerator slightly more to the rear by turning the leveling feet to the left. It may take several more turns, and you should turn both leveling feet the same amount. 5. Use a bubble level to check the leveling of the refrigerator. NOTE: Whenever you need to move the refrigerator, turn the leveling feet to the right until they are no longer touching the ground. This will allow the refrigerator to roll more easily. 9
-
 1
1 -
2
-
3
-
 4
4 -
 5
5 -
 6
6 -
 7
7 -
 8
8 -
 9
9 -
 10
10 -
 11
11 -
 12
12 -
 13
13 -
 14
14 -
15
-
16
-
17
-
18
-
19
-
20
-
21
-
22
-
23
-
24
-
25
-
26
-
27
-
28
-
29
-
30
-
31
-
32
-
33
-
34
-
35
-
36
-
37
-
38
-
39
-
40
-
41
-
42
-
43
-
44
-
45
-
46
-
47
-
48
-
49
-
50
-
51
-
52
-
53
-
54
-
55
-
56
-
57
-
58
-
59
-
60
-
61
-
62
-
63
-
64
 |
 |