Whirlpool YWFE361LVQ User Manual - Page 11
Accessories
 |
View all Whirlpool YWFE361LVQ manuals
Add to My Manuals
Save this manual to your list of manuals |
Page 11 highlights
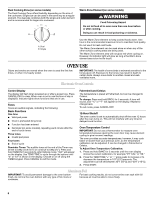
Oven will not operate ■ Is the electronic oven control set correctly? See "Electronic Oven Controls" section. ■ Has a delay start been set? See "Timed Cooking" section. ■ On some models, is the oven control lockout set? See the "Lock Hold 3 Sec" keypad feature in the "Feature Guide" section. Oven temperature too high or too low ■ Does the oven temperature calibration need adjustment? See "Oven Temperature Control" section of the "Electronic Oven Controls" section. Oven indicator lights flash ■ Do the oven indicator lights flash? See "Control Display" in the "Electronic Oven Controls" section. If the indicator light(s) keeps flashing, call for service. See cover for contact information. Display shows messages ■ Is the display showing a flashing time? There has been a power failure. Clear the display. On some models, reset the clock, if needed. See "Clock" keypad feature in the "Feature Guide" section. ■ Is the display showing a letter followed by a number? Depending on your model, press OFF/CANCEL or CANCEL/ OFF to clear the display. See "Control Display" in the "Electronic Oven Controls" section. If it reappears, call for service. See cover for contact information. ■ Is the display showing a flashing "PUSH?" or "PSH"? See the "Start" keypad feature in the "Feature Guide" section. Self-Cleaning cycle will not operate ■ Is the oven door open? Close the oven door all the way. ■ Has the function been entered? See "Self-Cleaning Cycle" section. ■ Has a delay start been set? See "Timed Cooking" section. Oven cooking results not what expected ■ Is the range level? Level the range. See the Installation Instructions. ■ Is the proper temperature set? Double-check the recipe in a reliable cookbook. ■ Is the proper oven temperature calibration set? See "Oven Temperature Control" section of the "Electronic Oven Controls" section. ■ Was the oven preheated? See "Baking and Roasting" section. ■ Are the racks positioned properly? See "Positioning Racks and Bakeware" section. ■ Is there proper air circulation around bakeware? See "Positioning Racks and Bakeware" section. ■ Is the batter evenly distributed in the pan? Check that batter is level in the pan. ■ Is the proper length of time being used? Adjust cooking time. ■ Has the oven door been opened while cooking? Oven peeking releases oven heat and can result in longer cooking times. ■ Are baked items too brown on the bottom? Move rack to higher position in the oven. ■ Are pie crust edges browning early? Use aluminum foil to cover the edge of the crust and/or reduce baking temperature. Canning Unit Kit (coil element models) Order Part Number 242905 Cooktop Care Kit (includes cleaner, protectant, and applicator pads) Order Part Number 31605B Cooktop Protectant Order Part Number 31463B ACCESSORIES Cooktop Cleaner (ceramic glass models) Order Part Number 31464B Cooktop Scraper (ceramic glass models) Order Part Number WA906B Stainless Steel Cleaner and Polish (stainless steel models) Order Part Number 31462B All-Purpose Appliance Cleaner Order Part Number 31682B Split-Rack with Removable Insert Order Part Number 4396927 Broiler Pan Order Part Number 4396923 11
-
 1
1 -
2
-
3
-
4
-
5
-
 6
6 -
 7
7 -
 8
8 -
 9
9 -
 10
10 -
 11
11 -
 12
12 -
 13
13 -
 14
14 -
 15
15 -
 16
16 -
17
-
18
-
19
-
20
-
21
-
22
-
23
-
24
-
25
-
26
-
27
-
28
 |
 |
