Xerox 2006NPC DocuColor 2006 Performing Setup from the Printer Control Panel
Xerox 2006NPC - DocuColor Color Laser Manual
 |
UPC - 042215475440
View all Xerox 2006NPC manuals
Add to My Manuals
Save this manual to your list of manuals |
Xerox 2006NPC manual content summary:
- Xerox 2006NPC | DocuColor 2006 Performing Setup from the Printer Control Panel - Page 1
to perform the following functions: • Set up the print functions • Specify network information and network protocol options • Perform Network Services Setup • Print information pages After network communication settings have been established, you can specify additional Setup options from a client - Xerox 2006NPC | DocuColor 2006 Performing Setup from the Printer Control Panel - Page 2
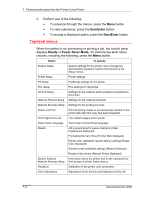
Settings for the network and/or parallel connections to the printer Network Protocol Setup Settings for the network protocols Network Services Setup Settings for the printing services Check and Print Print remaining copies or processed jobs stored on the printer disk after first copy has been - Xerox 2006NPC | DocuColor 2006 Performing Setup from the Printer Control Panel - Page 3
7. Performing the setup from the Printer Control Panel System Setup Use this procedure for first-time setup if no password has been set. 1. Press the Offline button and press the Menu button until System Setup is displayed. 2. Press the Item/Enter button to display the following options. Enter - Xerox 2006NPC | DocuColor 2006 Performing Setup from the Printer Control Panel - Page 4
7. Performing the setup from the Printer Control Panel To enter a new password, use the up arrow button to scroll through characters and the right arrow button to move from left to right, from character to character. To delete a character, use the left arrow button. The password can be any - Xerox 2006NPC | DocuColor 2006 Performing Setup from the Printer Control Panel - Page 5
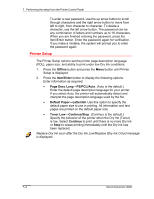
7. Performing the setup from the Printer Control Panel PostScript Setup The PostScript setup menus enable you to set PostScript printing options. 1. Press the Offline button and press the Menu button until PS Setup is displayed. 2. Press the Item/Enter button to display the following options. Enter - Xerox 2006NPC | DocuColor 2006 Performing Setup from the Printer Control Panel - Page 6
7. Performing the setup from the Printer Control Panel PCL Setup The PCL setup menus enable you to set PCL printing options. PCL is available only when printing from Windows workstations. 1. Press the Offline button and press the Menu button until PCL Setup is displayed. 2. Press the Item/Enter - Xerox 2006NPC | DocuColor 2006 Performing Setup from the Printer Control Panel - Page 7
7. Performing the setup from the Printer Control Panel Specify network information 1. Press the Offline button and press the Menu button until the I/O Port Setup option is displayed. 2. Press the Item/Enter button to display the following options. Enter information as required: • Ethernet-Off/On. ( - Xerox 2006NPC | DocuColor 2006 Performing Setup from the Printer Control Panel - Page 8
7. Performing the setup from the Printer Control Panel Specify network protocol options Network Protocol Setup options are used to specify and set up TCP/IP Ethernet, AppleTalk, and IPX (Novell) network protocols. 1. Press the Offline button and press the Menu button until the Network Protocol Setup - Xerox 2006NPC | DocuColor 2006 Performing Setup from the Printer Control Panel - Page 9
NetWare file servers if you connect to more than one) and the printer: • Auto Frame Type-Yes/No (the default is Yes). Select No to manually determine the frame type. • Ethernet 802.3-Yes/No (The default is No). Select Yes to enable Ethernet 802.3. • Ethernet 802.2-Yes/No (The default is - Xerox 2006NPC | DocuColor 2006 Performing Setup from the Printer Control Panel - Page 10
Item/Enter button until the Enable PServer option is displayed. 3. Select Yes or No. (No is the default.) PServer is a program on the printer that services all the Novell print queues assigned to the printer. Select Yes if you have a Novell network connected to the printer and if you have already - Xerox 2006NPC | DocuColor 2006 Performing Setup from the Printer Control Panel - Page 11
7. Performing the setup from the Printer Control Panel 6. If you answered Yes, you may start to browse when the Find Login screen is displayed. Press Item/Enter when you find the desired object. 7. Use the up and down arrow buttons to scroll through options. To display objects below the level of the - Xerox 2006NPC | DocuColor 2006 Performing Setup from the Printer Control Panel - Page 12
7. Performing the setup from the Printer Control Panel 14. Use the up and down arrow buttons to scroll through the list of available print servers. After selecting a server, press Item/Enter. If the print server login requires a password, the Enter Password screen displays. Use the up and down arrow - Xerox 2006NPC | DocuColor 2006 Performing Setup from the Printer Control Panel - Page 13
Setup option is displayed. 2. Press the Item/Enter button until the Enable Bindery option is displayed. Use this option to enable bindery emulation services. The Bindery Settings screens displays. 3. Use the up and down arrow buttons to scroll through the menu options. Select one of the following - Xerox 2006NPC | DocuColor 2006 Performing Setup from the Printer Control Panel - Page 14
7. Performing the setup from the Printer Control Panel 4. If a password is required to login to the server, the File Servr Login screen is displayed. Use the up and down arrow buttons to view the list of options. Press Item/Enter to accept an option. 5. When the Server Password screen is displayed, - Xerox 2006NPC | DocuColor 2006 Performing Setup from the Printer Control Panel - Page 15
can be run on Windows 95/98, Windows 2000, and Windows NT. 1. Press the Offline button and press the Menu button until the Network Services Setup option is displayed. 2. Press the Item/Enter button until the Enable SMB option is displayed. Use this option to enable network communication using SMB - Xerox 2006NPC | DocuColor 2006 Performing Setup from the Printer Control Panel - Page 16
Page This page enables you to confirm that the printer is properly connected. The page includes samples of color that you can use to troubleshoot printing problems as well as such information as printer name, enabled network protocols and amount of memory. 1. Power on the printer and allow it to
-
 1
1 -
 2
2 -
 3
3 -
 4
4 -
 5
5 -
 6
6 -
 7
7 -
8
-
9
-
10
-
11
-
12
-
13
-
14
-
15
-
16
 |
 |

Xerox DocuColor 2006
7–1
Performing the setup from the
Printer Control Panel
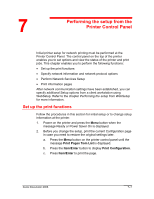
Initial printer setup for network printing must be performed at the
Printer Control Panel. The control panel on the top of the printer
enables you to set options and view the status of the printer and print
jobs. This chapter enables you to perform the following functions:
•
Set up the print functions
•
Specify network information and network protocol options
•
Perform Network Services Setup
•
Print information pages
After network communication settings have been established, you can
specify additional Setup options from a client workstation using
WebSetup. Refer to the chapter
Performing the setup from WebSetup
for more information.
Set up the print functions
Follow the procedures in this section for initial setup or to change setup
information at the printer.
1.
Power on the printer and press the
Menu
button when the
message Ready or Power Saver On is displayed.
2.
Before you change the setup, print the current Configuration page
in case you need to restore the original settings later.
a.
Press the
Menu
button on the printer control panel until the
message
Print Pages from List
is displayed.
b.
Press the
Item/Enter
button to display
Print Configuration
.
c.
Press
Item/Enter
to print the page.
7