Xerox C2424 User Guide Section 3: Copying - Page 9
Lightening or Darkening the Image, Adjusting the Contrast of the Image
 |
UPC - 095205676532
View all Xerox C2424 manuals
Add to My Manuals
Save this manual to your list of manuals |
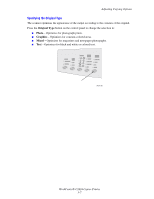
Page 9 highlights
Adjusting Copying Options 3. Select one of the following, then press the Enter button: ■ 100% - Keeps the copy image the same size as the original. (Factory default value). ■ Auto - Reduces or enlarges the image as needed to fit the full size of the copy paper. ■ Preset - Reduces or enlarges the image as needed to fit a selected copy paper size. ■ 25%-400% - Reduces or enlarges the image by a selected percentage. ■ Poster 4x4 - Enlarges the image to fit onto 16 copy pages so that it can be assembled into a 4x4 poster. 4. If you selected Preset, select the preset value, the size of the original followed by the size of the copy paper. 5. If you selected 25%-400%, use the keypad to enter a value from 25% to 400% (in 1% increments) or press the Up Arrow or Down Arrow button to scroll to the desired value, then press the Enter button. Lightening or Darkening the Image To lighten or darken the image when it is copied: 1. On the control panel, press the Copy button. 2. In the menu, select Lighten/Darken, then press the Enter button. Note You can press the Lighten/Darken shortcut button on the control panel to skip Steps 1 and 2. 3. Press the Up Arrow or Down Arrow button to scroll to a whole number from Darkest (+3) to Lightest (-3), then press the Enter button. Adjusting the Contrast of the Image To reduce or increase the contrast of the image when it is copied: 1. On the control panel, press the Copy button. 2. In the menu, select Contrast, then press the Enter button. 3. Press the Up Arrow or Down Arrow button to scroll to a whole number from Highest (+3) to Lowest (-3), then press the Enter button. The factory default is 0. Automatically Suppressing Background Variations Sometimes, two-sided originals on thin paper show some of the text or images from the back side of the paper. To improve your copies from this type of original, use the Auto Suppression setting to minimize the sensitivity of the scanner to variations in light background colors. To change this setting: 1. On the control panel, press the Copy button. 2. In the menu, select Auto Suppression, then press the Enter button. 3. Select either On or Off, then press the Enter button. The factory default is Off. WorkCentre® C2424 Copier-Printer 3-9
-
 1
1 -
2
-
3
-
 4
4 -
 5
5 -
 6
6 -
 7
7 -
 8
8 -
 9
9 -
 10
10 -
 11
11 -
 12
12 -
 13
13 -
 14
14 -
15
-
16
-
17
-
18
-
19
 |
 |
