Yamaha 505 Reference Manual
Yamaha 505 Manual
 |
View all Yamaha 505 manuals
Add to My Manuals
Save this manual to your list of manuals |
Yamaha 505 manual content summary:
- Yamaha 505 | Reference Manual - Page 1
CVP-509 / 505 / 503 / 501 Reference Manual This Reference Manual explains advanced features of the CVP-509/505/503/501 that are not explained in the Owner's Manual. Please read the Owner's Manual first, before reading this Reference Manual. EN - Yamaha 505 | Reference Manual - Page 2
Global Settings - 95 CONFIG1 95 CONFIG2 97 SCREEN OUT CVP-509 CVP-505 98 MEDIA 98 OWNER 99 SYSTEM RESET 100 Index 102 * Each chapter in this Reference Manual corresponds to the relevant chapters in the Owner's Manual. Using the PDF manual • To quickly jump to items and topics of interest - Yamaha 505 | Reference Manual - Page 3
! (CVP-509/505) MegaVoice (CVP-509/505/503) Natural! Live! Cool! See the Owner's Manual, chapter 2. These rich and luscious Voices are comprised mostly of keyboard instrument sounds and are especially intended for playing piano and other keyboard parts. They also take full advantage of Yamaha - Yamaha 505 | Reference Manual - Page 4
organ Voice lets you use the Voice Set to CVP-509/505) You can find the "Legacy" folder in this display. This folder contains previous Yamaha Clavinova Voices (such as CVP-409, 407 etc.) for data compatibility with other models. 6 Select the desired Voice. 4 CVP-509/505/503/501 Reference Manual - Yamaha 505 | Reference Manual - Page 5
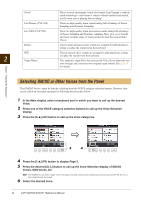
up the operation display by pressing the [J] (TYPE SELECT) button. 4 Use the [1 ▲▼]-[3 ▲▼] buttons to select the Harmony/Echo type. The Harmony/ Style playback) (for the Voice) Chord section for Style playback and Harmony effect LEFT Voice RIGHT 1 and 2 Voices CVP-509/505/503/501 Reference Manual - Yamaha 505 | Reference Manual - Page 6
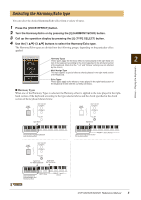
separate parts (Voices). Both of the keyboard part [RIGHT 1] and [RIGHT 2] should be turn on when using the Multi Assign effect. The Right 1 and Right 2 Voices are alternately assigned to the notes in the order you play the key strongly (above the set value). 6 CVP-509/505/503/501 Reference Manual - Yamaha 505 | Reference Manual - Page 7
-useful when you play the Clavinova along can hear this best in actual vocal used extensively during the time of Bach and Beethoven, and even now it is often used when performing period music on the harpsichord. Use these tunings when playing Arabic music. CVP-509/505/503/501 Reference Manual - Yamaha 505 | Reference Manual - Page 8
ON/OFF Select the part to which the Scale Tune setting is applied by using the [6 ▲▼]/[7 ▲▼] buttons. Then press the [8 ▲] button to add a buttons affect the pitch of keyboard played Voices and Style playback (controlled by the performance in the chord section CVP-509/505/503/501 Reference Manual - Yamaha 505 | Reference Manual - Page 9
for the ORGAN FLUTES Voices compared to other Voices. For instructions on editing the ORGAN FLUTES Voices, see page 15. 2 Press the VOICE SET) button to call up the VOICE SET display. 3 Use the TAB [E][F] buttons to call up the relevant setting display. For CVP-509/505/503/501 Reference Manual 9 - Yamaha 505 | Reference Manual - Page 10
below. NOTE The available parameters differ depending on the Voice. ■ PIANO Page This display is available only when the Natural! piano Voice (page 3) is selected. [1 ▲▼]/ TUNING [2 ▲▼] CURVE velocities are adjusted for the actual velocity effect. 10 CVP-509/505/503/501 Reference Manual - Yamaha 505 | Reference Manual - Page 11
, see page 86. 3 MODULATION When a pedal function is assigned to MODULATION, the pedal can be used to modulate the parameters below as well as the pitch (vibrato). Here, you can set the degree which the pedal modulates the amplitude, or the tremolo effect. CVP-509/505/503/501 Reference Manual 11 - Yamaha 505 | Reference Manual - Page 12
making the sound either brighter or mellower, Filter can be used to produce electronic, synthesizer-like effects. [1 ▲▼] BRIGHT. of percussion sounds, or the long release of a sustained piano tone. Level ATTACK DECAY Key on Sustain Level RELEASE Time Key CVP-509/505/503/501 Reference Manual - Yamaha 505 | Reference Manual - Page 13
about EQ, refer to page 74. ■ HARMONY Page Harmony sets the Right 1 and 2 parts together. Select the Right 1 part in the Main display, before you set it. This has the same settings as the display of "Selecting the Harmony/Echo type" page 5 in step 3. CVP-509/505/503/501 Reference Manual 13 - Yamaha 505 | Reference Manual - Page 14
→ TAB [E][F] VOICE SET 2 Use the [A]/[B] buttons to select a keyboard part. 2 2 Voices - Playing the Keyboard - 3 3 Use the [4 ▲▼]-[8 ▲▼] buttons to enable/disable automatic calling up of the settings (ON or OFF) independently for each parameter group. 14 CVP-509/505/503/501 Reference Manual - Yamaha 505 | Reference Manual - Page 15
Voice or turn the power to the instrument off without executing the Save operation. ■ FOOTAGE Page Refer to the Owner's Manual, chapter 2. ■ VOLUME/ATTACK Page 2 Same as the FOOTAGE Page. Voices - Playing the VOICE SET "EFFECT/EQ" Page explained on page 13. CVP-509/505/503/501 Reference Manual 15 - Yamaha 505 | Reference Manual - Page 16
to play. This is the Chord Tutor function. On the CHORD FINGERING display, specify the Chord Root and Chord Type by using the [6 ▲▼]-[8 ▲▼] button. The notes you need to play are shown in the display. NOTE Depending on the chord, some notes may be omitted. 16 CVP-509/505/503/501 Reference Manual - Yamaha 505 | Reference Manual - Page 17
chord types which are listed on the separate Data List booklet and can be looked up using the Chord Tutor function on page 16. 3 Styles - Playing Rhythm and This type is available only for Style playback. NOTE "AI" stands for "Artificial Intelligence." CVP-509/505/503/501 Reference Manual 17 - Yamaha 505 | Reference Manual - Page 18
→ [C] STYLE SETTING/SPLIT POINT/CHORD FINGERING → TAB [E][F] STYLE SETTING 2 Use the [1 ▲▼]-[8 ▲▼] buttons for each setting. 3 Styles - Playing data will be recorded when set to "STYLE," and only the chord data will be recorded when set to "OFF" or "FIXED." 18 CVP-509/505/503/501 Reference Manual - Yamaha 505 | Reference Manual - Page 19
the initial default tempo for the selected Style. This determines whether the Style Channel On/Off status changes or not when you change Styles. HOLD The Style Channel On/Off status of the previous Style is maintained. RESET All Style Channels are set to On. CVP-509/505/503/501 Reference Manual 19 - Yamaha 505 | Reference Manual - Page 20
] dial. [H] Split Point (L) NOTE Split Point (L) cannot be set lower than Split Point (S). [1 ▲▼]/ STYLE [2 ▲▼] [3 ▲▼]/ LEFT [4 ▲▼] You can specify each Split Point by note name. "STYLE" indicates Split Point (S) and "LEFT" indicates Split Point (L). 20 CVP-509/505/503/501 Reference Manual - Yamaha 505 | Reference Manual - Page 21
display and save the panel settings as a Style file. CAUTION The panel settings memorized to each OTS button will be lost if you change the Style or turn the power off without executing the Save operation. Styles - Playing Rhythm and Accompaniment - CVP-509/505/503/501 Reference Manual 21 - Yamaha 505 | Reference Manual - Page 22
• CHANNEL Edits data for each channel-quantizing, changing velocity, etc. See page 30. • PARAMETER Changes the settings related for Style File Format. See page 31. • EDIT Lets you enter notes one by one to create your Style (Step Recording). See page 26. 22 CVP-509/505/503/501 Reference Manual - Yamaha 505 | Reference Manual - Page 23
RECORD display again, press the [F] (REC CH) button. NOTE You can specify the sections to be recorded by using the Section buttons on the panel. Refer to step 3 on page 26. NOTE You cannot select INTRO 4 and ENDING 4 sections directly via the panel operation. CVP-509/505/503/501 Reference Manual 23 - Yamaha 505 | Reference Manual - Page 24
▼]-[8 ▼] button again. 6 7 3 7 Call up the Voice Selection display by using the [1 ▲]-[8 ▲] buttons and select the desired Voice for the corresponding recording channels. PHR2 based on the existing Style, you have to delete the original data before recording. 24 CVP-509/505/503/501 Reference Manual - Yamaha 505 | Reference Manual - Page 25
= Chord note C R C C R C C, R = Recommended note Using the data recorded here, the auto accompaniment (Style playback) is appropriately converted depending on the chord changes you make during your any appropriate chord or chord progression can be used. CVP-509/505/503/501 Reference Manual 25 - Yamaha 505 | Reference Manual - Page 26
, MAIN, ENDING, etc.) on the panel. Then change the section as desired by using the [6 ▲▼]/[7 ▲▼] buttons and actually enter the selection by pressing the [8 ▲] (OK) button. NOTE You cannot select INTRO 4 and ENDING 4 sections directly via the panel operation. 26 CVP-509/505/503/501 Reference Manual - Yamaha 505 | Reference Manual - Page 27
Mutes the selected channel in the ASSEMBLY Page. 7 Press the [J] (SAVE) button to execute the Save operation. CAUTION The edited Style will be lost if you change to another Style or turn the power to the instrument off without executing the Save operation. CVP-509/505/503/501 Reference Manual 27 - Yamaha 505 | Reference Manual - Page 28
3 1 3 1 In the GROOVE Page, use the [A]/[B] buttons to select the edit menu, then edit the data by using the [1 ▲▼]-[8 ▲▼] buttons. Styles - Playing Rhythm and Accompaniment - 1 GROOVE This produce medium effect, and "C" types produce maximum effect. 28 CVP-509/505/503/501 Reference Manual - Yamaha 505 | Reference Manual - Page 29
changes to "UNDO," letting you restore the original data if you are not satisfied with the Style will be lost if you change to another Style or turn the power to the instrument off without executing the Save operation. Styles - Playing Rhythm and Accompaniment - CVP-509/505/503/501 Reference Manual - Yamaha 505 | Reference Manual - Page 30
at the upper left of the display. 3 Use the [4 ▲▼]-[8 ▲▼] buttons to edit the data. 4 Press the [D] (EXECUTE) button to actually Style will be lost if you change to another Style or turn the power to the instrument off without executing the Save operation. 30 CVP-509/505/503/501 Reference Manual - Yamaha 505 | Reference Manual - Page 31
. NOTE The Style files created on the CVP-509/505/503/501 can only be played back on instruments which are compatible with SFF GE. 1 In the PARAMETER Page, use the [A]/[B] buttons to select the edit menu. For details of the edit menu, see page 32. 1 4 2 3 CVP-509/505/503/501 Reference Manual 31 - Yamaha 505 | Reference Manual - Page 32
key used when recording the pattern). The default setting of CM7 (with a Source Root of "C" and a Chord Type of "M7"), is automatically selected whenever the preset data is deleted prior to recording a new Style, This is not applied when NTR is set to GUITAR. 32 CVP-509/505/503/501 Reference Manual - Yamaha 505 | Reference Manual - Page 33
assigned to bass will be played back by the bass root note. Styles - Playing Rhythm and Accompaniment - NTR (Note Transposition Rule) ROOT TRANS . Use this for chord channels of Sections which respond only to major/minor chords, such as Intros and Endings. CVP-509/505/503/501 Reference Manual 33 - Yamaha 505 | Reference Manual - Page 34
intervals are raised by a semitone. Other notes are not changed. Use this for chord channels of Sections which respond only to a note range (highest and lowest notes) for Voices recorded to the Style channels. By judicious setting of this range, you can ensure CVP-509/505/503/501 Reference Manual - Yamaha 505 | Reference Manual - Page 35
. The note is retriggered with a new attack at the root note of the next chord. However, the octave of the new note remains the same. 3 Styles - Playing Rhythm and Accompaniment - CVP-509/505/503/501 Reference Manual 35 - Yamaha 505 | Reference Manual - Page 36
Channel settings, Guide Function) . . .41 • Keyboard and Vocal Practice Using the Guide Function 42 • the setting here as a part of a Song by accessing [FUNCTION] → [F] DIGITAL REC MENU → [A] SONG CREATOR → TAB [E][F] CHANNEL → [A]/[B] SETUP. See page time. 36 CVP-509/505/503/501 Reference Manual - Yamaha 505 | Reference Manual - Page 37
[3 ▲▼]/ KEY SIGNA[4 ▲▼] TURE [5 ▲▼] QUANTIZE Determines which MIDI channel in the Song data is used for the left-hand/righthand part. This setting returns to AUTO when a different Song is selected sure to select the smallest note value used in the Song. CVP-509/505/503/501 Reference Manual 37 - Yamaha 505 | Reference Manual - Page 38
" would be indicated as "Do." As with "Fixed Do," the indication differs depending on the selected language. 4 Songs - Recording Your Performances and Creating Songs - 38 CVP-509/505/503/501 Reference Manual - Yamaha 505 | Reference Manual - Page 39
the [EXIT] button to return back to the Lyrics/Text display. NOTE When the background picture is specified in the Song data, the BACKGROUND setting cannot be changed. NOTE For information on available image files, refer to the MAIN PICTURE parameter on page 99. CVP-509/505/503/501 Reference Manual 39 - Yamaha 505 | Reference Manual - Page 40
on (page 37) allows you to see the chord information. NOTE When playing back a Song and a Style at the same time, the tempo value set in the Song is automatically used. When the Song playback is stopped, the Style playback is also stopped at the same time. 40 CVP-509/505/503/501 Reference Manual - Yamaha 505 | Reference Manual - Page 41
Guide settings. These Songs are inappropriate for use with ALL or RANDOM repeat. PHRASE MARK REPEAT Phrase Mark is a pre-programmed part of some Song data, data is assigned to the Left- or Right-hand part of the Guide function and the Song Score function. CVP-509/505/503/501 Reference Manual - Yamaha 505 | Reference Manual - Page 42
- and Left hand parts pre-programmed in the commercially available Song data. Normally, this should be set to "ON." [5 ▲▼]/ LYRICS Use the [A]/[B] buttons to select the desired Guide function type. Songs - Recording Your Performances and Creating Songs - 42 CVP-509/505/503/501 Reference Manual - Yamaha 505 | Reference Manual - Page 43
above). NOTE You can save the Guide settings as a part of the Song data (page 57). For Songs to which the Guide settings have been saved, the Guide function will be automatically turned on and the related settings will be recalled when the Song is selected. CVP-509/505/503/501 Reference Manual 43 - Yamaha 505 | Reference Manual - Page 44
, letting you easily check whether the Song contains chord data or not. 1 Select a Song. In these example instructions, we recommend that you use the Songs in the "Sing-a-long" folder. 2 Call hand. Songs - Recording Your Performances and Creating Songs - 44 CVP-509/505/503/501 Reference Manual - Yamaha 505 | Reference Manual - Page 45
Owner's Manual). This section explains operations of Step Recording and re-recording or editing existing Song data. Call up the operation display. [FUNCTION] → [F] DIGITAL display. [FUNCTION] → [F] DIGITAL REC MENU → [A] SONG CREATOR → TAB [E][F] 1-16 3 4 CVP-509/505/503/501 Reference Manual 45 - Yamaha 505 | Reference Manual - Page 46
. [J] DELETE Deletes the selected data. [1 ▲▼] BAR Sets the position of the note to be entered. [2 ▲▼] BEAT [3 ▲▼] CLOCK [4 ▲▼]- [8 ▲▼] Determines the note length to be entered: whole-note, half-note, quarternote, eighth-note or sixteenth-note. 46 CVP-509/505/503/501 Reference Manual - Yamaha 505 | Reference Manual - Page 47
instrument is generated from the recorded MIDI data, it may not appear exactly the same use the [4 ▲▼]-[8 ▲▼] buttons. (Press the button once to select the rest value, and once again to actually enter it.) A rest having the specified note length will be entered. CVP-509/505/503/501 Reference Manual - Yamaha 505 | Reference Manual - Page 48
] button to exit from the Step Recording display. 7 Press the [I] (SAVE) button to execute the Save operation. CAUTION The recorded Song data will be lost if you select another Song or turn the power to the instrument off without executing the Save operation. 48 CVP-509/505/503/501 Reference Manual - Yamaha 505 | Reference Manual - Page 49
] → [F] DIGITAL REC MENU → [A] SONG CREATOR → TAB [E][F] CHORD 4 Press the [G] (STEP REC) button to call up the STEP RECORD display. 4 5 Start Step Recording. About these buttons, refer to page 46. Songs - Recording Your Performances and Creating Songs - CVP-509/505/503/501 Reference Manual 49 - Yamaha 505 | Reference Manual - Page 50
Example of Step Recording-Chords NOTE This example uses a Style in 4/4 time. 1 2 MAIN A BREAK 3 MAIN B CF G F G7 C * The numbers shown in the illustration turn the [AUTO FILL IN] button to ON, and simply press the desired MAIN VARIATION [A]-[D] button. 50 CVP-509/505/503/501 Reference Manual - Yamaha 505 | Reference Manual - Page 51
for the Main B section. 3-1 Press the STYLE CONTROL [MAIN B] button. 3-2 Press the data will be lost if you select another Song or turn the power to the instrument off without executing the Save operation. Songs - Recording Your Performances and Creating Songs - CVP-509/505/503/501 Reference Manual - Yamaha 505 | Reference Manual - Page 52
measure (set with the corresponding display button), at which point recording stops and normal playback continues. This setting maintains all data after the point at which recording is stopped. You can set the Punch Out measure by pressing the [6 ▲▼] buttons. 52 CVP-509/505/503/501 Reference Manual - Yamaha 505 | Reference Manual - Page 53
Punch In/Out settings This instrument features several different ways you use the Punch In/Out function. The illustrations below indicate a Previously recorded data Newly recorded data Deleted data Songs - Recording Your Performances and Creating Songs - 4 CVP-509/505/503/501 Reference Manual 53 - Yamaha 505 | Reference Manual - Page 54
the edit menu, then edit the data by using the [1 ▲▼]-[8 ▲▼] buttons. For data will be lost if you select another Song or turn the power to the instrument off without executing the Save operation. Songs - Recording Your Performances and Creating Songs - 54 CVP-509/505/503/501 Reference Manual - Yamaha 505 | Reference Manual - Page 55
to straight eighth notes-completely eliminating any triplet feel. However, if you use the eighth note + eighth note triplet setting, both the straight and Quarter-note length Original data (assuming 4/4 meter) Quantizing strength =100 Quantizing strength =50 CVP-509/505/503/501 Reference Manual 55 - Yamaha 505 | Reference Manual - Page 56
Select the channel whose data to be deleted by using the [1 ▲▼]-[8 ▲▼] buttons, then press the [D] (EXECUTE) button to execute the operation. 3 MIX This function lets you mix the data of two channels and - Recording Your Performances and Creating Songs - 56 CVP-509/505/503/501 Reference Manual - Yamaha 505 | Reference Manual - Page 57
position of the Song as the Setup data. The Mixing Console and panel settings GUIDE SETTING Records the settings of the Guide functions including the Guide ON/OFF 4 setting. LYRICS SETTING Records the settings in the Lyrics display. MIC SETTING (CVP-509 CVP-509/505/503/501 Reference Manual 57 - Yamaha 505 | Reference Manual - Page 58
and restores the original value. NOTE After you edit events in the CHORD tab display, press the [F] (EXPAND) button to convert the data into Song data. NOTE Chord section data recorded with Realtime Recording cannot be indicated and edited on this display. 58 CVP-509/505/503/501 Reference Manual - Yamaha 505 | Reference Manual - Page 59
and paste the data. ■ Lyrics Events (LYRICS Page) Name Allows you to enter the Song name. Lyrics Allows you to enter lyrics. Code CR: Enters a line break in the lyrics text. LF: Clears the currently displayed lyrics and displays the next set of lyrics. CVP-509/505/503/501 Reference Manual 59 - Yamaha 505 | Reference Manual - Page 60
lets you determine which event types will be shown in the Event List displays. 1 Press the [H] (FILTER) button in the CHORD, Style playback related events. [H] ALL ON Checkmarks all event types. [I] NOTE/ALL OFF/ "NOTE" or "CHORD" selects only NOTE/CHORD data CVP-509/505/503/501 Reference Manual - Yamaha 505 | Reference Manual - Page 61
of your favorite records-so you can quickly call up the panel settings and song data you use frequently. 1 Select the desired record from the MUSIC FINDER display. 2 Press the . Music Finder - Calling Up Ideal Setups (Voice, Style, etc.) for Each Song - CVP-509/505/503/501 Reference Manual 61 - Yamaha 505 | Reference Manual - Page 62
Style automatically be set up to start with an Intro section. For SONG or AUDIO records, this field cannot be changed. [5 ▲▼]/ GENRE [6 ▲▼] Selects the desired genre. [7 ▲▼] GENRE NAME Creates a new genre. [I] DELETE RECORD Deletes the currently selected record. 62 CVP-509/505/503/501 Reference - Yamaha 505 | Reference Manual - Page 63
in mind that individual records (panel settings and song data) cannot be handled as separate files. 1 Call the File Selection display. [MUSIC FINDER] → [7 ▲▼] FILES 2 Use the TAB [E][F] buttons to select USER/USB. 3 Press the Style, etc.) for Each Song - CVP-509/505/503/501 Reference Manual 63 - Yamaha 505 | Reference Manual - Page 64
available contents of the Music Finder Plus service are subject to change. 1 Make sure Select the record whose information you want to view by using the [1 ▲▼]-[5 ▲▼] buttons or the [DATA ENTRY] dial. 3 Press the [J] (MUSIC FINDER Style, etc.) for Each Song - 64 CVP-509/505/503/501 Reference Manual - Yamaha 505 | Reference Manual - Page 65
switch Voices or effect settings while keeping the same accompaniment Style. This is where the Freeze function comes in handy. 6 Select the desired item by using the [2 ▲▼]-[7 ▲▼] buttons, then enter or remove the checkmark by using the [8 ▲] (MARK ON)/[8 ▼] CVP-509/505/503/501 Reference Manual 65 - Yamaha 505 | Reference Manual - Page 66
Registration Sequence function lets you call up the eight setups in any order you specify, by simply using the TAB [E][F] buttons or the pedal as you play. 1 Select the desired Registration Memory bank Memory - Saving and Recalling Custom Panel Setups - 66 CVP-509/505/503/501 Reference Manual - Yamaha 505 | Reference Manual - Page 67
. However, if you turn the power off without exiting from this display, the settings will be lost. Registration Memory - Saving and Recalling Custom Panel Setups - CVP-509/505/503/501 Reference Manual 67 - Yamaha 505 | Reference Manual - Page 68
buttons or by pressing the pedal. NOTE The pedal can be used for Registration Sequence no matter which display is called up (except for 6 CAUTION Keep in mind that all Registration Sequence data is lost when changing Registration Memory Banks, unless you - 68 CVP-509/505/503/501 Reference Manual - Yamaha 505 | Reference Manual - Page 69
CVP-509/505/503) - Playback and Recording Audio Files - This function is fully explained in the Owner's Manual. Refer to the corresponding chapter in the Owner's Manual song data. When you play back any commercially available XG song data or that created on other instruments, you can use Auto - Yamaha 505 | Reference Manual - Page 70
used to replace the XG Voices (when SONG AUTO REVOICE is set to ON). [F] ALL REVOICE Replaces all of the replaceable XG Voices with the rich and authentic Voices of the instrument. [G] PIANO REVOICE Replaces only the piano the cutoff frequency (page 12). 70 CVP-509/505/503/501 Reference Manual - Yamaha 505 | Reference Manual - Page 71
for overall sound of the instrument [3 ▲▼] (MASTER), Song playback (SONG), or the keyboard pitch (KEY- BOARD), respectively. 8 Mixing Console - Editing the Volume and Tonal Balance - CVP-509/505/503/501 Reference Manual 71 - Yamaha 505 | Reference Manual - Page 72
to the Vocal Harmony effect. DSP8-9 (CVP-509) STYLE PART These effects are applied only to Style parts. NOTE When the "Connection" Use the [5 ▲▼]/[6 ▲▼] buttons to select the effect CATEGORY. Mixing Console - Editing the Volume and Tonal Balance - 72 CVP-509/505/503/501 Reference Manual - Yamaha 505 | Reference Manual - Page 73
and type, use the [1 ▲▼]-[3 ▲▼] buttons. The re-selected effect configuration is displayed at the upper left side box in the display. NOTE Keep in mind that in some cases noise may result if you adjust the effect parameters while playing the instrument. CVP-509/505/503/501 Reference Manual 73 Mixing - Yamaha 505 | Reference Manual - Page 74
can be boosted or cut as required to tailor the overall frequency response. Usually an equalizer is used to correct the sound from speakers to match the special character of the room. For example, you where the sound is relatively "dead" and free of echoes. 74 CVP-509/505/503/501 Reference Manual - Yamaha 505 | Reference Manual - Page 75
The instrument possesses a high grade five-band digital EQ. With this function, a final effect-tone control- can be added to the output of your instrument be created and saved. The saved EQ can be recalled from the EQ tab display by using the [A]/[B] buttons. CVP-509/505/503/501 Reference Manual 75 - Yamaha 505 | Reference Manual - Page 76
/503/501 Directly to the Internet - Internet Direct Connection - Connecting the CVP-509/505/503/501 Directly to the Internet - Contents Editing the Browser Settings 76 the [7 ▲▼] (OK) button to close the display. To cancel, press the [8 ▲▼] (CANCEL) button. 76 CVP-509/505/503/501 Reference Manual - Yamaha 505 | Reference Manual - Page 77
appears, showing a list of the currently saved bookmarks. NOTE For information on Bookmark display, see page 78. Internet Direct Connection - Connecting the CVP-509/505/503/501 Directly be opened by pressing the [2 ▲▼] (VIEW) button in the Bookmark display. CVP-509/505/503/501 Reference Manual 77 - Yamaha 505 | Reference Manual - Page 78
the name of the selected bookmark. Pressing this button calls up the display for entering characters. 9 [6 ▲▼] [8 ▲▼] DELETE CLOSE Deletes the selected bookmark from the Bookmark list. Closes the Bookmark display and returns to the browser display. 78 CVP-509/505/503/501 Reference Manual - Yamaha 505 | Reference Manual - Page 79
the Chord Type for Style Playback via MIDI Receive 94 Connections - Using Your Instrument with Other Devices - Microphone Settings Microphone Overall Settings CVP-509 CVP-505 CVP-503 CVP-501 1 Call up exiting from this display, the settings will be lost. CVP-509/505/503/501 Reference Manual 79 - Yamaha 505 | Reference Manual - Page 80
and HIGH) digital equalizer function data control over harmony is turned off. When set to one of the values 1-16, note data (played from a Song on the Clavinova or external MIDI sequencer) contained on the corresponding channel is used to control the harmony. 80 CVP-509/505/503/501 Reference Manual - Yamaha 505 | Reference Manual - Page 81
below. AUTO When the [ACMP ON/OFF] or [LEFT] is set to ON and if chord data exists in the Song, the mode is automatically set to CHORDAL. In all other cases, the singing close to the microphone. Connections - Using Your Instrument with Other Devices - 10 CVP-509/505/503/501 Reference Manual 81 - Yamaha 505 | Reference Manual - Page 82
to select the parameter to be adjusted, then set the value by using the [1 ▲▼]-[7 ▲▼] buttons. Connections - Using Your Instrument with Other Devices - 10 CAUTION Settings in the TALK sets the depth of the DSP effect applied to the microphone sound. 82 CVP-509/505/503/501 Reference Manual - Yamaha 505 | Reference Manual - Page 83
Vocal Harmony types, and lists the detailed parameters for Using Your Instrument with Other Devices - 3 Select a Vocal Harmony type to be edited by using the [A]-[J] buttons. 3 4 4 Press the [8 ▼] (EDIT) button to call up the VOCAL HARMONY EDIT display. 10 CVP-509/505/503/501 Reference Manual - Yamaha 505 | Reference Manual - Page 84
5 Edit the Vocal Harmony. 6 Connections - Using Your Instrument with Other Devices - 10 [1 ▲▼]/ EFFECT TYPE [2 ▲▼] [3 ▲▼]- PARAMETER [5 ▲▼] [6 ▲▼]/ VALUE [7 ▲▼] [8 ▲▼] RETURN Re-selects . Female The corresponding gender change is applied to the lead vocal. 84 CVP-509/505/503/501 Reference Manual - Yamaha 505 | Reference Manual - Page 85
with your voice. (The instrument tracks the pitch of your voice and converts it to note data for the tone generator. Keep in mind, however, that dynamic changes in your voice do not above is "ON." Connections - Using Your Instrument with Other Devices - 10 CVP-509/505/503/501 Reference Manual 85 - Yamaha 505 | Reference Manual - Page 86
piano pedals CVP-509/505) When you use a Super Articulation Voice that has an effect assigned to the pedal/footswitch, you can enable the effect by pressing the pedal/footswitch. You can turn this function on or off for each keyboard part on this display. 86 CVP-509/505/503/501 Reference Manual - Yamaha 505 | Reference Manual - Page 87
while the pedal is pressed. Portamento is produced when notes are played legato style (i.e., a note is played while the preceding note is still held). The portamento off for each keyboard part. Connections - Using Your Instrument with Other Devices - 10 CVP-509/505/503/501 Reference Manual 87 - Yamaha 505 | Reference Manual - Page 88
Connections - Using Your Instrument with Other Devices - 10 MODULATION* Applies a vibrato Style bass note will be held even if the chord is changed during Style playback. If the fingering is set to "AI FULL KEYBOARD," the function does not work. 88 CVP-509/505/503/501 Reference Manual - Yamaha 505 | Reference Manual - Page 89
up the MIDI display to edit the selected template. 4 Use the TAB [E][F] buttons to call up the relevant setting Style playback via MIDI reception data (page 94) • CHORD DETECT Settings for the chord type for Style playback via MIDI reception data (page 94) 10 CVP-509/505/503/501 Reference Manual - Yamaha 505 | Reference Manual - Page 90
for playing single note bass parts). This template lets you play/control the chord root in Style playback with a MIDI pedal unit. This template lets you play the bass part for Style playback by using a MIDI pedal unit. No MIDI signals are sent or received. 90 CVP-509/505/503/501 Reference Manual - Yamaha 505 | Reference Manual - Page 91
INTERNAL, the Style or Song data (chord detect. root and type) on or off. The "Rx" setting turns MIDI reception and recognition of MIDI chord exclusive data generated by external equipment on or off. Connections - Using Your Instrument with Other Devices - 10 CVP-509/505/503/501 Reference Manual - Yamaha 505 | Reference Manual - Page 92
▲▼] button to determine the types of data to be sent. The following MIDI messages can be set on the TRANSMIT/RECEIVE display. NOTE (Note events page 59 CC (Control Change page 59 PC (Program Change page 59 PB (Pitch Bend page 59 AT (Aftertouch page 59 92 CVP-509/505/503/501 Reference Manual - Yamaha 505 | Reference Manual - Page 93
explained elsewhere in the Owner's Manual. KEYBOARD The received data. Normally, these parts are not used by the instrument itself. The instrument can be used as a 32-channel multi-timbral tone generator by using Using Your Instrument with Other Devices - 10 CVP-509/505/503/501 Reference Manual 93 - Yamaha 505 | Reference Manual - Page 94
of the [ACMP ON/OFF] or split point settings. When several channels are simultaneously set to "ON," the chord type is detected from merged MIDI data received over the channels. 10 The operation procedure is basically the same as that of the BASS display above. 94 CVP-509/505/503/501 Reference Manual - Yamaha 505 | Reference Manual - Page 95
CONFIG2 97 SCREEN OUT 98 MEDIA 98 OWNER 99 SYSTEM RESET 100 • Factory Reset Making Global Settings - 1 Fade In/Out These parameters determine the behavior when the Style or Song playback is faded in/out. [3 ▲▼] FADE IN TIME Determines the seconds). 11 CVP-509/505/503/501 Reference Manual 95 - Yamaha 505 | Reference Manual - Page 96
Touch Setting, Music Finder, or Song and sequence data. Use the [1 ▲▼]-[7 ▲▼] buttons to select the desired parameter used. [2 ▲▼]- PERCUSSION Selects the instrument. [4 ▲▼] [5 ▲▼]/ VELOCITY [6 ▲▼] Sets the velocity. Utility - Making Global Settings - 11 96 CVP-509/505/503/501 Reference Manual - Yamaha 505 | Reference Manual - Page 97
is useful when you Style Selection display. [7 ▲▼]/ POPUP DIS[8 ▲▼] PLAY TIME Determines the time in which the pop-up windows close. (Pop-up windows are displayed when you press buttons such as TEMPO, TRANSPOSE, etc.) Utility - Making Global Settings - 11 CVP-509/505/503/501 Reference Manual - Yamaha 505 | Reference Manual - Page 98
OUT Refer to the Owner's Manual, chapter 10. CVP-509 CVP-505 CVP-503 CVP-501 MEDIA You can set or execute important media-related operations for the instrument. The word "media" refers to the connected USB storage device. Utility - Making Global Settings - 11 [A]/[B] DEVICE LIST [F] PROPERTY - Yamaha 505 | Reference Manual - Page 99
. Refer to the Owner's Manual. [J] MAIN PIC- Lets you select background picture for the Main display. You can select a TURE picture from among various pictures provided on the Preset Page. After (CVP-509/505) selecting, press the [EXIT] button to close the Selection display. You can also use - Yamaha 505 | Reference Manual - Page 100
the original factory settings. 1 Select the desired item to be restored by using [1 ▲▼]-[3 ▲▼] buttons and add a checkmark to it by pressing the Setup parameters to the original factory settings. Refer to the Data List for details about which parameters belong to CVP-509/505/503/501 Reference Manual - Yamaha 505 | Reference Manual - Page 101
(CVP-509/505/503) are han- dled as a single System Setup file. Refer to the Data List for CVP-509/505/503) created via the Mixing Console displays are managed as a single file. [I] MUSIC All the preset and created records of the Music Finder are handled as a FINDER FILES single file. 4 Use - Yamaha 505 | Reference Manual - Page 102
56 DELETE (Style Creator 24 DIGITAL REC MENU 22 Guide 42 Guide lamp 42 GUIDE LAMP TIMING 43 GUITAR 33 H HARMO. (Harmonic content 12 HARMONIC CONTENT 70 HARMONIC MINOR 33 HARMONY 13 Harmony Type 5 HARMONY/ECHO 5 HIGH KEY 34 Home page setting 76 102 CVP-509/505/503/501 Reference Manual - Yamaha 505 | Reference Manual - Page 103
OWNER NAME 99 P P.A.T 44 PAN (Talk 82 PARAMETER (Style Creator) ......22, 31 Parameter Lock 96 PART OCTAVE 11 PART ON/OFF (Style Setting 19 PEDAL 86 PEDAL POLARITY 86 PEDAL PUNCH IN/OUT 53 Performance Assistant 44 PHRASE MARK REPEAT 41 PIANO 35 CVP-509/505/503/501 Reference Manual 103 - Yamaha 505 | Reference Manual - Page 104
10 STROKE 34 Style 16 Style Assembly 26 STYLE CREATOR 22 Style File Format 31 STYLE SETTING 18 STYLE SETTING/SPLIT POINT/ CHORD FINGERING ........ 16, 18, 20 STYLE TOUCH 19 SUSTAIN (Voice Set 10 VOLUME/ATTACK 15 W WERCKMEISTER 7 X XG 4 104 CVP-509/505/503/501 Reference Manual
-
 1
1 -
 2
2 -
 3
3 -
 4
4 -
 5
5 -
 6
6 -
 7
7 -
8
-
9
-
10
-
11
-
12
-
13
-
14
-
15
-
16
-
17
-
18
-
19
-
20
-
21
-
22
-
23
-
24
-
25
-
26
-
27
-
28
-
29
-
30
-
31
-
32
-
33
-
34
-
35
-
36
-
37
-
38
-
39
-
40
-
41
-
42
-
43
-
44
-
45
-
46
-
47
-
48
-
49
-
50
-
51
-
52
-
53
-
54
-
55
-
56
-
57
-
58
-
59
-
60
-
61
-
62
-
63
-
64
-
65
-
66
-
67
-
68
-
69
-
70
-
71
-
72
-
73
-
74
-
75
-
76
-
77
-
78
-
79
-
80
-
81
-
82
-
83
-
84
-
85
-
86
-
87
-
88
-
89
-
90
-
91
-
92
-
93
-
94
-
95
-
96
-
97
-
98
-
99
-
100
-
101
-
102
-
103
-
104
 |
 |
CVP-509 / 505 / 503 / 501
Reference Manual
This Reference Manual explains advanced features of the CVP-509/505/503/501 that are not
explained in the Owner's Manual. Please read the Owner's Manual first, before reading this
Reference Manual.
EN