Yamaha BD-S473 Owners Manual - Page 7
Controls and functions, Front panel, Rear panel
 |
View all Yamaha BD-S473 manuals
Add to My Manuals
Save this manual to your list of manuals |
Page 7 highlights
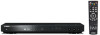
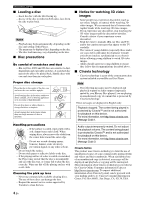
Introduction Controls and functions 1 ■ Front panel USB 1 2 3 1 p (On/Standby) Turns this Player on/Sets to standby mode. Pressing and holding this button for approximately 5 seconds forcibly resets this Player (system reset). 2 Disc tray door 3 (Eject) Opens/Closes the disc tray. 4 USB connector (p. 11) 4 5 678 5 Front panel display Displays various information for operational status. 6 (Play) Starts a playback. 7 (Pause) Pauses a playback. 8 (Stop) Stops a playback. Note - A factory-fitted protective film covers the front panel of this Player. Remove the protective film from the Player before operating it. ■ Rear panel MAINS HDMI NETWORK USB 5V 0.5A 1 2 3 4 1 Power cable This Player has a captive power cable. Connect it to an AC outlet after all connections are made (p. 10). Note - To prevent risk of electric shock, do not touch the un-insulated parts of any cables while the power cable is connected. 2 HDMI terminal (p. 10) 3 USB connector (p. 11) 4 NETWORK terminal (p. 11) 5 En
-
 1
1 -
 2
2 -
 3
3 -
 4
4 -
 5
5 -
 6
6 -
 7
7 -
 8
8 -
 9
9 -
 10
10 -
 11
11 -
 12
12 -
13
-
14
-
15
-
16
-
17
-
18
-
19
-
20
-
21
-
22
-
23
-
24
-
25
-
26
-
27
-
28
-
29
-
30
-
31
-
32
-
33
-
34
-
35
-
36
-
37
-
38
-
39
-
40
-
41
-
42
-
43
-
44
-
45
-
46
-
47
-
48
-
49
-
50
-
51
-
52
-
53
-
54
-
55
 |
 |
