Yamaha CLP-811 Owner's Manual - Page 62
and plug the power cord into a standard
 |
View all Yamaha CLP-811 manuals
Add to My Manuals
Save this manual to your list of manuals |
Page 62 highlights
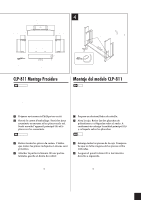
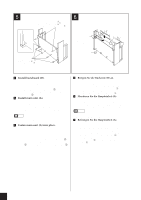
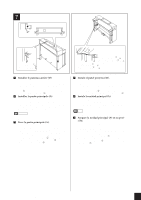
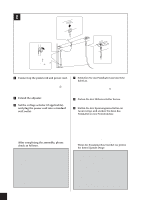
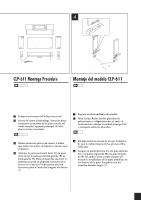
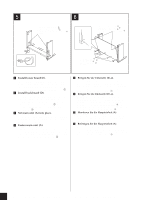
8 AC INLET AC INLET Two cord clamps 6 Zwei Kabelhalter 6 Deux pinces de fixation pour câbles 6 Dos bridas de cable 6 8 Connect up the pedal cord and power cord. Hold the pedal-cord connector so that the hook is facing away from the backboard, the backboard, and plug it into the main unit. Then adhere the two cord clamps 6 to the backboard at the locations shown in the diagram. Set the pedal cord securely into the clamps. Finally, connect the power cord (F) to the main unit. 9 Extend the adjuster. Turn the adjuster so that it is set firmly against the floor. 0 Set the voltage selector (if applicable), and plug the power cord into a standard wall outlet. If your unit is equipped with a voltage selector, make sure that the value is set to the voltage level used in your area (110V, 127V, 220V or 240V). To change the setting, turn the selector (with a screwdriver) so that the appropriate value is aligned with the pointer on the panel. Note that the selector is set to 240V at time of shipment. After completing the adjustment, you can plug the cord into a wall outlet. In some areas you may need to attach a (supplied) adaptor to the plug to enable connection to the standard local outlet. s After completing the assembly, please check as follows. • Are there any parts left over? Review the assembly procedure and correct any errors. • Is the Clavinova clear of doors and other movable fixtures? Move the Clavinova to an appropriate location. • Does the Clavinova make a rattling noise when you shake it? Tighten all screws. • Does the lower board rattle or give way when you step on the pedals? Turn the adjuster so that it is set firmly against the floor. • Are the pedal and power cords inserted securely into the inlets? Check the connections. • If the main unit creaks or is otherwise unsteady when you play on the keyboard, refer to the assembly diagrams and retighten all screws. 8 Schließen Sie das Pedalkabel und das Netzkabel an. Halten Sie den Stecker des Pedalkabels so, daß der Haken zur Tastaturseite weist, und stecken Sie ihn an die Haupteinheit. Bringen Sie dann die beiden Kabelhalter 6 an der Rückseite an den in der Abbildung gezeigten Positionen an. Stecken Sie das Pedalkabel sicher in die Kabelhalter. Stecken Sie zum Schluß das Netzkabel (F) an die Haupteinheit. 9 Ziehen Sie den Höhenversteller heraus. Drehen Sie den Höhenversteller so, daß er fest gegen den Fußboden drückt. 0 Stellen Sie den Spannungsumschalter ein (wenn nötig), und stecken Sie dann das Netzkabel in eine Netzsteckdose. Wenn Ihr Gerät mit einem Spannungsumschalter ausgestattet ist, vergewissern Sie sich, daß der eingestellte Wert auf die Versorgungsspannung Ihrer Gegend eingestellt ist (110 V, 127 V, 220 V oder 240 V). Um die Einstellung zu ändern, drehen Sie den Schalter (mit einem Schraubendreher), so der korrekte Wert mit dem Zeiger auf dem Panel übereinstimmt. Beachten Sie, daß der Schalter zur Zeit der Auslieferung auf 240 V eingestellt ist. Wenn Sie die Einstellung vorgenommen haben, können Sie das Kabel in eine Netzsteckdose stecken. In einigen Gegenden müssen Sie evtl. einen (mitgelieferten) Adapter am Stecker anbringen, um diesen in die Netzsteckdose einstecken zu können. s Wenn der Zusammenbau beendet ist, prüfen Sie bitte folgende Dinge: • Sind Teile übrig geblieben? Gehen Sie den Vorgang des Zusammenbaus noch einmal durch und korrigieren Sie eventuelle Fehler. • Befindet sich das Clavinova weit genug von Türen und anderen beweglichen Vorrichtungen entfernt? Bewegen Sie das Clavinova an einen entsprechend sicheren Ort. • Macht das Clavinova Klappergeräusche, wenn Sie es schütteln? Ziehen Sie alle Schrauben fest. • Klappert die Unterseite oder gibt sie nach, wenn Sie das Pedal treten? Drehen Sie den Höhenversteller, bis er fest auf dem Fußboden steht. • Sind Pedal- und Netzkabel richtig an den Buchsen angeschlossen? Prüfen Sie die Verbindung. • Wenn die Haupteinheit knarrt oder beim Spielen wackelt, betrachten Sie die Abbildungen und ziehen Sie alle Schrauben noch einmal nach. 58 CLP-811/611 CLP-811 Assembly Procedure/Montage des CLP-811/CLP-811 Montage Procédure/Montaje del modelo CLP-811
-
 1
1 -
2
-
3
-
4
-
5
-
6
-
7
-
8
-
9
-
10
-
11
-
12
-
13
-
14
-
15
-
16
-
17
-
18
-
19
-
20
-
21
-
22
-
23
-
24
-
25
-
26
-
27
-
28
-
29
-
30
-
31
-
32
-
33
-
34
-
35
-
36
-
37
-
38
-
39
-
40
-
41
-
42
-
43
-
44
-
45
-
46
-
47
-
48
-
49
-
50
-
51
-
52
-
53
-
54
-
55
-
56
-
 57
57 -
 58
58 -
 59
59 -
 60
60 -
 61
61 -
 62
62 -
 63
63 -
 64
64 -
 65
65 -
 66
66 -
 67
67 -
68
-
69
-
70
-
71
-
72
 |
 |
