Yamaha CVP-509 Reference Manual - Page 67
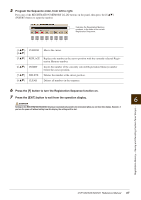
Press the [F] button to turn the Registration Sequence function on., Program the Sequence order
 |
View all Yamaha CVP-509 manuals
Add to My Manuals
Save this manual to your list of manuals |
Page 67 highlights
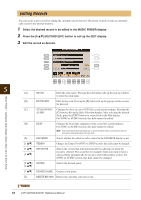
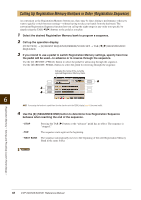
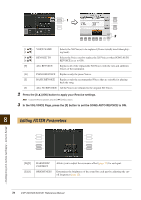
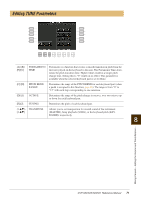
5 Program the Sequence order, from left to right. Press one of the REGISTRATION MEMORY [1]-[8] buttons on the panel, then press the [6 ▲▼] (INSERT) button to input the number. Indicates the Registration Memory numbers, in the order of the current Registration Sequence. [1 ▲▼]- CURSOR [4 ▲▼] [5 ▲▼] REPLACE [6 ▲▼] INSERT [7 ▲▼] [8 ▲▼] DELETE CLEAR Moves the cursor. Replaces the number at the cursor position with the currently selected Registration Memory number. Inserts the number of the currently selected Registration Memory number before the cursor position. Deletes the number at the cursor position. Deletes all numbers in the sequence. 6 Press the [F] button to turn the Registration Sequence function on. 7 Press the [EXIT] button to exit from the operation display. 6 CAUTION Settings in the REGISTRATION SEQUENCE display are automatically saved to the instrument when you exit from this display. However, if you turn the power off without exiting from this display, the settings will be lost. Registration Memory - Saving and Recalling Custom Panel Setups - CVP-509/505/503/501 Reference Manual 67
-
 1
1 -
2
-
3
-
4
-
5
-
6
-
7
-
8
-
9
-
10
-
11
-
12
-
13
-
14
-
15
-
16
-
17
-
18
-
19
-
20
-
21
-
22
-
23
-
24
-
25
-
26
-
27
-
28
-
29
-
30
-
31
-
32
-
33
-
34
-
35
-
36
-
37
-
38
-
39
-
40
-
41
-
42
-
43
-
44
-
45
-
46
-
47
-
48
-
49
-
50
-
51
-
52
-
53
-
54
-
55
-
56
-
57
-
58
-
59
-
60
-
61
-
 62
62 -
 63
63 -
 64
64 -
 65
65 -
 66
66 -
 67
67 -
 68
68 -
 69
69 -
 70
70 -
 71
71 -
 72
72 -
73
-
74
-
75
-
76
-
77
-
78
-
79
-
80
-
81
-
82
-
83
-
84
-
85
-
86
-
87
-
88
-
89
-
90
-
91
-
92
-
93
-
94
-
95
-
96
-
97
-
98
-
99
-
100
-
101
-
102
-
103
-
104
 |
 |
