Yamaha DKC-850 Additional Functions
Yamaha DKC-850 Manual
 |
View all Yamaha DKC-850 manuals
Add to My Manuals
Save this manual to your list of manuals |
Yamaha DKC-850 manual content summary:
- Yamaha DKC-850 | Additional Functions - Page 1
Disklavier Control Unit DKC-850 Additional Function Manual (Version 3.10) Table of Contents Introduction 2 New Features for Version 3.10 2 Advanced Song Playback 3 Using the Timer Play 3 Enhancing the Disklavier by Hooking Up Other Devices 5 Setting the Disklavier for Audio Data Reception/ - Yamaha DKC-850 | Additional Functions - Page 2
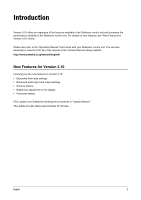
your Disklavier control unit. You can also download or view the PDF file of the manual at the Yamaha Manual Library website: http://www.yamaha.co.jp/manual/english/ New Features for Version 3.10 Following are the new features in Version 3.10: • Expanded timer play settings • Enhanced audio input - Yamaha DKC-850 | Additional Functions - Page 3
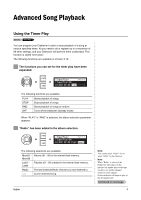
Advanced Song Playback Using the Timer Play [SETUP] "TimerPlay" You can program your Disklavier to start or stop playback of a song at various specified times. All you need to do is register up to a maximum of 99 timer settings, and your Disklavier will perform them unattended. This function is - Yamaha DKC-850 | Additional Functions - Page 4
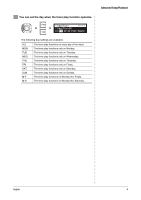
You can set the day when the timer play function operates. =TimerPlay= _?=]-+ >TimerPlay=ON 01[M-F ##:## PLAY Mem01] The following day settings are available: ALL MON TUE WED THU FRI SAT SUN M-F M-S The timer play functions on every day of the week. The timer play functions only on Monday. - Yamaha DKC-850 | Additional Functions - Page 5
ms to 0 ms. Decrease this value to delay the piano playing, and increase to advance the piano playing. OUTPUT Offset For some speakers or digital amplifiers, the audio from the Disklavier may be output a little bit later than the acoustic piano playing. To eliminate this delay, you can adjust the - Yamaha DKC-850 | Additional Functions - Page 6
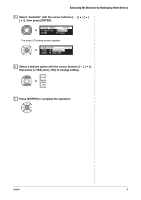
Enhancing the Disklavier by Hooking Up Other Devices 2 Select "AudioI/O" with the cursor buttons then press [ENTER]. =SETUP MENU= (1/3) *TimerPlay *AudioI/O *MIDI *M-Tune The audio I/O setting screen appears. =AudioI/O= ] -+ >OMNI IN=AutoDetect >OMNI IN VOL=100 3 Select a desired option - Yamaha DKC-850 | Additional Functions - Page 7
[SETUP] "Shortcut" You can assign the number keypad of the remote control ([1] thru [9] and [0]) a series of procedures for often used functions. ■ Assigning Functions 1 Press [SETUP] on the remote control. The setup menu screen appears. =SETUP MENU= (1/3)] *TimerPlay *AudioI/O *MIDI *M-Tune - Yamaha DKC-850 | Additional Functions - Page 8
of the selected DisklavierRadio channel. BLNC Adjusts the volume balance among the different sound sources (tone generator or audio). POWER Turns on and off the Disklavier. When functions other than "POWER" are selected, the detailed setting parameter appears. 5 Press [ ] to move the cursor to - Yamaha DKC-850 | Additional Functions - Page 9
random. When "RADIO" is selected: Option CH01 CH99 Description Starts playback of the selected DisklavierRadio channel. When "BLNC" is selected: Option 1 TG AUDIO Option 2 UP DOWN UP DOWN Description Raises the volume of the tone generator. Lowers the volume of the tone generator. Raises the - Yamaha DKC-850 | Additional Functions - Page 10
■ Using the Shortcut Holding the green button on the remote control, press the corresponding number button on the of time has elapsed without someone operating the instrument. 1 Press [SYSTEM] on the remote control. The system menu screen appears. =SYSTEM MENU= (1/2)] *Clock Adj. *TimeZone *Backup - Yamaha DKC-850 | Additional Functions - Page 11
to allow it to access your Disklavier without entering the passcode. Note: These settings are not required for the use of the remote control of this unit. In case of using an external remote controller, refer to the user's guide for that remote controller. Note: If changes are inappropriately made - Yamaha DKC-850 | Additional Functions - Page 12
-+ + >Passcode=1234 >MAdr1 See "Setting the MAC Address" for details on the MAC address settings. Note: You can also use [+/YES] and [-/NO] on the remote control, or the dial on the control unit to enter the code. 4 Press [ENTER] to complete the operation. English Continued on next page 12 - Yamaha DKC-850 | Additional Functions - Page 13
Disklavier from an external remote controller, you can set the MAC address of the external remote controller. This will allow the external remote controller with the registered MAC address to access your Disklavier ]). Note: You can also use the dial on the control unit to enter the address. =
-
 1
1 -
 2
2 -
 3
3 -
 4
4 -
 5
5 -
 6
6 -
 7
7 -
8
-
9
-
10
-
11
-
12
-
13
 |
 |
Copyright © 2011 by Yamaha Corporation
English
Jun-11
Disklavier Control Unit DKC-850
Additional Function Manual
(Version 3.10)
Table of Contents
Introduction
................................................................................................
2
New Features for Version 3.10
.................................................................................
2
Advanced Song Playback
..........................................................................
3
Using the Timer Play
................................................................................................
3
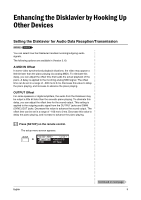
Enhancing the Disklavier by Hooking Up Other Devices
........................
5
Setting the Disklavier for Audio Data Reception/Transmission
................................
5
Other Settings
............................................................................................
7
Assigning Frequently-used Functions to the Number Keypad on the Remote
Control
......................................................................................................................
7
Adjusting the Brightness of the Display
..................................................................
10
Setting the Passcode to Prevent Unauthorized Access
.........................................
11