Yamaha DVX-700 Owner's Manual
Yamaha DVX-700 Manual
 |
View all Yamaha DVX-700 manuals
Add to My Manuals
Save this manual to your list of manuals |
Yamaha DVX-700 manual content summary:
- Yamaha DVX-700 | Owner's Manual - Page 1
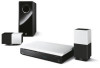
UC DVD HOME THEATER SYSTEM SYSTEME HOME CINEMA AVEC LECTUER DVD DVX-700 (DVR-700 + NS-PSW700 + NS-P700) OWNER'S MANUAL MODE D'EMPLOI - Yamaha DVX-700 | Owner's Manual - Page 2
servicing) instructions in the literature accompanying the appliance. Note to CATV system installer: This reminder is provided to call the CATV system installer installed as indicated in the instructions contained in this manual, meets FCC requirements. Modifications not expressly approved by Yamaha - Yamaha DVX-700 | Owner's Manual - Page 3
manual carefully. Keep it in a safe place for future reference. 2 Install this sound system Yamaha service personnel when any service explosion if battery is incorrectly digital apparatus complies with Canadian ICES-003. IMPORTANT Please record the serial number of this unit in the space below. MODEL - Yamaha DVX-700 | Owner's Manual - Page 4
. Due to possible eye injury, only a qualified service person should remove the cover or attempt to service this device. DANGER This unit emits visible laser radiation laser ALGaInP 655nm (DVD) 790nm (VCD/CD) 5/7mW (DVD/VCD,CD) 20degrees CAUTION Use of controls or adjustments or performance - Yamaha DVX-700 | Owner's Manual - Page 5
AV components 19 Connecting the power cable 20 3. PREPARATION GETTING STARTED 21 Inserting batteries into the remote control 21 Using the remote control 21 Turn on the system 22 Setting the video input/output 23 Setting language preferences 25 4. BASIC OPERATIONS DISC OPERATION 26 Playing - Yamaha DVX-700 | Owner's Manual - Page 6
INTRODUCTION Thank you for purchasing this unit. This Owner's Manual explains the basic operation of this unit. Notes about discs - This DVD controller is designed for use with the following discs. DVD disc: DVD-Video, DVD-R/-RW/-R DL, DVD+R/+RW/+R DL Compact Disc: Audio CD, CD-R, CD-RW - Yamaha DVX-700 | Owner's Manual - Page 7
to support the Region Management System. Check the region code number on the disc package. If the number does not match the unit's region number (Refer to the table below or the back of the unit), the unit may be unable to play the disc. Destination U.S.A., and Canada model Region code of DVR-700 - Yamaha DVX-700 | Owner's Manual - Page 8
Battery x 2 (AA, R6, UM-3) Video pin cable (1.5 m) System control cable (4 m) Speaker cable x 2 (4 m) Cover (For NS-PSW700) Screw x 6 (for cover 3 x 6 mm) Stand x 2 (For NS-P700) Screw x 2 (for stand 4 x 10 mm) Owner's Manual U DVD HOME THEATER SYSTEM SYSTEME HOME CINEMA AVEC LECTUER DVD DVX-700 - Yamaha DVX-700 | Owner's Manual - Page 9
/ d Adjusts the volume level. 9 Remote control sensor Point the remote control towards this sensor. 0 Power indicator Lights up when system is on. A Front panel display Shows information about the operational status of the unit. B USB terminal Connect to the USB connector of your USB device (Page 35 - Yamaha DVX-700 | Owner's Manual - Page 10
FUNCTIONAL OVERVIEW ■ Rear panel (DVR-700) 1 2 34 NS-PSW700 Y VIDEO SYSTEM CONNECTOR PB PR COMPONENT VIDEO OUTPUT HDMI OUTPUT 1 SYSTEM CONNECTOR terminal Connect to the subwoofer/system control (Page 16). 2 COMPONENT VIDEO OUTPUT jacks Connect to the Y PB/CB PR/CR jacks on your TV (Page - Yamaha DVX-700 | Owner's Manual - Page 11
to the DOCK terminal of the subwoofer/system control (Page 20). - Lights up while the Yamaha Bluetooth wireless audio receiver (such as YBA-10, sold separately) is connected to the Bluetooth component (Page 61). - Flashes while the connected Yamaha Bluetooth wireless audio receiver (such as YBA-10 - Yamaha DVX-700 | Owner's Manual - Page 12
Bluetooth wireless audio receiver (such as YBA-10, sold separately) (Page 20). 6 SIRIUS terminal Connect to a SiriusConnect tuner (sold separately). 7 XM terminal Connect to an XM Mini-Tuner and XM Mini-Tuner Home Dock (sold separately). 8 SYSTEM CONNECTOR terminal Connect to the DVD controller - Yamaha DVX-700 | Owner's Manual - Page 13
■ Remote control 1 2 4 5 6 8 9 A B D E G I K M P Q R DVX-700 WP87010 STANDBY/ON TV STB POWER FUNC. 10KEY MOVIE MUSIC SPORTS GAME STEREO ENHANCER NIGHT SLEEP DISP. MODE AUDIO DELAY ZOOM ON SCREEN ON BLUETOOTH OFF AUDIO SUBTITLE ANGLE PLAY MODE LOCK CLEAR SRCH MODE AUTO/ MANUAL MEMORY - Yamaha DVX-700 | Owner's Manual - Page 14
remote control, you need to set the preset code. Refer to "Setting the preset code" on page 66. You can select TV or STB by switching FUNC./ 10KEY. N VOLUME +/- Adjusts the volume level of DVX-700. O MUTE Mutes the volume of DVX-700. Press the button again to mute OFF. P Input selection buttons DVD - Yamaha DVX-700 | Owner's Manual - Page 15
position so that you can produce high quality surround sound. You can install the speakers on a rack using the stands or on a wall. 2 Subwoofer/system control The subwoofer produces bass sounds and LFE sounds contained in Dolby Digital or DTS. Place the subwoofer in the front of the listening - Yamaha DVX-700 | Owner's Manual - Page 16
lumber 1 When placing the speakers on a wall, remove the stands. 2 Install screws on a wall as shown in the illustration. The distance between the screws in a horizontal position Put the speaker on the stand so that the black side of the speaker becomes outside, and then secure it with the screw - Yamaha DVX-700 | Owner's Manual - Page 17
- Use commercially available screws that can support the weight of the installation. - Make sure you use specified screws to attach the speakers . - After attaching the speakers, check that the speakers are installed securely. Yamaha will bear no responsibility for any accidents caused by improper - Yamaha DVX-700 | Owner's Manual - Page 18
power cable of the subwoofer/system control into an AC outlet until all cable connections are completed. DVD controller NS-PSW700 Y VIDEO SYSTEM CONNECTOR PB PR COMPONENT VIDEO OUTPUT HDMI OUTPUT Subwoofer/system control SYSTEM CONNECTOR DVR-700 SPEAKERS SPEAKER IMPEDANCE : 6 MIN. MAINS - Yamaha DVX-700 | Owner's Manual - Page 19
with red plug: for speaker (R) SYSTEM CONNECTIONS Connecting the subwoofer/system control 1 Insert the speaker cable plug until you hear a click sound. 2 from speaker (L) CONNECTIONS for speaker (R): Red plug for speaker (L): White plug SYSTEM CONNECTOR DVR-700 1 Push down the knob of the - Yamaha DVX-700 | Owner's Manual - Page 20
at the rear of the subwoofer/system control to the SYSTEM CONNECTOR terminal at the rear of the DVD controller using the system control cable. NS-PSW700 Y VIDE SYSTEM CONNECTOR PB COMPONENT VIDEO OUTPUT NS-PSW700 Tighten the screws. SYSTEM CONNECTOR DVR-700 SPEAKERS SPEAKER IMPEDANCE : 6 MIN - Yamaha DVX-700 | Owner's Manual - Page 21
OUTPUT jack Use the Video pin cable (yellow-supplied) to connect the DVD controller's VIDEO OUTPUT jack to the video input jack (or A/V In/Video In/Composite/Baseband jack) on your TV. NS-PSW700 Y VIDEO SYSTEM CONNECTOR PB PR COMPONENT VIDEO OUTPUT DVD controller English 17 En - Yamaha DVX-700 | Owner's Manual - Page 22
the settings manually. It is necessary to prepare in advance to output an HDMI signal. 1 Set the system to standby mode. 2 Connect the HDMI terminals on your HDMI compatible device and the DVD controller using a commercially available HDMI cable. TV HDMI IN 4 To set the video output according - Yamaha DVX-700 | Owner's Manual - Page 23
, to the audio input terminal on the subwoofer/system control, you can listen to those audio sources on the system. This section provides some examples of VCR and digital AV equipment connections. Connecting analog AV components Connect the DVD controller and external AV equipment as shown in the - Yamaha DVX-700 | Owner's Manual - Page 24
connections. OPTICAL Attach the cover to the rear panel of subwoofer/system COAXIAL control using the 6 supplied screws as shown. ANALOG DOCK When connecting the Yamaha Bluetooth wireless audio receiver Yamaha Bluetooth wireless audio receiver (such as YBA-10, sold separately) OPTICAL COAXIAL - Yamaha DVX-700 | Owner's Manual - Page 25
STARTED ■ Inserting batteries into the remote control ■ Using the remote control Use the remote control within 6 m of the DVD controller and point it toward the remote control sensor. STANDBY / ON 3 EJECT Press 1 2 Within 6 m 30˚ 30˚ PREPARATION 1 Press 3 on the battery cover and open - Yamaha DVX-700 | Owner's Manual - Page 26
GETTING STARTED ■ Turn on the system Press STANDBY/ON on the DVD controller or the remote control. The LED indicators beside the disc loading slot light up when the system is turned on. STANDBY/ON DVX-700 WP87010 STANDBY/ON TV STB POWER FUNC. 10KEY MOVIE MUSIC SPORTS GAME STEREO ENHANCER NIGHT - Yamaha DVX-700 | Owner's Manual - Page 27
highest channels and may be called FRONT, A/V IN or VIDEO. See your TV manual for more details. - Or, you may go to channel 1 on your TV, then press the Channel down button repeatedly until you see the Video In channel. - Or, the TV remote control may have a button or switch that chooses different - Yamaha DVX-700 | Owner's Manual - Page 28
is 4:3, black bars cover the sides of the screen. Selecting the output type for COMPONENT VIDEO OUTPUT jacks To use progressive display function, connect to a TV, which has that function, via COMPONENT VIDEO OUTPUT jacks. 1 Press SETUP on the remote control. 2 Press / / / on the remote control to - Yamaha DVX-700 | Owner's Manual - Page 29
SETUP on the remote control. DVD setup menu appears on the screen. 2 Press / / / on the remote control to 3 highlight [Initial Settings], and then press ENTER. 3 Press / on the remote control to highlight [Language], and then press ENTER. PREPARATION Initial Setting Video Output Language Display - Yamaha DVX-700 | Owner's Manual - Page 30
controller to malfunction. - Depending on the disc, some functions may be prohibited. - This unit is not compatible with 8-cm discs. ■ Playing discs 1 Turn on the system. 2 Press DVD/USB repeatedly until "DVD" appears in the front panel display. 3 Turn on the TV power and set to the correct Video - Yamaha DVX-700 | Owner's Manual - Page 31
is not supported. - DRM-Protected video files are not played in the DVD controller. DISC OPERATION ■ Basic playback controls DVX-700 WP87010 STANDBY/ON TV STB POWER FUNC. 10KEY MOVIE MUSIC SPORTS GAME STEREO ENHANCER NIGHT SLEEP DISP. MODE AUDIO DELAY ZOOM ON SCREEN ON BLUETOOTH OFF AUDIO - Yamaha DVX-700 | Owner's Manual - Page 32
DVD controller. EJECT ■ Playback control (PBC) (Video CD only) Some Video CD/super Video CD discs are compatibility with PBC function. PBC playback allows you to play Video a playback feature or item Press / / / on the remote control, then press ENTER to start playback. You can also specify the - Yamaha DVX-700 | Owner's Manual - Page 33
DVD controller after stopping playback, the last play position is stored in memory. If the next disc you load is the same one, "Last Memory" appears and playback will resume. For DVD-Video discs, the system the disc contains sequences recorded from different camera angles, the angle mark appears on - Yamaha DVX-700 | Owner's Manual - Page 34
MODE AUTO/ MANUAL MEMORY TOP MENU PRESET/CH MENU INFO. A-E/CAT. SETUP ENTER A-E/CAT. RETURN CODE SET 1 Press PLAY MODE on the remote control. Play Mode DVD: [Title Repeat], [Chapter Repeat] CD/Video CD: [Disc Repeat], [Track Repeat] DivX®/WMV: [Title Repeat], [Chapter Repeat] (if supported - Yamaha DVX-700 | Owner's Manual - Page 35
procedure to complete the programming. DISC OPERATION Search mode types DVD: [Title Search], [Chapter Search], [Time Search] CD/Video CD: [Track Search], [Time Search] DivX®/WMV: [Time Search], [Chapter Search] (if supported) You can select [Time Search] during playback. Enter a 4digit number - Yamaha DVX-700 | Owner's Manual - Page 36
/previous page. You can select the number either from the menu or remote control. 01 02 03 04 05 06 1 Press SETUP on the remote control. DVD setup menu appears. Play Mode Initial Setting Video Adjust Disc Navigator 2 Press / / / to highlight [Disc Navigator], then press ENTER. 3 Select - Yamaha DVX-700 | Owner's Manual - Page 37
system can play audio files and picture files recorded on CD-R or DVD-R/DVD correctly. - MPEG-4 AAC files encoded with iTunes are supported. Those files may not play back correctly depending on SCREEN ON BLUETOOTH OFF AUDIO SUBTITLE ANGLE PLAY MODE LOCK CLEAR SRCH MODE AUTO/ MANUAL MEMORY - Yamaha DVX-700 | Owner's Manual - Page 38
MODE AUDIO DELAY ZOOM ON SCREEN ON BLUETOOTH OFF AUDIO SUBTITLE ANGLE PLAY MODE LOCK CLEAR SRCH MODE AUTO/ MANUAL MEMORY TOP MENU PRESET/CH MENU Press SETUP after inserting the disc you want to play back. The DVD setup menu appears on the screen. 2 Select [Disc Navigator], then press - Yamaha DVX-700 | Owner's Manual - Page 39
USB devices. Supported USB devices The DVD controller supports USB mass Yamaha and suppliers accepts no liability for the loss of data saved on the USB devices connected to the DVD controller. As a precaution, it is recommended that the files are tested after they have been saved on. 1 Press DVD - Yamaha DVX-700 | Owner's Manual - Page 40
DVD SETUP MENU DVD SETUP MENU OPTIONS ■ Menu overview [Video Adjust] menu Adjusts the picture quality. The bold 42 * Depending on the disc, NTSC and PAL switches automatically. For U.S.A. and Canada models, only NTSC is available. Notes - Refer to page 30 for [Play Mode] - Refer to page 32 - Yamaha DVX-700 | Owner's Manual - Page 41
/ STB TV INPUT TUNER CODE SET MUTE DVD/ USB INPUT 1-4 DOCK POSITION AREA SOUND TEST 1 Press DVD/USB repeatedly to switch the input source to DVD. 2 Press SETUP on the remote control. DVD setup menu appears. Play Mode Initial Setting Video Adjust Disc Navigator 3 Press / / / to highlight - Yamaha DVX-700 | Owner's Manual - Page 42
the TV, enabling you to customize the DVD controller to suit your particular requirements DVX-700 WP87010 STANDBY/ON TV STB POWER FUNC. 10KEY MOVIE MUSIC SPORTS GAME STEREO ENHANCER NIGHT SLEEP DISP. MODE AUDIO DELAY ZOOM ON SCREEN ON BLUETOOTH OFF AUDIO SUBTITLE ANGLE When using Numeric - Yamaha DVX-700 | Owner's Manual - Page 43
system) resolution. 480i/60Hz (NTSC) 576i/50Hz (PAL) Notes - Depending on the disc, NTSC and PAL switches automatically. For U.S.A. and Canada models white and deep black colors video output format of the HDMI component. 5 Note The default setting varies depending on your HDMI component. DVD SETUP - Yamaha DVX-700 | Owner's Manual - Page 44
to "DISC OPERATION" on page 26. Initial Setting Video Output Language Display Options Audio Language Subtitle Language DVD Menu Lang. Subtitle Display English English English On Notes - Depending on the disc, the language set on the DVD controller may not play. - If the disc does not contain - Yamaha DVX-700 | Owner's Manual - Page 45
. Initial Setting Video Output Parental Lock Off Language DivX(R) VOD Display Options OSD Language Selects a language for the DVD setup menu. Use Numeric keypad 0-9 on the remote control to enter a 4-digit number, then press ENTER to confirm. Hint When you play a DVD that is restricted by a - Yamaha DVX-700 | Owner's Manual - Page 46
at the end of this manual. 1 Select [Country Code], then press ENTER. 2 Use Numeric keypad 0-9 on the remote control to enter a password, then VOD Yamaha provides you with the DivX® VOD (Video On Demand) registration code that allows you to rent and purchase videos using the DivX® VOD service. For - Yamaha DVX-700 | Owner's Manual - Page 47
system Front speakers Subwoofer ■ Listening to surround mode of AIR SURROUND XTREME DVX-700 DVDs, etc. SPORTS This mode is useful when you enjoy sports or TV news programs. GAME This mode is useful when you play video games. Hints - To reproduce the original sounds, press STEREO. - The system - Yamaha DVX-700 | Owner's Manual - Page 48
SETUP ENTER A-E/CAT. RETURN TV/ STB DVD/ USB INPUT 1-4 CODE SET DOCK POSITION AREA SOUND TEST 1 Press AREA when the surround mode is - The default setting is CENTER. - If you press TEST after performing step 1, the system outputs the test tone for a virtual center speaker so that you can - Yamaha DVX-700 | Owner's Manual - Page 49
DVD/ USB INPUT 1-4 DOCK POSITION AREA SOUND TEST 1 Press TEST to output the test tone. 2 The system outputs the test tone and the output channel of the test tone appears in the front panel display. TEST music data stored on an iPod or a digital music player. MOVIE MUSIC SPORTS GAME STEREO - Yamaha DVX-700 | Owner's Manual - Page 50
and number. ■ Basic tuning operation DVX-700 WP87010 STANDBY/ON TV STB POWER FUNC. 10KEY MOVIE MUSIC SPORTS GAME STEREO ENHANCER NIGHT SLEEP DISP. MODE AUDIO DELAY ZOOM ON SCREEN ON BLUETOOTH OFF ALUODCIKOPTY SEEKSUBSTTITALRET FARENQG/ TLEEXT SRCH MODE AUTO/ MANUAL MEMORY When using Numeric - Yamaha DVX-700 | Owner's Manual - Page 51
RETURN TV/ STB CODE SET TV VOL TV INPUT TUNER VOLUME MUTE DVD/ USB INPUT 1-4 DOCK 6 OTHER FUNCTIONS Automatic station preset Available automatic preset. If a radio station's signal is weak, set it by using manual preset tuning. 1 Press TUNER repeatedly to set the input source to FM. " - Yamaha DVX-700 | Owner's Manual - Page 52
a station is not stored to the desired preset group and number, preset the station manually. Refer to Manual station preset for details. Manual station preset Use this feature to store the radio stations manually. 1 Tune into a station. Refer to "Basic tuning operation" on page 46 for the details - Yamaha DVX-700 | Owner's Manual - Page 53
stations", you can recall them using the following procedures. 1 Press TUNER on the remote control. "FM" appears in the front panel display. 2 Press PRESET/CH to select preset tuning mode. Hint If a colon(:) appears, the system is set to preset tuning mode. 3 Use A-E/CAT. / to select the preset - Yamaha DVX-700 | Owner's Manual - Page 54
Dock (sold separately) to the XM terminal on the rear panel of subwoofer/system control. For details, see the operating instructions provided with the XM Mini-Tuner Home Dock. SIRIUS XM XM Mini-Tuner and XM Mini-Tuner Home Dock (sold separately) Hint To ensure optimal reception of the XM Satellite - Yamaha DVX-700 | Owner's Manual - Page 55
DVX-700 WP87010 STANDBY/ON TV STB POWER FUNC. 10KEY MOVIE MUSIC SPORTS GAME STEREO ENHANCER NIGHT SLEEP DISP. MODE AUDIO DELAY ZOOM ON SCREEN ON BLUETOOTH OFF AUDIO LOCK SUBTITLE ANGLE SRCH MODE AUTO/ MANUAL XM Satellite Radio" section in "Troubleshooting" on page 68 for appropriate remedies - Yamaha DVX-700 | Owner's Manual - Page 56
0-9. Hints - To enter a 1-digit or 2-digit channel number, press the Numeric keypad 0-9 on the remote control and then press ENTER to confirm the as described in "Preset Search mode" on page 51. SRCH MODE AUTO/ MANUAL MEMORY TOP MENU PRESET/CH MENU INFO. A-E/CAT. SETUP ENTER A-E/CAT. RETURN - Yamaha DVX-700 | Owner's Manual - Page 57
MODE AUTO/ MANUAL MEMORY TOP MENU Troubleshooting remote control while it is being displayed. The HOLD indicator flashes in the front panel display while you are holding the XM information. Press ENTER again to release the held information. - When the antenna of the XM Mini-Tuner Home - Yamaha DVX-700 | Owner's Manual - Page 58
the best reception differs depending on the area. Refer to the instruction manuals supplied with the SiriusConnect tuner for the installation of the antenna. You can mount it indoors or outdoors. tuner and the antenna. - If "NOT SUPPORTED" appears in the front panel display, the unit does not - Yamaha DVX-700 | Owner's Manual - Page 59
DVX-700 WP87010 STANDBY/ON TV STB POWER FUNC. 10KEY MOVIE MUSIC SPORTS GAME STEREO ENHANCER NIGHT SLEEP DISP. MODE AUDIO DELAY ZOOM ON SCREEN ON BLUETOOTH OFF ALUODCIKO SUBTITLE ANGLE SRCH MODE AUTO/ MANUAL the 12-digit Sirius ID Satellite Radio" section in "Troubleshooting" on page 69 for - Yamaha DVX-700 | Owner's Manual - Page 60
cases (it is not malfunction of the system): - the channel is locked (page 58). - the channel is out of service. - you do not subscribe to the on the remote control repeatedly to select "ALL CH SEARCH" or "CAT SEARCH". 2 Press the Numeric keypad 0-9 to enter the desired 3-digit channel number. - Yamaha DVX-700 | Owner's Manual - Page 61
™ preset channels LOCK LISTENING TO SIRIUS SATELLITE RADIO™ BROADCASTS The preset channel number appears in the front panel display. Flashes SRCH MODE AUTO/ MANUAL MEMORY TOP MENU PRESET/CH MENU INFO. A-E/CAT. SETUP ENTER A-E/CAT. RETURN TV/ STB CODE SET You can use this feature to store - Yamaha DVX-700 | Owner's Manual - Page 62
DVX-700 WP87010 STANDBY/ON TV STB POWER FUNC. 10KEY MOVIE MUSIC SPORTS GAME STEREO ENHANCER NIGHT SLEEP DISP. MODE AUDIO DELAY ZOOM ON SCREEN ON BLUETOOTH OFF AUDIO LOCK SUBTITLE ANGLE SRCH MODE AUTO/ MANUAL restore to the factory defaults. Refer to "System menu" on page 65 for details. - Each - Yamaha DVX-700 | Owner's Manual - Page 63
panel display, refer to the "SIRIUS Satellite Radio" section in "Troubleshooting" on page 69 for appropriate remedies. CATEGORY INFO Channel category system, the character will be displayed with a space. - To hold the current SIRIUS Satellite Radio information, press ENTER on the remote control - Yamaha DVX-700 | Owner's Manual - Page 64
to the DOCK terminal of the subwoofer/system control (Page 20), you can enjoy playback on your iPod. Supported iPod iPod (Click and Wheel) iPod touch iPod nano iPod mini Battery charge feature This system charges the battery of an iPod stationed in the Yamaha iPod universal dock connected to the - Yamaha DVX-700 | Owner's Manual - Page 65
iPod menu vary, depending on the model or the generation. USING OPTIONAL EQUIPMENT ■ Using Bluetooth™ components You can connect the Yamaha Bluetooth wireless audio receiver (such as YBA-10, sold separately) to the DOCK terminal of the subwoofer/system control and enjoy the music contents stored - Yamaha DVX-700 | Owner's Manual - Page 66
. 1 Connect the Yamaha Bluetooth wireless audio receiver to the DOCK terminal of the subwoofer/ system control. (Page 20) 2 Press DOCK to set the input source to DOCK. 3 Turn on the Bluetooth component you want to pair with, and then enter pairing mode. Refer to the instruction manual of your - Yamaha DVX-700 | Owner's Manual - Page 67
video image. DVX-700 WP87010 STANDBY/ON TV STB POWER FUNC. 10KEY MOVIE MUSIC SPORTS GAME Switch FUNC./10KEY to FUNC. STEREO ENHANCER NIGHT SLEEP DISP. MODE AUDIO DELAY ZOOM ON SCREEN ON BLUETOOTH in the front panel display. - The system memorizes the settings assigned to each input source - Yamaha DVX-700 | Owner's Manual - Page 68
RETURN TV/ STB TV INPUT TUNER CODE SET MUTE DVD/ USB INPUT 1-4 DOCK POSITION AREA SOUND TEST 1 Press SOUND repeatedly to select the item you STEREO ENHANCER NIGHT SLEEP DISP. MODE AUDIO DELAY ZOOM ON SCREEN ON BLUETOOTH OFF AUDIO SUBTITLE ANGLE PLAY MODE LOCK CLEAR Press DISP. MODE - Yamaha DVX-700 | Owner's Manual - Page 69
DVD controller, then press STANDBY/ON. Keep holding INPUT and e until "SYSTEM MENU" appears in the front panel display. The system menu appears on the front panel display. SYSTEM such as TV. 5:SIRIUS P.CLR (U.S.A. and Canada models only) Clears the parental lock code for the SiriusConnect tuner - Yamaha DVX-700 | Owner's Manual - Page 70
SCREEN ON BLUETOOTH OFF A-E/CAATU. DIO ESUNBTTIETLRE ANGLAE-E SETUP RETURN TV/ STB CODE SET 1 Switch TV/STB to the side you want to set. 2 Press and hold CODE SET, then press POWER. 3 Point the remote control toward the remote control sensor on the DVD controller and enter a 3-digit code - Yamaha DVX-700 | Owner's Manual - Page 71
INFORMATION TROUBLESHOOTING If there is any problem with your unit, check the following items. If you cannot solve your problem with the following remedies or if your problem is not listed below, turn off the system and unplug the unit, then consult the nearest authorized Yamaha dealer or service - Yamaha DVX-700 | Owner's Manual - Page 72
TROUBLESHOOTING Problem The picture is not displayed on the TV screen. The picture is not displayed on the TV screen correctly. The message "HDMI ERROR" is displayed or the picture is not displayed on the HDMI TV screen. Cause The TV cables may be connected improperly. If the COMPONENT VIDEO - Yamaha DVX-700 | Owner's Manual - Page 73
TUNER TROUBLESHOOTING Cause video monitor to check the antenna reception level. See instructions supplied with the XM Mini-Tuner and Dock for antenna installation Consult the latest channel guide at -- The channel this selection. This unit does not support the connected XM Mini-Tuner. Connect - Yamaha DVX-700 | Owner's Manual - Page 74
TROUBLESHOOTING Status message CHECK SR TUNER NOT SUPPORTED channel is currently out of service. The operation you made is "SIRIUS Information" screen in the video monitor to check the antenna reception is not supported by this system. Your iPod is properly stationed in the Yamaha iPod universal - Yamaha DVX-700 | Owner's Manual - Page 75
Bluetooth component. Disc Problem Some functions do not work. Playback does not start, the sound or picture is distorted or playback is stopped halfway. After loading a DVD-Video . The loaded disc in not supported. Condensation on the pickup lens. When this system is moved from a cold environment - Yamaha DVX-700 | Owner's Manual - Page 76
TROUBLESHOOTING Problem Cannot select foreign language soundtracks or subtitles. Subtitles are not displayed. Cannot select camera angles. Cannot play some files. Cannot record a DVD. The TV picture is disturbed. The picture is stretched or black bars are displayed. Ghosting appears in some areas - Yamaha DVX-700 | Owner's Manual - Page 77
Problem The message "NO USB" or "USB ERROR" is displayed. TROUBLESHOOTING Cause Remedy The USB device is not compatible, or this unit cannot supply enough power to the device for it to function properly. Turn this - Yamaha DVX-700 | Owner's Manual - Page 78
sound system developed by Digital Theater Systems, Inc., which provides 5.1 channel audio (max). With an abundance of audio data, it is able to provide authentic-sounding effects. HDMI HDMI (High-Definition Multimedia Interface) is the first industry-supported, uncompressed, all-digital audio/video - Yamaha DVX-700 | Owner's Manual - Page 79
image compression system proposed works on digital photographs controller for creating realistic three-dimensional sound fields full of realism by arranging multiple speakers around the listener. VR format (Video Recording format) A DVD video recording format, which allows editing DVD video - Yamaha DVX-700 | Owner's Manual - Page 80
Pin Jack: 1 (AUX) Digital Audio Coaxial: 1 Optical: 2 DOCK: 1 (YDS-10, YDS-11, YBA-10) FM Antenna terminal: 1 XM Tuner: 1 (U.S.A., and Canada model only) Sirius Tuner: 1 (U.S.A., and Canada model only) OUTPUT Analog Audio SPEAKER OUT Others System Connector: 1 Amplifier Section Maximum Power - Yamaha DVX-700 | Owner's Manual - Page 81
, FM 47 ■B battery insertion, remote control .......... 21 Bluetooth component listening 61 brightness of front panel display .......... 64 Brightness, Video Adjust menu 37 ■C CH, remote control 10 Chroma Level, Video Adjust menu ..... 37 CLEAR, remote control 10 CODE SET, remote control 10 - Yamaha DVX-700 | Owner's Manual - Page 82
40 SUBTITLE, remote control 10 supplied accessory 4 SYSTEM CONNECTOR terminal, DVD controller rear panel 6 SYSTEM CONNECTOR terminal, subwoofer/system control rear panel 8 system menu 65 ■T TEST, remote control 10 TUNED indicator, front panel display ... 7 TUNER, remote control 10 tuning - Yamaha DVX-700 | Owner's Manual - Page 83
APPENDIX LIST OF PRESET CODES LISTE DES CODES PRÉDÉFINIS TV Brand name Yamaha Admiral Aiwa Akai Alba AOC Bell & Howell Bester Blaupunkt Blue sky Brandt Brocsonic Bush By Design Clatronic Craig Croslex Curtis Mathis Daewoo Daytron Dual Dwin - Yamaha DVX-700 | Owner's Manual - Page 84
DBS Brand name Bell expressvu DirecTV Dish Network system Dishpro Echostar Expressvu GE General Instrument Goi Hitachi Houston HTS Hughes JVC Magnavox Panasonic Philips Primestar Proscan Radio Shack RCA Samsung SKY + SKY HD Sony - Yamaha DVX-700 | Owner's Manual - Page 85
2012 tg 2007 ta 2001 tt 2020 te 2005 th 2008 bo 0215 ti 2009 to 2015 ts 2019 tr 2018 tk 2011 tw 2023 uk 2111 ur 2118 uz 2126 vi 2209 vo 2215 cy 0325 wo 2315 xh 2408 ji 1009 yo 2515 zu 2621 iii - Yamaha DVX-700 | Owner's Manual - Page 86
LASER INFORMATION INFORMATION LASER ● The name plate is located on the rear panel of the DVD controller. ● La plaque signalétique se trouve sur le panneau arrière du lecteur de DVD. Without top cover Sans couvercle supérieur © 2008 All rights reserved. Printed in China WQ33520
-
 1
1 -
 2
2 -
 3
3 -
 4
4 -
 5
5 -
 6
6 -
 7
7 -
8
-
9
-
10
-
11
-
12
-
13
-
14
-
15
-
16
-
17
-
18
-
19
-
20
-
21
-
22
-
23
-
24
-
25
-
26
-
27
-
28
-
29
-
30
-
31
-
32
-
33
-
34
-
35
-
36
-
37
-
38
-
39
-
40
-
41
-
42
-
43
-
44
-
45
-
46
-
47
-
48
-
49
-
50
-
51
-
52
-
53
-
54
-
55
-
56
-
57
-
58
-
59
-
60
-
61
-
62
-
63
-
64
-
65
-
66
-
67
-
68
-
69
-
70
-
71
-
72
-
73
-
74
-
75
-
76
-
77
-
78
-
79
-
80
-
81
-
82
-
83
-
84
-
85
-
86
 |
 |

UC
OWNER’S MANUAL
MODE D’EMPLOI
DVX-700
(DVR-700 + NS-PSW700 + NS-P700)
DVD HOME THEATER SYSTEM
SYSTEME HOME CINEMA AVEC LECTUER DVD