Yamaha DX200 Owner's Manual - Page 95
Tip 77 Stutter fill-in 3, Tip 78 Assigning Patterns for your gig, Tip 79 Chord progressions
 |
View all Yamaha DX200 manuals
Add to My Manuals
Save this manual to your list of manuals |
Page 95 highlights
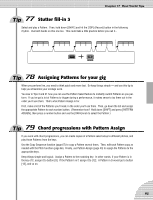
Chapter 17 Real World Tips 77 Stutter fill-in 3 Select and play a Pattern. Then, hold down [SHIFT] and hit the [TOP] (Record) button in the following rhythm. Use both hands on this one too. This could take a little practice before you nail it... ONE TWO THREE FOUR ONE Start ! Hit it here... ... and here ! ... and here ! ... and here ! ... and here ! ... and here ! 78 Assigning Patterns for your gig When you perform live, you need to think quick and move fast. So keep things simple - and use this tip to help you streamline your onstage work. You saw in Tips 3 and 31 how you can use the Pattern Select feature to instantly switch Patterns as you perform. If you've got a lot of Patterns to trigger during a performance, it makes sense to lay them out in the order you'll use them. That's what Pattern Assign is for. First, make a list of the Patterns you'll need, in the order you'll use them. Then, go down the list and assign the appropriate Pattern to each number button. (Remember how? Hold down [SHIFT] and press [PATTERN ASSIGN], then press a number button and use the [DATA] knob to select the Pattern.) 79 Chord progressions with Pattern Assign If you work with chord progressions, you can create copies of a Pattern select setup to different pitches, and play those Patterns from the keys. Use the Copy Sequence function (page 67) to copy a Pattern several times. Then, edit each Pattern copy as needed with the Pitch function (page 66). Finally, use Pattern Assign (page 40) to assign the Patterns to the appropriate keys. Keep things simple and logical. Assign a Pattern to the matching key. In other words, if your Pattern is in the key of C, assign it to button [9]. If the Pattern's in F, assign it to [12]. A Pattern in G would go to button [13], and so on. 95
-
 1
1 -
2
-
3
-
4
-
5
-
6
-
7
-
8
-
9
-
10
-
11
-
12
-
13
-
14
-
15
-
16
-
17
-
18
-
19
-
20
-
21
-
22
-
23
-
24
-
25
-
26
-
27
-
28
-
29
-
30
-
31
-
32
-
33
-
34
-
35
-
36
-
37
-
38
-
39
-
40
-
41
-
42
-
43
-
44
-
45
-
46
-
47
-
48
-
49
-
50
-
51
-
52
-
53
-
54
-
55
-
56
-
57
-
58
-
59
-
60
-
61
-
62
-
63
-
64
-
65
-
66
-
67
-
68
-
69
-
70
-
71
-
72
-
73
-
74
-
75
-
76
-
77
-
78
-
79
-
80
-
81
-
82
-
83
-
84
-
85
-
86
-
87
-
88
-
89
-
 90
90 -
 91
91 -
 92
92 -
 93
93 -
 94
94 -
 95
95 -
 96
96 -
 97
97 -
 98
98 -
 99
99 -
 100
100 -
101
-
102
-
103
-
104
-
105
-
106
-
107
-
108
-
109
-
110
-
111
-
112
-
113
-
114
-
115
-
116
-
117
-
118
-
119
-
120
-
121
-
122
-
123
-
124
-
125
-
126
-
127
-
128
-
129
-
130
-
131
-
132
-
133
-
134
-
135
-
136
-
137
-
138
-
139
-
140
-
141
-
142
-
143
-
144
-
145
-
146
-
147
-
148
-
149
-
150
-
151
-
152
 |
 |
