Yamaha EZ-AG Owner's Manual - Page 9
Connector & Power Switch MIDI IN/MIDI OUT Connectors - guitar
 |
View all Yamaha EZ-AG manuals
Add to My Manuals
Save this manual to your list of manuals |
Page 9 highlights
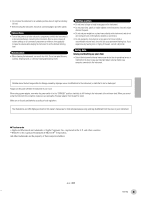
Names Of the Parts, Controls, and Connectors r [TUNING] Button Allows overall tuning of the EZ-AG in semitone increments, as well as selection of one of the EZAG's alternative tunings: in addition to standard guitar tuning the EZ-AG provides drop-D, open-D, open-G, and open-E tunings. t [TEMPO] Button Allows the song tempo to be set from q=32 through q=280. y [CAPO] Button Allows the position of the EZ-AG's "virtual capo" to be specified. u [SONG] Button Allows any of the 25 internal songs to be selected for playback. In addition to the songs initially provided, songs downloaded from the internet to a computer can be read into and stored in the EZ-AG. i [SOUND] Button Allows selection of any of the EZ-AG's 20 instrument sounds. o [DEMO] Button Starts and stops song playback. !0 [STRUM], [CHORD], [BOTH] Buttons Starts playback of the selected song using the corresponding playback method. Connector & Power Switch Section qw e r q Power Switch ([STANDBY/ON]) This is the EZ-AG power switch. Press the switch in to turn the power ON. Press the switch again to return it to the extended STANDBY position and turn power off. w DC IN 12V Jack The AC Power Adaptor (PA-3C) can be connected here. • Make sure that power to all external devices is OFF when connecting the EZ-AG to avoid possible electric shock and damage to the equipment. Also, start with all volume controls turned down to minimum to prevent possible damage to speakers and other playback equipment. e PHONES/OUTPUT Jack This jack can be used to connect a pair of stereo headphones for private practice or listening, or to connect the EZ-AG to an audio system, television, or instrument amplifier. r MIDI IN/MIDI OUT Connectors These connectors can be used to connect the EZ-AG to other MIDI gear or a computer using standard MIDI cables. EZ-AG 9 7
-
 1
1 -
2
-
3
-
 4
4 -
 5
5 -
 6
6 -
 7
7 -
 8
8 -
 9
9 -
 10
10 -
 11
11 -
 12
12 -
 13
13 -
 14
14 -
15
-
16
-
17
-
18
-
19
-
20
-
21
-
22
-
23
-
24
-
25
-
26
-
27
-
28
-
29
-
30
-
31
-
32
-
33
-
34
-
35
-
36
 |
 |
