Yamaha HTR-5950 Owners Manual - Page 9
Memory Man'l/auto Fm, Phones Silent Cinema Jack - remote control
 |
UPC - 027108925547
View all Yamaha HTR-5950 manuals
Add to My Manuals
Save this manual to your list of manuals |
Page 9 highlights
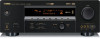
INTRODUCTION 8 MEMORY (MAN'L/AUTO FM) Stores a preset station in the memory. Hold down this button for more than 3 seconds to start automatic preset tuning (see page 47). 9 TUNING MODE (AUTO/MAN'L) Switches between automatic tuning (the AUTO indicator is turned on) and manual tuning (the AUTO indicator is turned off) (see page 45). 0 VIDEO AUX jacks Input audio and video signals from a portable external source such as a game console, a video camera or a portable audio player (see page 23). y To reproduce the source signals input at these jacks, select "V-AUX" as the input source. Notes • The audio signals input at the PORTABLE mini jack take priority over the ones input at the AUDIO L/R jacks. • The audio signals input at the DOCK terminal on the rear panel take priority over the ones input at the VIDEO AUX jacks. A VOLUME Controls the output level of all audio channels. y This does not affect the AUDIO OUT (REC) level. B PHONES (SILENT CINEMA) jack Outputs audio signals for private listening with headphones (see page 33). Notes • When you connect headphones, no signals are output at the SUBWOOFER OUTPUT jack or the speaker terminals. • All Dolby Digital and DTS audio signals are mixed down to the left and right headphone channels. C SPEAKERS A/B Turns on or off the set of front speakers connected to the FRONT A and/or B terminals on the rear panel each time the corresponding button is pressed. D STRAIGHT (EFFECT) Turns the sound field programs off or on. When the "STRAIGHT" mode is selected, 2-channel or multichannel input signals are output directly from their respective speakers without effect processing (see page 38). E TONE CONTROL Selects "BASS" or "TREBLE" to adjust the tonal balance of the front left and right speakers in conjunction with BASS/TREBLE +/- (see page 32). CONTROLS AND FUNCTIONS F BASS/TREBLE +/- Adjusts the bass/treble balance of the front left and right speakers in conjunction with TONE CONTROL (see page 32). G PROGRAM l / h Selects sound field programs (see page 32). H INPUT MODE Selects either digital or analog input signals exclusively or sets this unit to automatically detect the type of input signals and select the corresponding input signals when one component is connected via both digital and analog connections (see page 34). I INPUT selector Selects the desired input source. J MULTI CH INPUT Selects the component connected to the MULTI CH INPUT jacks as the input source (see page 37). Note The input source connected to the MULTI CH INPUT jacks takes priority over the source selected with the INPUT selector on the front panel (or the input selector buttons on the remote control). 5
-
 1
1 -
2
-
3
-
 4
4 -
 5
5 -
 6
6 -
 7
7 -
 8
8 -
 9
9 -
 10
10 -
 11
11 -
 12
12 -
 13
13 -
 14
14 -
15
-
16
-
17
-
18
-
19
-
20
-
21
-
22
-
23
-
24
-
25
-
26
-
27
-
28
-
29
-
30
-
31
-
32
-
33
-
34
-
35
-
36
-
37
-
38
-
39
-
40
-
41
-
42
-
43
-
44
-
45
-
46
-
47
-
48
-
49
-
50
-
51
-
52
-
53
-
54
-
55
-
56
-
57
-
58
-
59
-
60
-
61
-
62
-
63
-
64
-
65
-
66
-
67
-
68
-
69
-
70
-
71
-
72
-
73
-
74
-
75
-
76
-
77
-
78
-
79
-
80
-
81
-
82
-
83
-
84
-
85
-
86
-
87
-
88
-
89
-
90
-
91
-
92
-
93
-
94
-
95
-
96
-
97
-
98
-
99
-
100
-
101
-
102
-
103
-
104
-
105
-
106
-
107
-
108
-
109
-
110
-
111
-
112
-
113
-
114
-
115
-
116
 |
 |
