Yamaha MG20XU Owner's Manual - Page 10

Step 4 Getting Sound to the Speakers, Adjusting Tone and Level - used

Page 10 highlights

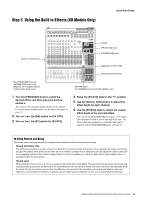
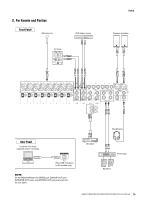
Quick Start Guide Step 4 Getting Sound to the Speakers [GAIN] knobs Channel [ON] switches Channel [ST] switches Channel [PFL] switches [PHONES] jack Level meter [PEAK] indicator Level meter [PFL] indicator [PHONES] knob [STEREO] master [ON] switch [STEREO] master fader Channel faders 1. Turn on ( ) the [PFL] switches for each chan- nel you are using. NOTE • When you turn on the [PFL] switch for a channel, you can monitor the signal for that channel through headphones connected to the [Phones] jack. The level of the signal is also shown on the level meter indicator, allowing you to more accurately check signal levels. After checking levels, turn the [PFL] switches off. • When a [PFL] switch is turned on, the [PFL] indicator below the level meter flashes. 2. While playing your instrument or speaking into a microphone, adjust the input signal with the [GAIN] knob until it goes past the "0" (

  • 1
  • 2
  • 3
  • 4
  • 5
  • 6
  • 7
  • 8
  • 9
  • 10
  • 11
  • 12
  • 13
  • 14
  • 15
  • 16
  • 17
  • 18
  • 19
  • 20
  • 21
  • 22
  • 23
  • 24
  • 25
  • 26
  • 27
  • 28
  • 29
  • 30
  • 31
  • 32
  • 33
  • 34
  • 35
  • 36
  • 37
  • 38
  • 39
  • 40

Quick Start Guide
MG20XU/MG20/MG16XU/MG16/MG12XU/MG12 Owner’s Manual
10
Step 4
Getting Sound to the Speakers
1.
Turn on (
) the [PFL] switches for each chan-
nel you are using.
NOTE
When you turn on the [PFL] switch for a channel, you can
monitor the signal for that channel through headphones con-
nected to the [Phones] jack. The level of the signal is also
shown on the level meter indicator, allowing you to more
accurately check signal levels. After checking levels, turn the
[PFL] switches off.
When a [PFL] switch is turned on, the [PFL] indicator below
the level meter flashes.
2.
While playing your instrument or speaking into
a microphone, adjust the input signal with the
[GAIN] knob until it goes past the “0” (
<
) posi-
tion on the level meter only occasionally.
NOTE
If you connect a portable audio player, synthesizer, or other
equipment to a stereo input channel that has no [GAIN] knob,
adjust the output level on the connected device.
3.
Turn on (
) the [ON] switches for each chan-
nel you are using.
4.
Turn on (
) the [ST] switches for each chan-
nel you are using.
5.
Turn off (
) all [PFL] switches.
Confirm that the [PFL] indicator below the level meter is off.
6.
Turn on (
) the [ON] switch for the [STEREO]
master.
7.
Raise the [STEREO] master fader to the “0”
position.
8.
Set the channel faders to create the desired
initial balance.
9.
Adjust the overall volume of the [STEREO]
master fader.
The overall headphone level is adjusted by the [PHONES]
knob.
NOTE
If the level meter [PEAK] indicator lights frequently, slightly
lower the channel faders to avoid distortion.
[GAIN] knobs
Channel [ON] switches
Channel [ST] switches
Channel [PFL] switches
[STEREO] master fader
[PHONES] jack
Level meter [PEAK] indicator
Level meter
[PFL] indicator
[PHONES] knob
[STEREO] master [ON] switch
Channel faders
Adjusting Tone and Level
• Equalizer ([HIGH]/[MID]/[LOW])
...............................
page 18
• [COMP] knobs
..........................................................
page 17
• [GAIN] knobs
............................................................
page 17
• Channel faders
.........................................................
page 19