Yamaha NS-AP2600 Owners Manual - Page 4
Setting Up The Speakers - speaker system
 |
View all Yamaha NS-AP2600 manuals
Add to My Manuals
Save this manual to your list of manuals |
Page 4 highlights
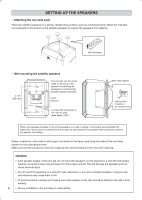
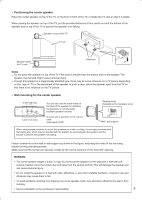
SETTING UP THE SPEAKERS Attaching the non-skid pads Place the satellite speakers on a sturdy, vibration-free surface, such as a well-built stand. Attach the included non-skid pads to the bottom of the satellite speakers to prevent the speakers from slipping. Non-skid pads Wall mounting the satellite speakers 4-1/8" (105 mm) You can also use the screw holes on the back of the speaker for installing the speakers on commercially available speaker brackets. 2-3/8" (60 mm) A screw with a diameter of 1/4" can be used. (Hole depth: 9/32") Wall / wall support Min 1" 3/8" Tapping screw (Available at the hardware store) When using speaker brackets to mount the speakers on a wall or celling, it is strongly recommended that safety wire, which may be included with the bracket, be used between the speaker and the bracket to prevent the speaker from falling. Fasten screws into a firm wall or wall support as shown in the figure, and hang the holes of the mounting bracket on the protruding screws. Make sure that the screws are securely caught by the narrow sections of the "key hole" opening. WARNING Each speaker weighs 1.6 lbs (0.7 kg). Do not mount the speakers on thin plywood or a wall with soft surface material, since the screws may pull away from the surface and fall. This will damage the speakers and can cause personal injury. Do not mount the speakers on a wall with nails, adhesives, or any other unstable hardware. Long-term use and vibrations may cause them to fall. To avoid accidents resulting from tripping over loose speaker cords, they should be affixed to the wall or floor molding. 4 Secure installation is the purchaser's responsibility.
-
 1
1 -
 2
2 -
 3
3 -
 4
4 -
 5
5 -
 6
6 -
 7
7 -
 8
8
 |
 |
