Yamaha NX-SW70 Owner's Manual - Page 10
Troubleshooting
 |
View all Yamaha NX-SW70 manuals
Add to My Manuals
Save this manual to your list of manuals |
Page 10 highlights
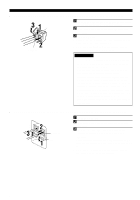
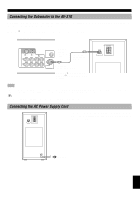
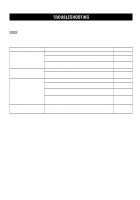
TROUBLESHOOTING Be sure to investigate thoroughly before requesting repairs or after service. If it cannot be corrected, or if the problem is not listed in the SYMPTOM column, disconnect the power cord and connect your authorized YAMAHA dealer or service center. Notes • Sometimes the system may cease to recognize operations due to a mistaken operation or as a result of strong external noise (such as irregular voltage due to shock of impact, excessive static electricity, or lightning strike). If this happens, first disconnect the power cord, wait about 30 seconds, re-connect the power cord, and try the desired operation again. • When requesting repairs or after service, be sure to bring along with the AV-S70 (sold separately). SYMPTOM No sound output at all. No sound output from subwoofer. No sound output from rear speakers. A "humming" noise is present. CHECK • Is the AC power supply cord connected? • Has the AV-S70's audio temporarily been lowered? Refer to the owner's manual for the AV-S70 (sold separately). • Is the input source to the AV-S70 correctly? Refer to the owner's manual for the AV-S70 (sold separately). • Is the system connector cable connected correctly? • Is the subwoofer level of the AV-S70 set too low? Refer to the owner's manual for the AV-S70 (sold separately). • Are the speaker cords connected correctly? • Is the rear speaker level of the AV-S70 set too low for the test tone? Refer to the owner's manual for the AV-S70 (sold separately). • Has VIRTUAL SURROUND been selected as the DSP program on the AV-S70? Refer to the owner's manual for the AV-S70 (sold separately). • Is DOLBY PRO LOGIC or DOLBY PRO LOGIC ENHANCED being used as the DSP program with a monaural source? Refer to the owner's manual for the AV-S70 (sold separately). • Hum caused by external electromagnetic waves may be generated. Try inverting the right-left polarity of the power cord and re-insert into the AC outlet. Refer to page 7 - - 7 - 5, 6 - - - 7 8
-
 1
1 -
2
-
3
-
4
-
 5
5 -
 6
6 -
 7
7 -
 8
8 -
 9
9 -
 10
10 -
 11
11 -
 12
12 -
 13
13 -
 14
14
 |
 |
