Yamaha P-850 P-850 OWNERS MANUAL - Page 7
Adjustments/connections
 |
View all Yamaha P-850 manuals
Add to My Manuals
Save this manual to your list of manuals |
Page 7 highlights
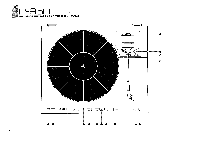
P-850 ADJUSTMENTS/CONNECTIONS TO 'TOUR AMPLIFIER AIDJUSTING TONEARM BALANCE Proceed with the balance adjustment after mounting and installing the tonearm assembly. Be sure to set the Anti-Skating control to "0". 1. Turn the power on and press the Cut switch to get the arm lifter to the down position. 2. Align the front end of the tracking force weight with the "0" line on the tracking force scale. Balance adjustment 3. Flip the stylus cover to its up position. (Remove the stylus cover completely on cartridges where this is possible. Free the tonearm from the tonearm rest. 4. Carefully release the finger hook and check to see if the tonearm is horizontally balanced. 5. Adjust the main weight until the tonearm will float in a perfectly horizontal position. 6. Once the tonearm has been balanced, return it to the arm rest. STYLUS HEIGHT ADJUSTMENT When the tonearm is in the up position, the height of the stylus above the record should be about 6 mm. If it is more or less than this, loosen the adjustment screw on the arm lifter, and adjust the height of the arm lifter so the distance of the stylus to the record is 6 mm. Arm Lifter Adjustment Screw Headshell is too heavy (rotate the black knob in the direction of the arrow) IL IL Arm lifter Tonearm • ANTISKATING Tracking force adjustment weight - "0 line" Rear assembly is too heavy (rotate the black knob in the direction of the arrow) Tonearm is balanced perfectly Tonearm Headshell with cartridge Weight Cartridge Headshell 6 mm Record Fig. 6 Fig. 4 Fig. 5 6
-
 1
1 -
 2
2 -
 3
3 -
 4
4 -
 5
5 -
 6
6 -
 7
7 -
 8
8 -
 9
9 -
 10
10 -
 11
11 -
 12
12
 |
 |
