Yamaha PSR-I455 Owner's Manual - Page 12
Setting Up, Power Requirements, Using an AC Power Adaptor, Using Batteries
 |
View all Yamaha PSR-I455 manuals
Add to My Manuals
Save this manual to your list of manuals |
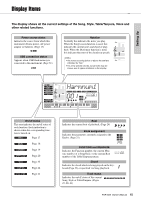
Page 12 highlights
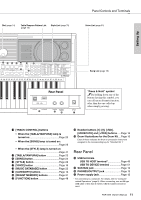
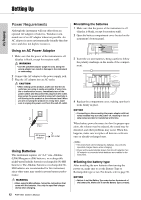
Setting Up Setting Up Power Requirements Although the instrument will run either from an optional AC adaptor or batteries, Yamaha recommends use of an AC adaptor whenever possible. An AC adaptor is more environmentally friendly than batteries and does not deplete resources. Using an AC Power Adaptor 1 Make sure that the power of the instrument is off (display is blank, except for notation staff). WARNING • Use the specified adaptor (page 81) only. Using the wrong adaptor can result in damage to the instrument or overheating. 2 Connect the AC adaptor to the power supply jack. 3 Plug the AC adaptor into an AC outlet. CAUTION • When setting up the product, make sure that the AC outlet you are using is easily accessible. If some trouble or malfunction occurs, immediately turn off the power switch and disconnect the plug from the outlet. Even when the power switch is turned off, electricity is still flowing to the product at the minimum level. When you are not using the product for a long time, make sure to unplug the power cord from the wall AC outlet. 2 AC power adaptor 3 AC outlet Using Batteries This instrument requires six "AA" size, Alkaline (LR6)/Manganese (R6) batteries, or rechargeable nickel-metal hydride batteries (rechargeable Ni-MH batteries). The Alkaline batteries or rechargeable NiMH batteries are recommended for this instrument, since other types may result in poorer battery performance. WARNING • When using Ni-MH batteries, follow the instructions that came with the batteries. Use only the specified charger device when charging. 12 PSR-I455 Owner's Manual Installing the batteries 1 Make sure that the power of the instrument is off (display is blank, except for notation staff). 2 Open the battery compartment cover located on the instrument's bottom panel. 3 Insert the six new batteries, being careful to follow the polarity markings on the inside of the compartment. 4 Replace the compartment cover, making sure that it locks firmly in place. NOTICE • Connecting or disconnecting the power adaptor with batteries installed may turn the power off, resulting in loss of data being recorded or transferred at the time. When battery power becomes too low for proper operation, the volume may be reduced, the sound may be distorted, and other problems may occur. When this happens, make sure to replace all batteries with new ones or already-recharged ones. NOTE • This instrument cannot charge the batteries. Use only the specified charger device when charging. • Power will be automatically drawn from the AC adaptor if an AC adaptor is connected while batteries are installed in the instrument. Setting the battery type After installing the new batteries then turning the power on, make sure to set the Battery Type to Rechargeable type or not. For details, refer to page 50. NOTICE • Failure to set the Battery Type may shorten the amount of the battery life. Make sure to set the Battery Type correctly.
-
 1
1 -
2
-
3
-
4
-
5
-
6
-
 7
7 -
 8
8 -
 9
9 -
 10
10 -
 11
11 -
 12
12 -
 13
13 -
 14
14 -
 15
15 -
 16
16 -
 17
17 -
18
-
19
-
20
-
21
-
22
-
23
-
24
-
25
-
26
-
27
-
28
-
29
-
30
-
31
-
32
-
33
-
34
-
35
-
36
-
37
-
38
-
39
-
40
-
41
-
42
-
43
-
44
-
45
-
46
-
47
-
48
-
49
-
50
-
51
-
52
-
53
-
54
-
55
-
56
-
57
-
58
-
59
-
60
-
61
-
62
-
63
-
64
-
65
-
66
-
67
-
68
-
69
-
70
-
71
-
72
-
73
-
74
-
75
-
76
-
77
-
78
-
79
-
80
-
81
-
82
-
83
-
84
 |
 |
