Yamaha RSW300 Owners Manual - Page 9
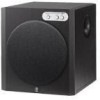
STANDBY/ON switch, POWER, Status indicator, HIGH CUT control, VOLUME control, English
 |
UPC - 027108928173
View all Yamaha RSW300 manuals
Add to My Manuals
Save this manual to your list of manuals |
Page 9 highlights
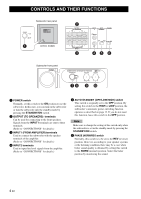
English 7 STANDBY/ON switch Press this switch to turn on the power when the POWER switch is set in the ON position (the status indicator lights up in green). Press again to set the subwoofer in the standby mode (the status indicator goes off). Note Even while the subwoofer is in the standby mode, it is still using a small amount of power. 8 Status indicator Lights up in green while the subwoofer is on. Lights up in red while the subwoofer is set in the standby mode by the operation of the automatic powerswitching function. Goes off when the subwoofer is set in the standby mode. 9 HIGH CUT control Adjusts the high frequency cut off point. Frequencies higher than the frequency selected by this control are all cut off (and no output). One graduation of this control represents 10 Hz. 0 VOLUME control Adjusts the volume level. Turn the control clockwise to increase the volume, and counterclockwise to decrease the volume. CONTROLS AND THEIR FUNCTIONS 5 En
-
 1
1 -
2
-
3
-
 4
4 -
 5
5 -
 6
6 -
 7
7 -
 8
8 -
 9
9 -
 10
10 -
 11
11 -
 12
12 -
 13
13 -
 14
14 -
15
-
16
-
17
-
18
-
19
-
20
-
21
-
22
-
23
-
24
 |
 |
