Yamaha S08 Owner's Manual - Page 34
Performing Live While, Playing Back a Song File, Splitting the Keyboard, Setting Upper and Lower - case
 |
View all Yamaha S08 manuals
Add to My Manuals
Save this manual to your list of manuals |
Page 34 highlights
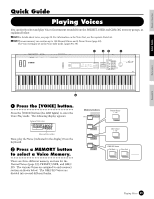
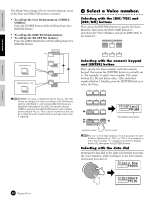
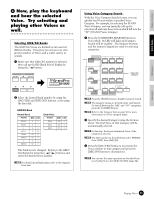
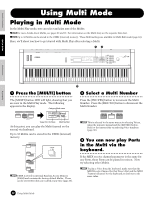
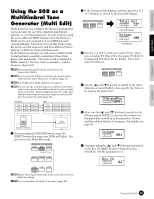
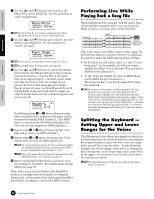
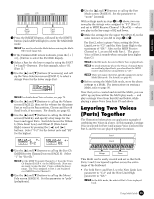
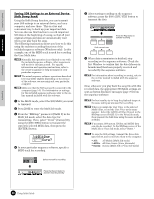
Basics Section Quick Guide Reference Appendix 7 Use the [▲] and [▼] buttons and switch to the Mono/Poly screen (PAGE 8). Set the parameter to "poly" (polyphonic). Mono/Poly PAGE PART ELEM KEY 8 P2 poly n For Parts that do not require polyphony, the Mode parameter can be set to "mono" (monophonic). 8 Use the [▲] and [▼] buttons and switch to the Part Mode screen (PAGE 9). Set the parameter to "norm" (normal). Part Mode PAGE PART ELEM KEY 9 P2 norm n In the case of a Drum Part, set the mode to "drum." n For details about the Part mode, see page 22. 9 Use the [▲] and [▼] buttons to call up the NtLmt (Note Limit) and VelLmt (Velocity Limit) settings, and check whether or not the Part of the piano Voice is set appropriately - in other words, make sure that the Note or Velocity settings do not prevent the Voice from being played normally. Except in special cases, you should generally avoid setting limits on the note and velocity ranges, in order to ensure that notes are sounded properly and are not cut off. NtLmt-L PAGE PART ELEM KEY 4 P2 C-2 By following steps 3 to 9 above, when you play back a song file in the sequencer, the piano track is transmitted through MIDI channel 2. The MIDI data is received by the S08 which then plays the Voice for the Part assigned to MIDI channel 2. ) Repeat steps 3 to 9 above, but set up Part 3 for bass and to receive on MIDI channel 3. ! Repeat steps 3 to 9 again, setting up Part 10 for drums and to receive on MIDI channel 10. n To avoid situations where the Voices of unused Parts are suddenly played back, you should set the MIDI receive channels for unused Parts to "off." n There are many other Part-specific parameters in the Multi Edit mode. For details, see page 63. @ Before exiting Multi Edit Mode, you need to store the settings for the Multi. For details about storing Multis, see page 50. Now, when you select this Multi in the Multi Play mode, you can play back the song file on computer (sequencer), and the piano, bass and drum Parts will be played back according to each track's MIDI channel. Performing Live While Playing Back a Song File While playing back the song file with the piano, bass and drum Parts assigned earlier, you can set up the Multi so that you can also play another Part live. Song File Track 1 Piano Transmit Ch.2 Track 2 Bass Transmit Ch.3 Track 3 Drums Transmit Ch.10 Multi Part 1 Solo-type Voice Receive Ch.1 Part 2 Part 3 Part 10 Piano Voice Bass Voice Drums Voice Receive Ch.2 Receive Ch.3 Playback using keyboard Receive Ch.10 This is the same as the Multi created earlier (page 33), but with the addition of another Part for live playback. Be careful to make the following important settings. • In the Multi created earlier, Parts 2, 3 and 10 were being used. As an example, we will now assign another Part (Part 1) to a solo-type Voice and set the MIDI Receive Channel to 1. • At the Trans Ch (PAGE 4) screen in MIDI Mode, set the MIDI Receive Channel to 1. The Voice for Part 1 can now be played live using the keyboard. n Because the S08 features a fully-compatible XG tone generator, you can play any of the wide variety of commercially available XG/GM/GM2 song software. This ensures broad dynamic and expressive range, with a wide variety of rich instrument sounds and effects. You can also mute specific parts of the MIDI data - allowing you to practice the missing parts yourself, or to use the song data as instrumental backing for your own singing and playing. Splitting the Keyboard - Setting Upper and Lower Ranges for the Voices The illustration below shows an example in which the keyboard has been effectively divided into two separate key ranges, letting you play one Voice over one range, and a second Voice over the other. In the following example, the Voices change at the note C3, letting you play a string Voice in the lower range and a piano Voice in the upper. To set up the Voices in this way, follow the instructions below. n For information on setting up a key split in the Voice mode, see page 42. 34 Using Multi Mode
-
 1
1 -
2
-
3
-
4
-
5
-
6
-
7
-
8
-
9
-
10
-
11
-
12
-
13
-
14
-
15
-
16
-
17
-
18
-
19
-
20
-
21
-
22
-
23
-
24
-
25
-
26
-
27
-
28
-
 29
29 -
 30
30 -
 31
31 -
 32
32 -
 33
33 -
 34
34 -
 35
35 -
 36
36 -
 37
37 -
 38
38 -
 39
39 -
40
-
41
-
42
-
43
-
44
-
45
-
46
-
47
-
48
-
49
-
50
-
51
-
52
-
53
-
54
-
55
-
56
-
57
-
58
-
59
-
60
-
61
-
62
-
63
-
64
-
65
-
66
-
67
-
68
-
69
-
70
-
71
-
72
-
73
-
74
-
75
-
76
-
77
-
78
-
79
-
80
-
81
-
82
-
83
-
84
-
85
-
86
-
87
-
88
 |
 |
