Yamaha SPM-K30 Support Guide - Page 10
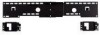
Attach the small wall mount brackets to the Digital Sound Projector., YSP-3000/YSP-30D/HTY-7030
 |
UPC - 027108928456
View all Yamaha SPM-K30 manuals
Add to My Manuals
Save this manual to your list of manuals |
Page 10 highlights
INSTALLATION PROCEDURE 3 Attach the small wall mount brackets to the Digital Sound Projector. The small wall mount brackets vary depending on the type of the Digital Sound Projector. Refer to the following table for details on the type of the Digital Sound Projector and the compatible small wall mound brackets (Type A or B). Use supplied projector mounting screws (M6 x 4 for YSP-4000, YSP-40D, HTY-7040, YSP-4100 or YSP-5100 and M4 x 8 for other models) to securely attach the two small wall mount brackets to the rear left and right sides of the Digital Sound Projector. Digital Sound Small wall Projector mount bracket ■ YSP-4000/YSP-40D/HTY-7040/YSP-4100/YSP-5100 Rear View Digital Sound Projector YSP-800 YSP-900 Type A YSP-3000 YSP-30D YSP-3050 HTY-7030 YSP-4000 YSP-40D HTY-7040 YSP-4100 YSP-5100 Type B Attach the brackets to the rear left and right sides of the Digital Sound Projector. Projector mounting screws (M6) (supplied) Small wall mount bracket (Type B) ■ YSP-3000/YSP-30D/HTY-7030/ YSP-3050 Rear View Digital Sound Projector ■ YSP-800/YSP-900 Rear View Digital Sound Projector Projector mounting screws (M4) (supplied) Projector mounting screws (M4) (supplied) Small wall mount bracket (Type B) Small wall mount bracket (Type A) Notes • In the unit of the model that the metal apparatuses are not attached, there are felt covers in the holes. In this case, tighten the screws to puncture the felt covers. • If you tighten the screws on the slant, the screw threads in the projector might be broken. Be careful when using electric tools. En 6
-
 1
1 -
2
-
3
-
4
-
 5
5 -
 6
6 -
 7
7 -
 8
8 -
 9
9 -
 10
10 -
 11
11 -
 12
12 -
 13
13 -
 14
14
 |
 |
