Yamaha SPM-K30 Support Guide - Page 12
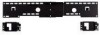
Secure the unit., Bottom View, YSP-800/YSP-900 - wall mount bracket
 |
UPC - 027108928456
View all Yamaha SPM-K30 manuals
Add to My Manuals
Save this manual to your list of manuals |
Page 12 highlights
INSTALLATION PROCEDURE 6 Secure the unit. Align the holes in the large wall mount bracket with the holes in the bottom of the small wall mount brackets, and then use two of the supplied projector mounting screws (M6 x 16) to secure the unit. The positions of the screw holes vary depending on the type of the Digital Sound Projector. Refer to the following illustrations and check the correct positions of the screw holes used to secure your Digital Sound Projector. ■ YSP-800/YSP-900 Digital Sound Projector Bottom View Projector mounting screws (M6) (supplied) ■ YSP-3000/YSP-30D/YSP-3050/HTY-7030/ YSP-4000/YSP-40D/HTY-7040/YSP-4100/YSP-5100 Digital Sound Projector Bottom View Use the inward screw hole on each side to secure your Digital Sound Projector. Projector mounting screws (M6) (supplied) Use the outward screw hole on each side to secure your Digital Sound Projector. En 8
-
 1
1 -
2
-
3
-
4
-
5
-
6
-
 7
7 -
 8
8 -
 9
9 -
 10
10 -
 11
11 -
 12
12 -
 13
13 -
 14
14
 |
 |
